Why do we have so many earwigs this year?
Well for one thing it has been a wet and slightly warmer spring. These weather conditions have made better that ideal living and growing media for the earwig. They like wet damp hiding places and with a little mulch or lose compost to hid in during the day.
How to identify good earwigs from bad earwigs. They are all the same so to speak. They are opportunistic eaters. They live on dead decaying matter, eat aphids and other small prey and love young growth of certain plants, like Marigolds. This is shown in the picture with all the cans full of earwigs and decimated marigold plants. The cans were placed next to plants that the earwigs thought were there most tasty.
Simple home remedies used to lower the earwigs population.
There are quit a few methods you can use depending on your preference and patience. I prefer a little beer in a small cat food can but there other preparations you can put in the cans.
Predatory insects that help control the earwigs.
Believe it or not, there are other insects and animals that prey on the earwigs. Since the earwigs are nocturnal, hungry birds have to hunt them out in their hiding places during the day. Evening birds and amphibians will be able to find them out and about in the duff on on their favorite plants.
Follow the reference links for more in-depth information.
Does something not look right on your plants or in your lawn
and garden?
What if I told you that it could possibly be a fungus that
is infecting them all?
Powdery Mildew could be the suspect we are looking for.
Powdery mildew looks like white to gray spots with a talcum powder like growth.
The mildew is host specific, i.e., the mildew that can be affecting your lilac
and elm trees would not affect your grass, or mildew on grapes would not affect
your lilac. Mildews thrive in warm dry climates. When plants have high
humidity, poor air circulation, or are located in shaded areas, it allows the
mildew to have an ideal growing environment.
The simplest and easiest option is to buy plant/seed
varieties that are resistant to powdery mildew, i.e., roses, cucumber, squash,
and beans.
Not everything we want to plant will have an available
resistant variety; therefore powdery mildew needs to be managed culturally and
chemically.
Cultural practices: ·Prune with good air circulation in mind.
·Do not over fertilize and possibly look into
slow release fertilizers for future applications.
·Do not overhead water to help reduce humidity
and reduce chances of spread of other fungus problems.
Chemical practices:
●Fungicides-
function as protectants, eradicants or both.A protectantfungicide is a
preventative to protect against new infections from occurring. An eradicant
fungicide kills an actively growing infection. For highly susceptible plants,
apply protectant fungicide before disease appears. Eradicants should be applied
at earliest appearance of disease.
●Horticultural
oils- can be an effective eradicant in plants with mild to moderate symptoms
and has some protectant effects with products such as Saf-T-Side Spray Oil,
Sunspray Ultra-Fine Spray Oil, neem oil or jojoba oil.
●Sulfur- usually a
spray that is only effective before the symptoms have appeared. Copper may also
be used in the same manner. It has a lower effective rate. ●Bacterial
Fungicides-made of a pathogen that
kills the fungus and helps prevent future infections. These are also safe for
beneficial insects, pets, and people.
With applying any chemicals, you want to make sure that you
are reading the labels and ensuring that you have correct target pest on
plants, proper protective equipment, and applying at correct rates. The label
is law and we do not want to damage the environment with an application applied
incorrectly. Now with our new knowledge on how powdery mildew works, we can
better manage it in our gardens going forward.
Consider signing up for land and garden pest alerts at the
Pest Alert Network in order to find out about pests as soon as they are found
in our area. These are the alerts for Powdery Mildew.
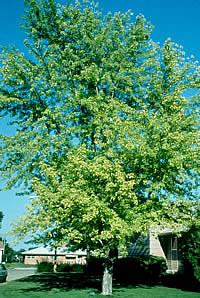
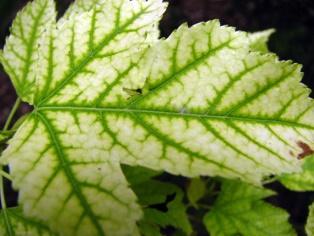
Strolling the grounds of my one acre “estate” on a warm summer day, I was distressed to see something wrong with two of my Sycamore trees. While two of the trees looked great, nice dark green leaves everywhere, the other two had sections of leaves that had yellowed. Upon further inspection, I noted that the veins of the leaves were still green, but the areas between the veins had turned yellow. In some cases the edges of the leaves were brown. “What is wrong?” I wondered.
What is wrong with my trees was something called, Iron Chlorosis. This problem is apparently common in places that have high alkalinity soil (pH above 7.0). My soil was significantly above this level. It is believed that there is a link between alkalinity and iron in the soil. The problem isn’t a lack of iron, but the inability of the plant to benefit from the iron that is there. For some reason, higher pH changes the chemical reactions which then render the iron unusable to the tree.
So, now that I know what is causing the trees’ problem, is there anything I can do about it? Yes, there are a number of things that can be done to deal with this problem. The best solution is prevention. Do a soil test to determine the soil pH and then select a species that will do well in a particular soil.
DIY soil test kits can be purchased from many garden outlets or your local U of I Extension Office can point you in the right direction to get the the test for a fee. There are several reputable labs that do a great job and send you the results and they are reasonable in cost. However, if the trees are already there, like mine, you have several options. According to North Dakota State University (NDSU) one option is to add elemental Sulfur to the ground around the tree. The Sulfur will help free up iron for the tree to take up. This is a slow process and may take a year or more before seeing results. Another option from NDSU is to inject iron directly into the trunk. This involves drilling a series of holes in the tree. This procedure should not be done more than once a year. Finally, the foliage can be sprayed with an iron solution. This usually provides the quickest results, however as new leaves come on they most likely will exhibit the problem.
Solving the problem of iron chlorosis is a difficult and time consuming challenge. Research and careful planning and follow up are keys to your success. Saving your beautiful plantings are worth the effort. Good luck!
Every organic gardener has had the experience of
dealing with any number of “weed” varieties in their home garden. One
could define a weed as a “plant that interferes with the management objectives
for a given area of land at a given point in time”. J. M. Torell, Plant Pathology Specialist-Western Laboratories. "Our job is to run interference in a
safe way and to get maximum yield from the preferred food plant source."
But wait. There are ways to use these “undesirable” plants to our
advantage. Many home gardeners as well as professionals have embraced an
early flush of green as well as harvested, in new and traditional ways, the
seeds and fruits from some of our most troublesome invaders.
Pulling weeds is just
about the most tedious task any gardener faces. But with many common species,
you can take another route: Try eating them. Here's a somewhat complete list of
commonly weeded plants that can add rustic flavor to your garden harvest. Just
be careful — before you eat anything outside, positively ID it visually by
using a guide book or by asking a knowledgeable person. Here's two recommended books: Delicious Forages and A Feast of Weeds.
Red Clover (Trifolium
pretense)This plant's blossoms
can be eaten fresh or steeped in hot water for tea. And you can toss both
the green leaves and blossoms into a
salad.
Plantain (Plantago
major)Also known as
"white man's foot," thisis another one of those plants
that seems to thrive right on the edge of gardens and driveway. Pick the green,
rippled leaves and leave the tall flower stems. Blanch the leaves and sauté
with some butter and garlic just as you would with kale or any other tough
green Garlic Grass (Allium
vineale)
Wild garlic is an herbal
treat often found lurking in fields, pastures, forests and disturbed soil. It
resembles cultivated garlic or spring onions, but the shoots are often very
thin. Use it in sandwiches, salads, pesto or chopped on main courses like
scallions. Sorrel (Rumex
acetosella) Also known assheep
sorrel or dock, this wild plant is a tart,
lemony green found all over North
America and Europe. It slightly resembles Swiss chard, with thin, triangularly
shaped leaves. Use the young leaves in salads for an interesting citrus flavor,
or cook older, tougher greens in soups, omelets, or stir-frys. Wood sorrel is
another variety that can be eaten; however, it looks more like clover, with three double egg-shaped leaves.
Watercress The cress family (garden
cress, watercress, rock cress, pepper cress) are leafy greens long
cultivated
in much of Northern Europe. They have a spicy tang and are great in salads,
sandwiches, and soups.
Chickweed (Stellaria
media)A low-growing succulent with bright green,
pointed oval
leaves, this plant is supercharged with vitamins, minerals,
omega-6 fatty acid derivatives, and deliciousness. Throw young leaves and stems
in salads. However, take note: Don't eat too much chickweed, as it can give you
diarrhea. For more information about edible weeds in Idaho check out https://www.northernbushcraft.com/plants/
Unlike my
childhood memory of Granny Allen’s ramble of raspberries, full of blooms, bees,
and berries, I have intentionally kept my inherited cluster of raspberries
small.These amazing plants have
tolerated moving to several locations as my landscaping has evolved over the
years.The neglected collection of
crowns and canes continue to survive regardless of my inattention, still able
to produce a tasty source of edible entertainment for the grandkids, filling
their mouths more than their cups, with tasty berries.
My
only attempt at pruning my berry patch was taking a shovel to a wandering
sucker that ventured too far from its designated home, never giving much thought
to how mindful pruning practices could improve fruit production.As with all plants we nurture in our garden,
it is important to know your plant.With
intentions of creating a bountiful crop to create Granny’s preserves, a better
understanding of my mistreated patch is priority!
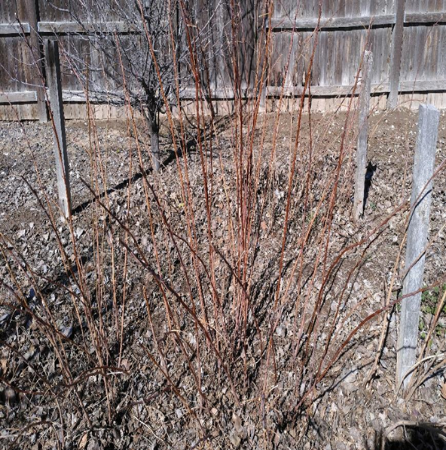
Raspberries are unique because they have perennial
roots and crowns that can live for many years.The canes or stems that produce the flowers and eventually berries are
biennial.Biennial canes live for two
years then die.
Primocanes (that will flower and fruit the
following year.) are new shoots that arise in the spring from the main crown,
or new suckers that rise from roots away from the main plant.
Floricanes are the second season canes that die
after producing fruit. Most berry brambles produce fruit on floricanes.
Primocane vs. Floricane
Varieties Most varieties of blackberries and raspberries are floricane
fruiting, or summer-bearing, which means they produce berries only on the
second-year growth, the floricanes. The fruit appears in early- to midsummer.
Primocane varieties are also known as fall-bearing or everbearing plants.
Ever-bearing varieties produce fruit on the floricanes in the summer, but they
also produce fruit on the primocanes. The primocane fruiting occurs at the tips
in early fall or late summer in the first year. They will then produce fruit
lower on the primocanes the following year in early summer. If you are growing
this type of berry, it is best to sacrifice the early summer crop by pruning
back primocanes after they produce in the fall. Cut them down close to the
ground, and you’ll get fewer but better-quality berries the following year.
There are two types of raspberries.Summer or June Bearers and Ever Bearers, also
known as Fall Bearers.
Summer/June Bearers produce vegetative, non-fruiting primocanes the first growing
season.Flowers and berries will form on
these canes the following year.During
the second growing season, the floricanes produces its fruit, then the cane
dies to the ground.
When pruning
Summer/June bearers, it is easy to identify the dead canes and prune it back to
the crown. Cutting out dead canes is recommended after harvest when the canes
are dry or in the early spring, before new growth starts.Prune out spindly canes and thin the crown,
leaving 2-4 of the strongest canes, cutting them back to 4-5 feet in
height.Remove unwanted suckers that are
sprouting outside of your designated area.
Summer Bearing – June
Bearing
Fall/Ever Bearers, if pruned correctly, have the potential to produce two crops in one
season.The primocanes that grow during
the first year will produce fruit late in the summer or early fall at the top
of the cane until the first frost, then the top of the cane will die. The next
summer, fruit will form lower on the same cane.To get both fall and summer crops, prune the canes as described for June Bearers.
Fall Bearing – Everbearing
If you desire a
larger crop of berries in the fall, cut Fall Bearer canes at ground level. This
convenient practice will typically produce one larger crop of berries in the
fall but no summer crop. It is recommended to mow or cut off all canes close to
the ground. If stubs are left, buds that sprout in the spring will produce
weak, unproductive branches.
Raspberries are
forgiving and with a small amount of time and attention they will produce a
bounty of berries.To the delight of my
grandkids and satisfaction of knowing this would have pleased Granny, I
approach my berry patch armed with sharpened shears, knowledge, and confidence
with intention for an abundance of berries for Granny’s freezer jam.
Have you ever heard
someone say, “After a mild winter, insects will hatch early?” Is this a
gardening myth? Can scientists forecast when particular insect will emerge? See the answers below!
Idaho State
Department of Agriculture
Entomologist Paul Castrovilla points to Phenology. The
study of relationships between weather and biological activities, it is also
known as the Degree-days Model (DDM).
When Insects Make Their Appearance:Insects are cold-blooded. Their development is linked directly to external temperatures. Each requires a defined amount of heat accumulation to reach life stages like egg hatch or adult flight.
Degree-days (DD) mean a measurement of heat units calculated from an average daily high and low temperatures. DD tell us how many heat units useful for a specific insect’s development have accumulated. In the lab, researchers determine a base and an upper threshold temperature for each species. The insect will eat and mature during this range. According to Dr. Castrovilla, base thresholds are typically set from 40 to 50 degrees F.
Example of threshold list at http://uspest.org/wea/weafaq.html
You can easily calculate Degree-days using the following formula:
[(daily maximum temperature + daily minimum temperature)/2] – baseline temperature = # DD for that day.
Accurate calculation of degree-hours over many days requires a record of hourly temperatures and is complex for a number of reasons.
The Integrated Plant Protection Center Phrenology Site Home Page
Make Your Own Science-Based Forecast:The public is welcome to use a free web site to forecast an insect or disease in a matter of seconds. Hosted by the University of Oregon, The Integrated Plant Protection Center combines US weather and climate data (29,000+ locations) with 110 plant pest and disease models.
Example of DDM results for codling moth at Nampa Zip Code
The above image is a table forecasting egg hatch dates every two weeks from May 17 to July 23. Dr. Castrovilla cautions that the DD Model is not 100% precise, but can predict a date within three to five days.
Accumulated DD help in timing crop scouting events like placing pheromone-monitoring traps. That helps predict the best timing of pest management. The DDM is a useful tool in predicting when a destructive pest is likely to occur. It is also helping to identify when beneficial insects are at dangerously low levels.
To answer our original questions, it is a fact bugs will develop earlier if spring temperatures warm up earlier than normal. Few insects develop in Idaho when the temperature is below 41 degrees F. Used in combination with scouting and pheromone traps, the DDM helps determine treatment timing for fields and back yard gardens alike. That can protect crops, save money, and minimize negative effects on the environment. To be notified, Sign up for PNW Pest Alerts
"Research and IPM Models: Insects, Mites, Diseases, Plants, and Beneficials." A long list of insect thresholds. University of California. Link:http://ipm.ucanr.edu/MODELS/index.html
There are simple steps
anybody can take to make their own backyard more friendly to pollinators.
Why should you create a
pollinator’s paradise?
In short, some pollinator
populations are currently under threat, especially bees. Pollination is vital
to our food supply and ecosystem. We can all be part of the solution with a few
simple steps!
One: Thoughtfully
plant a variety of native flowers and plants.
Planting native and
non-invasive plants is key. There are many species of invasive plants which
have a negative effect on our ecosystems. When possible, invasive species
should be identified quickly and removed. Always check your labels and ask for
scientific names of plants to be sure you have native varieties. Invasive
species out compete and overgrow native plants, and are often introduced to
landscapes as ornamentals. Some examples of invasive species to watch out for
in Idaho might be purple loose-strife or salt cedar. Learn more about invasive plants here.
When it comes to flowers, it
is also best avoid wild flower mixes.
Tip: Look for flat faced
flowers, rather than ruffled, double layer petals, as these are more
approachable to bees and butterflies.
Your thoughtful planting
should consider visual impact on pollinators. It might be good idea to choose an
area specific to your pollinators, and plant a swath of plants there. Or, paint
the whole yard in flowers and native plants! As long as bees, birds, moths or
butterflies can see your blooms easily, they’ll stop by. Be sure to plant a
variety of plants, so that your flowers do not bloom all at once. This provides
pollen to bees and butterflies for a longer period of time, ensuring they have
food for the duration of their lifespan.
Tip: Variety can apply to
color, species, shape, height, and more! The more options pollinators have, the
more likely they are able to find something they like, at any stage of life.
Two: Provide
water for pollinators.
Birdbaths and water features (in every season) are great for birds, bees and butterflies. It’s important to monitor standing
water, especially during the warm mosquito breeding season. Be sure to change
out water in birdbaths 2-3 times a week. More details here.
Three: Create
spaces for shelter.
Bees need spaces to create their homes, whether it be up high or down low! Be sure to leave ground space
as native bees are solitary and dwell near the ground. Nesting sites might
include dead wood or even messes of twigs and grass on the ground. These can
serve as habitable spaces for bees, and even provide overwintering protection.
Another consideration is mulching. If there is too much mulch, bees are unable
to penetrate the surface for shelter on the ground. Tip:Leaving bare ground or using
leaf cuttings or compost in a lighter layer will provide access and protection.
Four: Feed the
birds, bees and everything in between.
Provide seed for birds by
leaving seed heads and stalks intact for habitat and food to birds and
overwintering insects.
When planting, include a few
plants which support larvae and adult insect pollinators. It is always best to
consider the lifespan of insects and other pollinators, as they may have a food
source for one stage of life, but not another. For example: monarch
caterpillars only eat milkweed. Without this food source, there is no butterfly
to become a pollinator! Here's how to optimize your yard.
Five: Maintain
your pollinator garden.
Weed your garden by hand
often. Limit your use of pesticides.
Pesticides and herbicides can end up killing off beneficial pollinators or
insects that are vital pest controllers themselves. In the end, it is best to
use as little pesticides or herbicides as possible. Instead, work toward
maintaining your soil, and creating a healthy landscape overall, as this is the
best way to keep pests or weeds at bay.
Tip: Add compost in the spring,
but remember to leave room for ground dwelling bees. Plant species which require
less water together. If plants require more water, group them together so they
can be watered efficiently.

 They are all the same so to speak. They are opportunistic eaters. They live on dead decaying matter, eat aphids and other small prey and love young growth of certain plants, like Marigolds. This is shown in the picture with all the cans full of earwigs and decimated marigold plants. The cans were placed next to plants that the earwigs thought were there most tasty.