Thursday, April 27, 2023

Getting More Out of Your Ground Cover Plants

I have a very long strip of landscaping area between my lawn and the cul-de-sac, with six different types of plants growing (see photos below). I want to propagate those plants to make many more and fill in the area. In this article I will give the basic principles of propagation used for ground cover plants grown in this area.

Crown Division, or Division Division is form of plant propagation where new plants are not grown from seeds or bulbs but are separated from the parent plant. The crown of a plant is where its stem meets the roots.

  • Carefully lift plant clumps along with some soil removed from the roots.
  • The crown may then be cut into sections with a knife.
  • Individual growing points (shoots) that contain roots may be used to form new plants, or if a larger plant is desired, several shoots may be left together.
  • When dividing large, old crowns, it is often best to discard the older, center portions and replant the young, more vigorous shoots that have developed on the edges of the clump.                                                   
Stem Cuttings A stem cutting includes a piece of stem plus any attached leaves or buds, so it only needs to form new roots to become a plant.
  • Cuttings should be 4 to 6 inches in length and taken from vigorous, healthy plants.
  • Remove the cutting from the mother plant with a sharp, clean knife.
  • Use a rooting hormone.
  • Cuttings should be placed (stuck) in a propagation medium that retains moisture, yet is porous. Do not allow the medium to dry out.                          
Leaf cuttings
A leaf cutting uses just the leaf for propagation, so both new roots and new stems must be formed to create a new plant. Leaf cuttings first must form roots and later shoots. Depending upon the species, it can take several months to produce a plant suitable for transplanting from a leaf cutting.
  • Remove only a leaf blade or the blade and a portion of the petiole.
  • Apply rooting hormone, and sink the petiole into the rooting mix.
  • The base of the leaf blade should just touch the mix.
  • Place the pot in a plastic bag in a bright spot.
Root cuttings Though very few plants can be propagated from root cuttings, the technique is simple. 
  • When the plant is dormant, dig it up and cut off robust segments of the root, 2-3 inches long. 
  • If the roots are thin, lay them horizontally on the rooting mix and cover with 1/2 inch of the damp mix. If the roots are thick, lay them horizontally or place them vertically into the rooting mix, covering them completely. If placing the root vertically, make sure the end of the cutting that was nearest the crown of the plant points up. 
  • Put the pot in a plastic bag and place in a bright spot. In several weeks, shoots should emerge from the rooting mix. Keep the pot in the plastic bag until new roots have formed on the shoots.   

The chart below shows some of the common ground cover plants grown in the Treasure Valley of Idaho.

Common Name

Scientific Name

Best Ways to Propagate

Stonecrop

Sedum spurium 

Division 

Periwinkle

Vinca minor  

Division

Mazus

Mazus reptans

Rooting at the nods

Creeping thyme

Thymus serpyllum

Division, seeds or cuttings

White Woodruff

Golium odorstum

Self-seeds

Lamb’s Ear

Stachys bysantina

Self-seeds profusely

Houseleek / Hen & Chicks

Sempervivum tectorum

Leaf cuttings

Moss Phlox

Phlox subulata

Division, stem/root cuttings

Prickly Pear

Opuntia macrorhiza

Stem cuttings

Snow-in-Winter

Ceratium tomentosum

Self-seeding, division 

Rockcress 

Arabis caucasica

Seed, division/stem cutting

Candytuft

Iberis sempervirens

Division, or stem cuttings

Basket-of-gold

Aurinia saxatilis  

Self-seeds, or direct seeds

Bearberry Cotoneaster

Cotoneaster danneri 

Stem cuttings

Silver Mound

Artemisia schmidtana  

Division every 2-3 years 

Rose Moss / Purslane

Portulaca grandiflora

Cuttings

Ajuga  

Ajuga reptans

Seed or division


Saturday, April 22, 2023

Bees–Wasps –What’s all the Buzz?

Many creatures (seen and unseen) call Southern Idaho backyards home. For many of us, our introduction to flying yellow and black insects was an unwelcome and painful sting. Through experience and education, we know that some of these flying creatures are more friendly and less aggressive than others. 

Identifying the subtle differences between each species is not always intuitive–but important. It’s not as simple as identifying good vs. bad or friend vs. foe. Understanding each species can help us manage a safe and healthy backyard ecosystem. 

Bees – While there are 25,000 different species of bees, SW Idaho is home to more than 400 native bee species as well as some introduced species, such as the European honeybee and the alfalfa leaf cutting bee.  While it may be obvious, only honeybees (not native to Idaho) generate honey. The most common bees are worker bees who collect pollen to feed the queen and support the hive.  Bees also perform the important job of pollinating our gardens and fruit trees.  While generally less aggressive than wasps, bees can and will sting. 

Wasps – While known by many other names (hornets, bald faced hornets, yellow jackets, etc.) all are technically wasps. There are 30,000 wasp species. They can be recognized by their pointed lower abdomen (not furry), narrow waist, and shiny, slender cylindrical shaped legs. All wasps hunt food and build nests. Adult wasps cannot eat solid food. They return solid food (other insects, meat, fruits, etc.) to the nest to nourish carnivorous larva. The larvae digest the solid food and emit a sugary waste substance which is a primary food source for adult wasps.

There are two general wasp classifications, social and solitary.  Social wasps work together to build nests. This process begins from scratch each spring; they never return to the old nest. Adult wasps harvest decaying wood material. This wood material, once mixed with saliva, produces a paper-like substance used to construct intricate and often very large nests. Wasps build nests in voids found in homes (attics, walls, trees, bird houses), fences and sometimes in underground vacated animal dens.
Unlike bees and social wasps, solitary wasps do not participate in a social system. Solitary wasps excavate underground tunnels or build mud nests.

Wasps propagate in spring and early summer. As the worker wasps’ life cycle comes to a close in late summer, their hunt for food is their only purpose and they become very aggressive. While wasps are veracious hunters of pest insects, which is a valuable service; their venomous stings are painful and sometimes lethal. In early spring, remove nests close to human activity. Keep your home area clear of wasp nests by sealing foundation cracks and keeping garbage covered. Consider creating designated ‘wasp’ spaces luring them far away from BBQ and outdoor recreation spaces with bait or pheromone traps. Or give them their own zone. Forewarn your family and friends to steer clear of wasp zones.

in our area, is a solitary wasp that makes its home underground.
So as you can see, it's not as simple as a Friend or Foe. These complex insects present some risk but also provide benefits to our ecosystem. For more, here's a link https://pubs.usgs.gov/circ/1448/cir1448.pdf Identification of Bees in Southwest Idaho—A Guide for Beginners

Thursday, April 13, 2023

Why Raised Garden Beds?

Raised garden beds are a great choice for anyone who has a small space or wants to control the soil quality. Another good reason for raised garden beds, it is great for all ages, health conditions, and mobility types. We all love healthy grown foods, so with raised gardening beds it is easier to manage and control the quality of the soil to get better yields.


Evaluate what your needs are, how much room you have, and how much time you want to commit to your gardening space. 
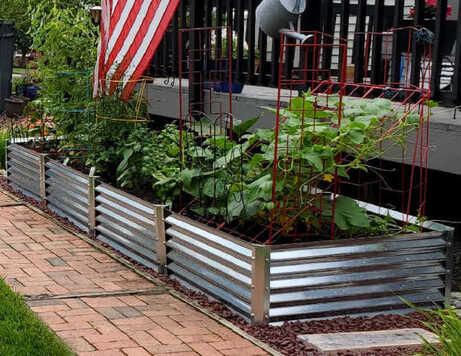
   Consider the different designs available and see what appeals to you. You will want to know your budget and choose the layout or plan that will work best.  

fresa garden beds

    Check out this site for many great ideas on types of gardening beds and different designs. 
    Look at your location and decide what plants you want, the amount of sunlight you are going to have, and how long your growing season is for your region. Make sure to add in drip irrigation, which will conserve water; set the drip at the base of your plants. Leave space for walking paths around your beds.
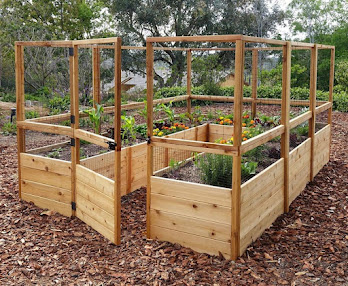
    Think ahead, if you need to cover your garden beds to keep out flying bugs and birds, add design components that will make it easy to net the spaces. This type of design is very useful for fall cold snaps when you need to shelter plants from the cold evenings. You can also use hoops for coverings. The size of your bed should be an arms length to reach far enough to get to your produce; 4 feet is a good width for your beds. If you have rodents that burrow, you may need to put down a wire mesh to block any digging into the bottom of garden boxes.
Deer Proof Cedar Complete Raised Garden Bed Kit - 8' x 12' | Eartheasy.com

    Soil preparation is key in a raised bed, so adding in compost and organic material is necessary. The beds can be filled cheaply with rocks, gravel for drainage, grass clippings, fall leaves, twigs, branches, logs, even cardboard boxes, or paper sacks.
    Don’t forget to get your mulch on top to retain the moisture. Keep in mind you do not want to put any items in the bed that have insect contamination or chemicals.  
    Get creative in your planning and designing, use what you have, so many different components can be used for raised beds. REPURPOSE, RECYCLE, REUSE!!


Monday, April 10, 2023

Powdery Mildew

Figure 1: PM on Tomato
Powdery mildew is a fungal disease that affects a wide variety of plants. The affected plants have a dusted-with-flour appearance with white to gray powdery spots on the surface of leaves and fruits (Fig 1). It causes cosmetic damage, and defoliation and decreases the quantity and quality of fruit (Fig. 2).

Disease and Development
There are many different species of (Powdery Mildew) fungi. Most species only attack specific plants in the same or closely related plant families. For example, powdery mildew on roses does not spread to grapes.

Powdery Mildew fungi overwinter in buds, twigs, bark, and plant debris. Their spores are carried by wind to new hosts. Low relative humidity during the day favors spore dispersal.

Fig 2: PM on grapes
The optimum conditions for spores to germinate are temperatures between 68 to 77°F and high relative humidity (> 70%). Powdery Mildew spores can germinate in the absence of water and can infect in arid conditions (40% humidity). Water on plant surfaces can kill or inhibit germination. Spores and fungal growth are sensitive to extreme heat (above 90°F) and direct sunlight. Shady conditions are favorable for PM development.


Management
The disease triangle is a useful tool to understand and manage diseases like Powdery Mildew (Fig. 3). The severity of Powdery Mildew infections is a function of the presence of the pathogen, the host susceptibility, and the environment. Powdery Mildew can be managed by good cultural practices.   

Fig 3: The Disease Triangle
The best control is to plant only resistant species or cultivars. Avoid excess fertilizer since plants with abundant succulent tissues are more susceptible to infection. The fungi can be eliminated by removing and burning all infected plant tissues and debris. Tools must be disinfected after use.

Another good control method is making environmental conditions less favorable for the disease. Avoid dense canopies by proper plant spacing and pruning to provide good air circulation, reduce humidity and increase sunlight penetration. Plants should not be planted in poorly drained soils or shady damp areas.

Overhead watering of the leaves during the day and when humidity is low can reduce infection. Water washes spores off the plant and inhibits its germination. This control method is not recommended for vegetables since it may contribute to other pest problems.

Powdery Mildew seldom needs chemical control in residential plantings, but it may be warranted in commercial plantings of susceptible crops like grapes and cucurbits. Chemicals are most effective when combined with cultural control. They should be applied before the disease symptoms appear. Further spread may be stopped or slowed with chemical treatment. Materials like horticultural oil or neem oils have a low environmental impact. Apply every 7 to 14 days throughout the season. Do not apply to drought-stress plants when the air temperature is above 85° nor within 2 weeks of a sulfur spray. Wettable sulfur is very effective in preventing infection. Like oil application, it should not be applied when the air temperature is over 90° nor within 2 weeks of an oil application.

Thursday, March 30, 2023

Billbug Cause Major Damage to Lawns (Turf) in the Treasure Valley

Billbugs are small, snouted beetles that belong to the family Curculionidae and are considered to be major pests to lawns in the Treasure Valley. These pests are known for causing significant damage to turf grass and lawns, leading to unsightly brown patches and reduced aesthetic appeal. In this blog, we will discuss what billbugs are, their impact on turf grass, and how to control them using integrated pest management (IPM) methods.

What Are Billbugs?
Billbugs are cylindrical beetles that range in size from 3 to 10 millimeters in length, depending upon life stage. As adults, they have a hard exoskeleton and are usually brown or black in color. Their snout, which is often longer than their body, is used for boring into plant stems. Billbugs undergo a complete metamorphosis, passing through the egg, larval, pupal, and adult stages, with a one-year life cycle (Oregon State University Extension, 2018). The majority of damage from billbugs occurs during the larval stage, as they feed on stems, rhizomes, and crowns, typically just below the soil surface. Damage from billbugs is typically visible in late June or early July each year.

In the Treasure Valley of Idaho, billbugs are particularly abundant in lawns, parks, and golf courses. They feed on the stems and roots of turf grass, causing significant damage to the plant's ability to absorb water and nutrients. This feeding can lead to large areas of grass dying, creating unsightly brown patches that are not only aesthetically unpleasing but also difficult to repair (Idaho State University Extension, 2017).

Impact of Billbugs
The impact of billbugs on turf grass can be significant. In addition to the unsightly brown patches, Billbugs can reduce the health of the grass, leading to reduced aesthetic appeal and causing economic losses for lawn owners (Idaho State University Extension, 2017).

Integrated Pest Management (IPM)
Integrated pest management (IPM) is a comprehensive approach to managing billbug infestations that involves multiple control methods
. This strategy utilizes cultural, biological, and chemical control methods to promote the health of the turf and prevent billbug damage. Cultural control methods involve selecting the proper grass varieties that exhibit resistance to billbug feeding. Several cultivars of Kentucky bluegrass, such as ‘Park’, ‘Arista’, and ‘NuDwarf’, have been proven to exhibit resistance to billbug feeding. Additionally, endophyte-enhanced ryegrasses and fescues display high resistance to billbug feeding (University of Utah). IPM of Billbugs also includes implementing proper irrigation, fertilization, and mowing practices to maintain healthy turf. Biological control methods may involve releasing beneficial insects that feed on billbugs to control their population. Several nonchemical bio-pesticides exist, including purchasing and applying predatory nematodes (Stinernema & Heterorhabditis spp.), as well as a fungal organism (Beauveria bassiana) that are listed and registered for control of billbug larvae in lawns. When necessary, insecticides can be used to control billbugs, but should be used with caution to avoid harming beneficial insects and creating insecticide-resistant billbug populations (The University of Idaho Extension, 2017). 
Properly implemented IPM practices can effectively manage billbugs and maintain healthy turf.

Thursday, March 23, 2023

Early Spring Lawn Care

Spring is here! The days are getting warmer and longer. We look out at our lawn coming out of a long winter that has not been fed for a while. Its color is off and we think: if I hit it with lots of water, dump some fertilizer on it that will fix it. But wait… there are a few things to consider about feeding and watering your lawn before you start.

C:\Users\jbbow\AppData\Local\Microsoft\Windows\INetCache\Content.MSO\A278CA17.tmpWhen to Fertilize
A program that applies fertilizer four times a year, using the holidays of Easter, Memorial Day, Halloween and Thanksgiving as a guide is desirable. An application of a quick release formula, where the nitrogen is quickly available to the plants, is best in the spring and slow release formulas, where the release of nitrogen is slower can be used for the rest of the applications.  It is better if the late fall application is slow release so the nutrients are released into the soil during the winter to help with lawn recovery in the spring.
Image result for lawn fertilizerWhat Type of Fertilizer
The ratio of nutrients on any plant food is represented by Nitrogen- Phosphorus- Potassium (N-P-K) in numbers. The numbers state the amount of each. For instance, a 10-10-10 is a balanced food with equal parts nitrogen, phosphorus and potassium. A fourth number would represent Sulfur (S).
Nitrogen promotes foliar growth and color. Phosphorus is useful in encouraging flower and root growth. Potassium in lawns enhances the plant’s ability to use nitrogen.
Lawns in southern Idaho can be fertilized by following one of two strategies: soil testing or nutrient ratios. In one, fertilizer rates for the lawn are based on a laboratory analysis of a soil sample. The other is based on the fact that lawns do best when fertilized with a fertilizer having a 3:1:2: ratio of N, P, K.  Spring applications can use a ratio where the phosphorus ratio is higher to promote root growth.                                 
Watering
Water deeply and less often to promote deep roots. Apply between 1”-1 1/2” of water weekly, depending on weather conditions, soil type, and landscape terrain (slopes, etc.). Soil should be moistened to a depth of about six inches. To test sprinkler output, place empty tuna fish cans or cat food tins along the water arc to see how long it takes your sprinkler to put down this amount of water. Output is greater the farthest point from the sprinkler head. (You can allow the cans to fill 1/4” or 1/2” and multiple accordingly.) One application a week may be all that is necessary, or you can divide the time into two or three applications per week. Also, take into consideration the areas where sprinklers overlap an area, and that sprinkler output varies. During hot weather, increase the water to 2” per week and apply more frequently if necessary. Visual clues that the lawn needs watering are when the grass begins to take on a blue-green color or has lost its spring, leaving an imprint behind when walked upon.
Aeration
Core aeration opens up avenues for water and fertilizer to reach down to the root zone, thus stimulating the activity of soil microorganisms and increasing root development. Lawns that have not been aerated before or those that get heavy foot traffic may benefit by aerating twice per year, once in the spring and again in the fall for the first two or three years, then drop back to once per year. On lawns that are regularly core aerated once per year in the spring is enough. Do not rake up plugs afterwards, these are topsoil and will decompose naturally, mow over them and they will soon disappear. An application of no more than a ¼” of compost after spring aeration is beneficial for all lawns.
Thatch
Image result for lawnThatch is not caused by leaving grass clippings on the lawn, as is commonly believed. It is an accumulation of dead and partly decomposed leaves, stems and roots above the soil surface but below the green leaves. Up to 1/2 inch of thatch is beneficial, acting as natural mulch, insulating the soil, reducing water evaporation and soil compaction, and increasing the lawns spring and wear tolerance.
Too much thatch serves as a barrier preventing air and moisture from moving into the root zone of the plants, causing the turf to dry out much too rapidly. This provides a haven for insects and disease. If thatch is over 1/2 inch, power raking in early spring is advised. Power raking every year is not necessary and may actually damage the lawn.
Giving your lawn an application of a slow release fertilizer in the fall will give your lawn a jump-start in the spring.

Thursday, March 16, 2023

Pruning Correctly and Other Ways to Avoid Bitter Pit in Apples

Bitter Pit
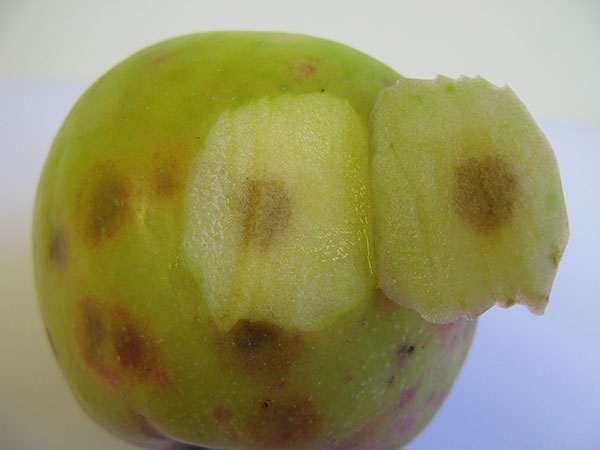
Imagine going out to harvest your apples only to find that all of your hard work has resulted in apples covered with brown sunken lesions on the skin, and brown spongy tissue below the skin surface. What caused this? Likely it was the result of a disorder called Bitter Pit!

Bitter pit can affect many apple varieties. The Granny Smith, Jonathan, Honeycrisp, Northern Spy, Gravenstein, Cortland, Fuji, Crispin, Empire, Ida Redd, and Baldwin are a few of the susceptible varieties. Rome Beauty, Winesap, Mackintosh, and Gala are all less susceptible varieties.

There are several things that can cause Bitter Pit, and a few different ways you can avoid or treat them.
  • Avoid wide fluctuations in soil moisture. Trees that have received too much or too little water are more prone to Bitter Pit. Mulch around the tree with a low nitrogen material to help retain moisture.
  • Do not over fertilize. Excessive nitrogen or potassium seem to coincide with Bitter Pit.
  • Do not over prune in the spring. Over pruning causes vigorous shoot growth. These shoots compete for calcium and it may result in Bitter Pit.
  • Do not over thin in the spring. Large apples from small crops seem to be more prone to Bitter Pit.
  • Late harvested fruit is prone to Bitter Pit. It can also develop if the fruit has been stored for a long time. Consider using the fruit quickly if bitter pit has been a problem in the past.
  • Calcium sprays should be applied carefully and according to packaging directions if none of the above methods works.
With a little extra effort and care you can avoid the dreaded Bitter Pit. It doesn’t take much effort and before you know it you will be harvesting the apple crop you always dreamed of.
Note: Bitter Pit can resemble damage caused by Stink Bugs. To learn more about Bitter Pit click here.