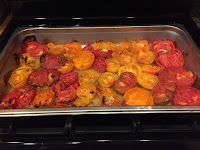
I’ve grown it. Now…what? Many years ago, I made and water bath canned my own tomato sauce. It was a lot of work. Since then, I’ve procured the mother of all freezers and now, what I would have canned years ago, I freeze. This way, I have the fresh taste of my garden, all year round. And, the bonus is, I know exactly what goes into what I freeze.
Making and freezing the sauce begins as soon as I have enough tomatoes for a batch. You can use any variety and any size of tomato. I’ll wash, core and quarter the big ones. The Sun Sugar cherry tomatoes, (that I’m so fond of) go into this procedure, whole.
I have peeled garlic, olive oil, salt and pepper at hand. Often, I’ll tuck basil leaves under the tomatoes, if my plan is to make the base for a drop-dead-delicious marinara sauce.
 I’ll use a small pan, if I have a smaller batch. I’ll save energy and roast the tomatoes in my toaster oven. Conversely, I’ll use a large restaurant size pan when roasting in my larger, convection oven.
 Once I’ve filled the pan with tomatoes, garlic and (sometimes) basil, I drizzle a very conservative amount of olive oil on top. This year, I’ll use a pump atomizer to coat the ingredients with oil, I think it will be more effective and cut down on the amount of oil used. If you use fresh basil, tuck it under the tomatoes, as it can tend to burn during the roasting process.
I pop the entire pan into a preheated, 400° oven and set a timer for 20-minutes. I use this time to revel in the glory of the smells that come from the oven…even opening a window to entice neighbors. I will also tidy my work space during the roasting time. After 20 minutes, I check for signs of roasting. Look for small char marks on the tomatoes and garlic. Check for tenderness in the tomatoes.
 Now, I’m in the home stretch! After removing the pan from the oven and letting it cool to touch, I’ll put the contents of it in my blender. I whiz it until it’s pureed.
 The next step is not entirely necessary. But, I do it to achieve a velvety smooth consistency. I pour the mixture through a wider gauge strainer to catch any seed or skins that didn’t get blended. This step really does kick it up a notch in terms of quality. Because the skin stayed on the tomatoes during the entire process, there are still plenty of vitamins in the sauce.
 I put my sauce in freezer-safe containers with ½ inch head space (for possible freezing expansion), and I label EXACTLY what I added to the mix. This way, I know if I’ll use the sauce for stews, chili, Italian or Mexican recipes. Plus, nothing goes in my freezer without a date. Try to use the sauce within a year’s time.
 The quality of the sauce really holds up with this procedure. The other night, I made homemade pizza. The container I thawed (from my 2016 harvest) was a bit thin for pizza sauce. I simply put the contents in a saucepan and added a small amount of cornstarch. In minutes, I had thick, delicious homemade pizza sauce. The results were delectable!
