Sunday, December 25, 2022

Winter: The best time to ponder the bones of your yard & garden

Are you thinking of creating or converting to a backyard forest garden? Here's a bridge over a dry river rock bed that flows through a wildlife area - even in a small yard! 
With the leaves on deciduous plants gone, you can see where you need structure, where you could plant evergreens, and where you need to prune. Here are 10 suggestions. 
You also now have the time out from planting and harvesting when you can think about building structures, such as walkways, decks, raised beds, trellis/gazebos, or seating areas. Oh so much fun!!!

Dr. Douglas W. Tallamy has written a seminal book, Bringing Nature Home, on how to plan for the best ecosystem in your own yard. He has followed it with a second book, Nature's Best Hope, outlining how we can help grassroots conservation with native plants! While he is from the NE USA, his ideas are applicable here. This is the time..."one yard at a time!" 

Our winter sunshine is a plus in this, as you can get outside even in January and February to mess with lumber, edging or stepping stones (unless the snow hits). 
Go out and stare at your gardening space and draw a map of what is already there. 
Consider what you’d like to keep and what isn’t working. Refer to your garden journal for successes and failures.

Envision what you’d like to see there and draw it in on your map.

Dream on about your 2023 yard and garden!

Friday, December 9, 2022

Plant, animal, & earth-friendly deicers??? Yes!

While applying products to keep our walkways clear of snow and ice, it’s important to remember the plant life living nearby. Deicing products, primarily composed of salt, can injure plant material, but is there a safer product to use around desirable vegetation? What about around pets? What about the run-off in our rivers and watershed?

  • Salts can cause injury to trees, lawns,  shrubs
  • salt run-off can harm our ground water 
  • they can corrode concrete 
  • and even do bodily harm to humans if handled improperly. 
  • And don’t forget about the poor little paws on your four-legged friends.
So you may be thinking salt is salt, right? No. Not all salt is not the same. Think table salts (Sodium chloride) and Epsom Salt (magnesium sulfate). If you remember your days in chemistry (I don’t), salts are combinations of negatively charged anions and positively charged cations. Examples are sodium chloride (table salt), potassium chloride (used as a fertilizer) and magnesium chloride (the one you see trucks spraying on our roads). 

The most problematic element in these salts is chloride, a corrosive ion that damages metal and concrete. Chloride is also toxic to plants.

Salt damages plants by dehydrating plant tissues, causing burn, or by being toxic in high levels. While most plants have some tolerance to salt injury, repeated applications of deicing products during the winter can result in dieback or even death the following spring. Misapplications of deicers (i.e. dumping piles or using too much) can leach through the ground and into the water table or wash into the storm sewers, causing pollution. Before buying or using any product, read the label carefully and use only as directed.

A few of the salt products you might run into while shopping:

Calcium magnesium acetate (CMA): It has low corrosion potential, so it’s less damaging to cars, metals, sidewalks and plants. Notice it’s not a chloride product, the “salt” comes from the calcium-magnesium mix and the acetate replaces the chloride. Plus, it’s biodegradable! Its ice-melting properties are equivalent to traditional deicers, but the cost may be 20-30 times as expensive as sodium chloride products. These are often touted as “pet friendly”. 
Magnesium chloride: Commonly referred to as “mag chloride”. Applied as a brine, it’s the most common product used on our roadways before storms, because it lowers the freezing point of soon-to-arrive precipitation. It can melt ice down to -15° F, which is a nice benefit. If applied in moderate amounts, it’s relatively safe for plants and pets. It’s corrosion potential is low, as is it’s pollutant possibilities.
Potassium chloride: It’s expensive and not as widely used as a deicer because of rising costs of fertilizer. This works best when temperatures are above 15° F. Because it’s most commonly used as a fertilizer, it’s relatively safe to apply near plants.
Sodium chloride: It’s the most widely available and the cheapest. It doesn’t cause corrosion to concrete, and melts ice best when temperatures are in the 20s. It is the most damaging to plant material. If you use this product, use it sparingly and in small amounts!

Before using any de-icing product, clear away as much snow and ice with a shovel as possible. If heavy snow is predicted, then try to shovel more frequently. Remember, deicing products are not meant to melt all snow and ice, but rather aid you in your removal efforts. If you want to avoid adding chemicals to your landscape, then consider using sand or kitty litter. While they don’t melt snow, they can provide traction in slippery spots. Sand and kitty litter are also safe for pets and plants and can be swept up when the snow melts.


If you do use deicing products near vegetative areas, then
use caution with potential salt build up and consider a soil test in the spring.  If it’s an especially snowy year, you may consider leaching the areas next spring with clean water. Try not to scoop snow laced with deicing products directly on top of plants, especially if they are sensitive. If you have the opportunity, consider planting more salt-tolerant plants near walkways and driveways. Here's a great publication on plant tolerance to salts.

For more information about sustainable gardening, contact your local University of Idaho Extension Office. 

Monday, November 28, 2022

Indoor Herbs for Holiday Meals!

Do you love using fresh herbs in your culinary creations? Consider growing your herbs insideyour home where you can snip a fresh branch while you are cooking your meals! 

For an indoor culinary garden consider growing garlic, chives, basil, oregano, parsley, sage, rosemary or thyme. If you want to grow a tea garden you may want to plant spearmint, peppermint, lemon balm, lemon verbena, chamomile or catnip. It's not too late to start from seeds.

Be sure to choose a container that provides good drainage, and fill with one or more of your favorite herbs. Light is very important so place your herb garden in a sunny location that receives at least half a day of sun. New information about indoor lighting has made it easier for the home gardeners. For grow lights, those labeled "cool white" work well. "Warm white" and "Daylight" may also work. Lamps tailored to a plant's needs are also available. Be to water regularly. After the threat of frost passes, you can place your garden outdoors and enjoy fresh herbs all year round.

For more information on herb gardening in Idaho, the University of Idaho Extension provides this excellent resource: Idaho Green Thumb How-To's.

Monday, November 21, 2022

Your Christmas Tree - Before & After

A few tips for a great holiday celebration around your beautifully decorated tree. 

Maintaining a high moisture level in the tree is the single most important factor in reducing needle loss and keeping the tree fresh. This is accomplished primarily through the use of water-holding stands and keeping the water level in the stand above the base of the tree. 
  • Use a tree stand with an adequate water-holding capacity. A tree stand should have a water basin that provides 1 quart of water per inch of stem diameter. For most Christmas trees, the stand should hold at least 1 gallon of water. A cut tree will absorb a surprising amount of water, particularly during the first week, so replenish the water daily. Check the stand daily to ensure the water level does not go below the base of the tree.
  • The tree stand should fit your tree. The ring must be large enough for the trunk of your tree to go through the hole. You don't want your tree flling over. Avoid whittling down the sides of the trunk to fit a stand. The outer layers of wood are the most efficient in taking up water and should not be removed.
  • Cutting off a disk of wood about ¼" thick from the base of the trunk is all that is necessary before putting the tree in the stand. Make the cut perpendicular to the stem axis. Don't cut the trunk at an angle, or into a V-shape, which makes it more difficult to hold the tree in the stand and reduces the amount of water available to the tree. If the tree has been cut within the past 12 hours, it will not be necessary to recut the trunk. If the tree is to be stored for more than a couple of days before display, place its trunk in water and store it in a cool, protected area such as an unheated garage.
  • Keep displayed trees away from sources of heat (fireplaces, heaters, heat vents, and direct sunlight). Lowering the room temperature will slow the drying process. Newer LED Christmas lights generate less heat. Always turn lights off when the tree is unattended. Displaying trees in water with the proper care is much more effective in reducing fire hazards than spraying trees with fire retardants. 
  • The temperature of the water used to fill the stand is not important and does not affect water uptake. Drilling a hole in the base of the trunk does not improve water uptake.
  • Additives, such as floral preservatives, commercial tree preservatives, molasses, sugar, bleach, soft drinks, aspirin, honey, and other concoctions in the water is not necessary. Clean water is best to maintain freshness.
  • Monitor your tree for dryness. Run your fingers across the needles to determine whether they are dry and brittle. If the needles break easily or fall off in your hand, the tree is dry and should be removed. 
Christmas trees can be useful even after they are taken down. Trees can be placed in the yard to add greenery, treats, stringed cranberries, and act as a bird haven until spring.

Wednesday, November 16, 2022

Become a Master Gardener? Yes!

Idaho Master Gardener was created in 1976 in Ada and Canyon Counties. There are Master Gardener Volunteer programs in Idaho in 44 counties offered by University of Idaho Extension. Individuals provide volunteer gardening services to communities while earning relevant skills and experience. As a large part of their responsibilities, master gardeners serve as educators who offer gardening information from a scientific perspective to the public via a variety of avenues ranging from email correspondence, phone calls, info booths, site visits, & social media.

And have fun while learning!
Becoming a Master Gardener gives you the hands-on chance to learn:
• soils
• basic botany
• disease diagnosis
• insects
• weed ID & management
• lawn care
• landscape shrubs & trees
• vegetables, herbs & fruits & flowers
Master Gardeners strive to ensure that the information they provide is:
Reliable: our gardening advice and education is research-based.
Relevant: our gardening advice can be customized to accommodate individual gardening
situations.
Reachable: folks can call us on the phone, email us a question, or visit with us at Extension
offices, markets, gardens in our community and on social media.

Complete your application today! 

To become an Idaho Master Gardener (IMG) Volunteer, you must complete the following: 
1. Apply to and be accepted into Canyon CountyIMG Program by the deadline of December 16th.
    a. The application process includes a background check and reference         inquiries, with volunteer service in the Canyon County IMG Program by the end of the program year.
    b. Payment is due at the time of submitting the IMG Application. ($150 for 2022) Scholarships are available

2. Course work: Satisfactorily complete the IMG training course with 95% minimum class attendance and complete of ALL exams and assignments. 
3. Volunteer Service: Continue the learning experience with 40 hours minimum
4. Record and report volunteer hours. (minimal 40 hours) 
Join us for a great group experience and fun activities while helping community! 

To see what we're all about - Follow us here 👉

Facebook @2CMasterGardeners   

 Instagram @2cMasterGardener

Twitter @2cUIHort

Monday, October 24, 2022

Time to Put Your Garden to Bed for the Winter

"Every gardener knows that under the cloak of winter lies a miracle ... a seed waiting to sprout, a bulb opening to the light, a bud straining to unfurl.  And the anticipation nurtures our dream."  -  Barbara Winkler

Some of you, at the end of the gardening season, are so ready to be done and put your tools away.  However, placing your garden to rest for the winter is planting the best seed for success in the next year.  Help your garden thrive, not just survive, with these few tips to get ready for next spring...  

Clean Up – Continually clean up the debris as it dies. Old vines and stems provide places for insects and diseases to hide.  Throw away plants that are suspect for bugs and disease to avoid passing them on to the next season.  Designate an area for a compost pile if you don’t already have one.  Add what you can to the compost pile or till back into the soil.  

Soil Testing – This is a great time to get your soil analyzed because if you find out now that your soil needs amended, you can apply it in the fall so that it has all winter to work its way into the soil.  

Cultivation – Cultivating the soil disturbs the life cycles of overwintering insect pests by exposing them to sun, birds, and freezing temperatures.  Fall tilling helps keep soil loose and will make it easier to work in the spring.  Leave the soil rough so it takes the full brunt of winter freezing, thawing, wetting, and drying.  Winter’s freezes and thaws will assist in breaking up large clods. This weathering process will also allow the organic amendments to keep the soil open for winter moisture to percolate down more deeply.  
Crimson Clover Cover Crop

Cover Crop – In some areas of your garden you might consider planting a cover crop.  They improve soil fertility, structure, water retention, and suppress annual winter weeds.  

Leaves – Rake fallen leaves into areas of the garden that do not have a cover crop.  Leaves can be used as a mulch in vegetable gardens, flower beds, and around shrubs and trees.  Leaves rot very quickly and you will be surprised how many you can work into your soil.  Leaf mulch encourages beneficial earthworms, soil microbes, and overwintering bumblebees..  They are also a great compost addition. 
Tools – Clean up your tools before storing them.  A wire brush can help get the dirt off and oil can maintain the metal parts to keep from rusting.  

Garden Journaling – Keep adding notes to your journal so you can keep track of your successes or what you could have done better, what you might want to try again or simply remove from the list. 


Tend your crops in your coldframes - carrots, lettuce, spinach, etc. Easy Peasy! 

Now relax, close your eyes, dream about spring, and await those seed and gardening catalogs! 

Saturday, October 15, 2022

Is this true...Chrysanthemums don't help Pollinators?

I read this on the internet and wondered "Is this True?"  I do love the Autumn Asters in my yard and the constant buzzing of pollinators around them - I, also, have several chrysanthemums planted that come back every year and when area nurseries bring out new colors, I'm so temped. So let's talk...
Some main points:
  • Pollination is the process that takes place when pollen is moved between flowers for successful seed and food production and ensures that a plant or tree will produce mature fruit and a viable set of seeds that are capable of germination. What do birds and bees have to do with this? Birds, domestic honeybees, butterflies, and other insects and animals are responsible for the moving of the pollen among the flowers. Without the pollinators, there is no plant growth.
  • Pollinators prefer some flowers over others, a concept known as Pollinator Syndromes. For example, because a butterfly has a long, slender mouth part (proboscis), they prefer flowers that are long and tube-like, also think hummingbirds. Some flies, on the other hand, have short, round mouth parts much like a sponge. For these pollinators and most bees, a wide-open flower is preferred. Or, for other pollinators, like moths, a flower that is open at night is preferred because that is when moths are active.
  • My primary goal is to create a backyard ecology that promotes all pollinators - bees, birds, mammals, reptiles, insects - with plants that sustain them - whether native or non-native throughout the flowering seasons. 
One of my go-to resources is Nature's Best Hope: A New Approach to Conservation That Starts in Your Yard by Douglas W. Tallamy. He believes that "every homeowner can turn their yards into conservation corridors" that promote diversity with native plants as well as other cultivars that contribute to the food web. 

Some cultivars have been removed from evolutionary history with insects; humans have bred cultivars in labs and greenhouses to meet our aesthetic preferences. And sometimes, by selecting for traits that we deem impressive, like double or triple petals, we inadvertently produce plants that broadcast false advertising and eliminate access. Recent work has demonstrated how cultivars—even ones that look quite visually similar—can vary dramatically in the abundance and diversity of insects that they are able to support, so it’s important to choose carefully. References from Tufts Pollinator Initiative article are in the link below.
Echinacea choices - Tufts Pollinator Iniative
While cultivars are great for people, they are not always great for pollinators. According to Tufts Pollinator Initiative, native plants and their pollinators share a long evolutionary history, and many flowers have evolved particular traits that signal honest advertisements of a high quality food resources. For instance, the smell and color of wild geranium tell a bee that nectar and pollen awaits and the dark lines on the petals help them to quickly locate their meal. 
However, some pollinators are "generalists" that will feed on a variety of nectars and pollens.That explains why you'll see bees, butterflies and other insects flying around such non-natives as butterfly bush, catmint, lavender, sedum, salvia, Russian sage, mints, lantana, pentas, daisies, alyssum and zinnias. See Cornell Cooperative Extension list for more.

Although pollinators prefer natives, says Tallamy, "If their mouthparts work, they don't care if it's native or non-native."

My new favorite bush 
Caryopteris 'Blue Mist'
Potted greenhouse mums that we see everywhere this time of year are not bred for their pollen, nectar, or accessibility to pollinators. Most are bred to have multiple petals which reduce accessibility to pollinators. Some good features about these mums is that they are bushy and provide cover for a variety of  predators and parasites that naturally keep plant pests under control. 
Try an old fashioned Mum instead...or Autumn Asters...or Autumn Sedum!

Monday, October 3, 2022

Seed Saving 101: Saving seeds for yourself and others

Have you wanted to start saving seeds from your favorite plants? Seed saving is easier than you think. All it takes is a little time to gather and then the space to process and store the seeds. Follow the links throughout the the text to learn more as we progress through this short introductory article.

For starters we are going to use the ever tasteful and all time favorite, tomato, as our introductory example.
Items you will need, a pint jar with its ring and a piece of paper towel large enough to cover the top, sharp knife, spoon, fork and cutting board. Later items needed, paper towel for drying, labeling paper and an envelope to store your dry seeds.

First you will need to decide which tomato on the vine you want to save seeds from. Make sure everyone at home knows which ones they are. Let it continue to grow till it is just past ripe before you cut it off of the vine. Put it on the cutting board and cut it in half, scooping out the insides where the seed are. You can eat the rest, just sans seeds.

Put these seeds in the pint jar and fill it with water till it is half to two thirds full. Using the fork, mash/puree the seed mixture in the jar till it is all separated. Swirl the jar to see if all of the mix is even. Put the paper towel over the top and fasten in place with the ring. Let the jar sit on your kitchen counter where you can watch it and swirl it at least once a day for the first two to three days. Let it sit then till it develops a fuzzy moldy looking top. Now comes the fun part. Add a little more water and swirl, then let sit for a minute or so, so the heavy viable seeds settle to the bottom. You can use the fork to lift out and dispose of the slime off of the top. Add water again and swirl and let sit, then pour off the top mixture leaving the seeds on the bottom. You may have to do this several times till all you have left is clear water and seeds on the bottom. Pour off the water and dump the seeds on your drying towel.

Remember to label and date these right from the start, especially if you have more than one batch going at the same time.


Now, let's take a quick look at how to save seeds from a few types of peppers. Bell , Jalapeno, Poblano and Anaheim Peppers will be featured as the example. Here again, you want to pick the pepper that you like and want to grow again next year. Cut the pepper open so you can remove the seeds. Put the seeds on a paper towel to dry. Make sure you label your seeds. When they are dry, usually in a couple weeks, soak them in water for a day or so. The seeds that sink to the bottom are your most viable seeds, these are the ones you want to save.
You can save seeds from all of your favorite plants, with a little extra research and reading.
There you go, you are saving seeds from your garden that are suited to the micro-climate of your garden. When you do this again next year with your favorite plants and on and on, this is called Landrace seed saving and planting. If you have extra seeds, share with your friends or join a local Seed Bank.

This book is a good resource material book on how to save seeds and plant them.

Other resources are your local U of I county Extension office, the local library, your favorite bookstore and your favorite online shop.

Happy Seed Saving and Gardening. 

Wednesday, September 28, 2022

The Fall Vegetable Garden

Four Season Harvest - E Coleman
You can extend your garden growing season by using some of these practiced techniques. With the help of row covers, fall and winter crops can be harvested well into the winter and early spring. Cold tolerant varieties are planted in late summer or early fall, primarily in low tunnels, for harvest throughout the winter. This requires learning the correct planting window times for your location. It is important to keep records by writing them down in your Garden Journal, determine what works best, and make improvements. Timing is important when planting. Eliot Coleman refers to the winter "Persephone period” when with less than 10 hours of daylight plant growth essentially stops. For the best fall and winter harvest, plants should reach 75% of their maturity by the Persephone period. This winter period starts on November 6th and ends on February 3rd in the Treasure Valley.
Row Covers Row covers or low tunnels are essentially small greenhouses. Plastic irrigation tubing is used to make arches and clear plastic sheeting is pulled tight at either end and buried on one side. The other side is held down with long boards and used to access and harvest the plants inside. These covers are placed over the winter hardy plants in October and vented on warm days. When daytime temperatures remain below freezing they are kept tightly closed and only harvested on the warmest sunny days. Snow can make them inaccessible at times, but the plants inside remain well insulated and protected. When the temperatures warm enough to melt the snow, the carrots, lettuce, spinach, onions and other greens will not only be eatable, but will begin to grow again. When daytime temperatures are above freezing the cover is removed and only pulled back over on freezing nights. Watch a great video on how to install row covers!
Succession Planting
A continuous harvest is insured through succession planting, which allows for crops to mature at different times, provide a longer harvest period, and create a buffer if winter temperatures arrive unusually early or late. Well-timed, staggered plantings create a smooth transition from one harvest to the next for a steady supply through the winter. Cold hardy crops are planted outside in late summer, then a movable row cover or low tunnel is placed over them when temperatures drop below freezing. After the winter crops are harvested, open spaces can be reseeded with cold tolerant crops for an early spring harvest. Whenever a crop is harvested or grows beyond its prime it is removed, the soil is amended and new seeds are planted. All salad and Asia greens grow so rapidly that it is necessary to have sweet tender leaves. Overwintered crops protected by a row cover can be uncovered by the middle of March. These protected crops of Spinach, lettuce, leeks, and onions will begin to grow with the increased daylight and warmer days, but still tolerate nighttime freezing. The row cover can now be used to warm and protect a new planting of carrots, beets and lettuce. Crop rotation aids in not exhausting the soil, and pests and diseases overwintering in the soil and infecting the new crop. An example would be to follow early lettuce with beans, peas, or carrots. It should be three to four years before the same crop is returned back to the same plot in your garden.
Here's a link for Idaho: Vegetable Planting Calendar.
Garden crops
Garlic Allium sativum Garlic is an essential ingredient in most savory dishes, and is another flavorful plant that can be used at any stage of growth. In Asia, young green garlic is common and has a mild fresh flavor. Garlic is planted in October to allow for the roots to establish before winter. The garlic beds are then covered with straw or a row cover, which is removed in spring. It is related to both onions, leeks, shallots, and chives. When considering a location, it is important to also note that Garlic does not do well where Brassica family crops grew the year before. When the green tops begin to die back the garlic bulbs are loosened and pulled. They must be allowed to cure out of direct sun, with good air flow.
Leeks Allium porrum Leeks are an important part of my year-around garden. They are an essential ingredient in winter and spring soup. Leeks are a long season crop and are started early from seed inside, then transplanted out into composted deep holes for long blanched white stems. For a winter harvest they can be protected by row covers and harvested well into the spring. If leeks remain after winter and they begin to go to seed, the flower stem can be removed and sautéed with butter, then the root will form a white bulb in early summer. These “leek bulbs” are wonderful in stews and roasted. Early leeks can be planted in succession and harvested into summer.
Spinach Spinacia oleracea Spinach is a hardy green that can be harvested almost all winter. It will germinate and grow at temperature just above freezing. Fall planted spinach can be overwintered under row covers and harvested right up until hard freezes. October plantings will overwinter very small and begin growing in the early spring for a fresh new crop when the winter harvest has depleted. Spring planting can start as early as January and continue through April for an almost uninterrupted harvest. During the heat of summer Spinach goes to seed rapidly and other greens can be consumed until it cools and the fall crop begins. 
 
Radish Raphanus sativus Radishes are traditionally the first crop harvested from a spring garden and one of the last late into the fall. Because they are related to the Brassica family they should not precede or follow them in the same location. Radishes grow quickly in cool moist conditions. They are a fast crop and can be planted in small open space throughout the garden every 2-3 weeks. 
Lettuce Lactuca sativa Lettuce is an essential crop in my garden rotation. Succession planting of cool season lettuces in the fall provides salads well into December and the new growth begins again at the end of January under the protection of row covers. Lettuce requires high soil fertility and consistent moisture at planting. In the heat of the summer it can be helpful to cover newly planted lettuce seed with a board to keep them cool and moist until germination. Be sure to check them daily and remove the board when the first seedlings are spotted. Plantings at two week intervals to replace other crops removed has been the best way I have found to insure a consistent lettuce harvest. Any excess lettuce provides a much loved treat for chickens.
Tatsoi Brassica rapa var. narinosa Tatsoi is an Asian green that forms a compact, thick rosette and has a long harvest period. It is both heat and cold tolerant and is excellent both in salads and stir-fries. Succession plant beginning in spring at 2-3 week intervals for a continuous harvest. They should be harvested before bolting for a less bitter flavor. Control flea beetles and other pests with a floating row cover. 

Carrot Daucus carota Carrots planted the first of August can be left in the ground with row covers for protection and harvested all winter. The cold-soil storage enhances the sweetness and flavor as they remain in the ground. New spring sowing can be made in December for an early May harvest.
These carrots were in hoop house and pulled mid February.
Onions Allium cepa Fresh onion all growing season is attained by planting a combination of seeds and transplants. January sown ‘Copra’ seeds will be transplanted into well composted soil where lettuce has been grown previously and provide the main harvest of storage onions. Fall planted overwintering ‘Walla Walla Sweet’ onions protected by a row cover provide green onions during the spring through thinning, and will produce an early large bulb in June.
Beet Beta vulgaris From beet green at thinning time to baby beets, and fall storage beets are a widely available and flexible root crop. Beets do best in a neutral pH soil with a generous amount of organic matter. Beets can be sown under row covers in January for an early spring harvest, all the way to August for a fall harvest. They should be thinned to 2 inches apart and the thinnings can be added to a salad. 

Wonderful Bounty Throughout the Winter!!!

Monday, September 19, 2022

Growing Garlic - Misses & Hits!

The first time I planned garlic was in the spring of 2018 and thought I had to harvest in the fall.  However, when fall arrived, and I pulled up my first garlic plant, there was nothing there. Let me tell you about three major mistakes in planting garlic the first time.
1. Planted in the spring
2. Pulled the plant out of the ground
3. Didn’t read any instructions on planting and harvesting garlic

Garlic (Allium sativum) is a member of the onion (Amaryllidaceae) family and is classified in the same genus to which onion, leek, chive and shallot belongs. Evidence exists that garlic originated from Allium longiscuspis, since it does not appear in the wild as a species itself. The mutation that resulted in garlic probably occurred somewhere in central Asia. Most scholars agree that garlic has been used as a medicinal plant and food source for over 7000 years. The latter makes garlic one of the most ancient of vegetables. According to Bilijana Petrovska, “for nearly as long as there has been a written record of history, garlic has been mentioned as a food.”.

Garlic may generally be divided into two subspecies: ophioscorodon (hardneck or topset garlic) and sativum (softneck or artichoke garlic). Hardneck garlic produces elongated flower stalks (technically called scapes) and bulbils at the top of the stalk. Softneck garlic does not produce bulbils, except in times of stress.

Hardneck garlic may be purple, purple striped, or white and is represented by varieties such as Roja, German Red, Valencia, Continental, and Creole. Creole garlic, a late variety covered with a deep purple skin.
Softneck garlic is also referred to as Silverskin, artichoke, or Italian garlic. Softneck types are best represented by the varieties California Early and California Late. Silverskin garlic may also be differentiated into many-cloved or few-cloved varieties, and may also be tan, all white, or purple tinged. 

Elephant garlic (Allium ampeloprasum) is not true garlic but a type of leek that produces very large cloves (often only 3 or 4 per bulb). Several small bulblets may also develop. Its flavor is milder than garlic and can be slightly bitter.

Garlic can be planted late in the fall, after other tasks are finished. The cloves will produce roots and minimal shoot growth before going dormant late in the season. Growth resumes in the spring and the bulbs develop, called bulbing, in mid-summer. Fall planted garlic plants are more mature and will form a larger bulb while spring plantings of cloves will result in smaller heads of garlic.

Ideally, the first garlic leaves should emerge above the ground prior to freezing temperatures in the fall. Planting too early can result in more above-ground growth that will be vulnerable to winter damage. Do not plant store-bought garlic from the grocery store produce aisle. It may have been treated to prevent sprouting—good for shelf life, but bad for planting. Select the healthiest bulbs for replanting. Since garlic is propagated asexually (without flower or seed) selecting propagation stock with ideal characteristics will maintain those characteristics from year to year.

Garlic are generally pest-free, or the pests found are well-tolerated by the plant. Scout or observe the garlic planting regularly for any plant injury and make control decisions based on the pests found in the planting. Some of the more common pest problems include:
Insect Management
Thrips are insects that suck juices from the leaves, causing damage. Thrips injury will cause the garlic leaves to turn a silver color with patchy, dry spots. Typically, this damage will not reduce the quality of the garlic bulbs.
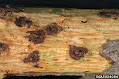
Bulb maggot is a fly larva that feeds on the developing bulbs. It is rarely a significant pest of garlic. Soils high in organic matter can encourage maggots. Crop rotation will help control bulb maggot.

Disease Management
Bloat nematode can be a major problem if introduced to the garlic planting. These microscopic worms feed inside the heads causing swollen or misshapen heads and cloves. Once nematodes get into the soil, they cannot be controlled without significant treatment.

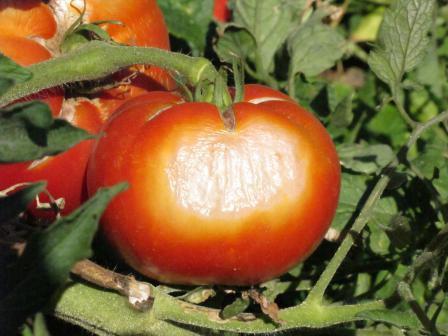
Bulb rot will be a problem in wet years or in poorly drained soil.

When the lower leaves begin to yellow, the garlic is ready for harvest. The leaves are connected to the garlic bulb wrappers below. Waiting until leaves turn brown will result in rotted or missing wrappers. Also, as the bulbs mature, they may dry and split, leading to shorter storage life or bulb rot.

Garlic should be cured or dried prior to storing it for later use. Start by brushing off any soil remnants clinging to the bulbs. Do not wash them off or get the bulbs wet. Leave the stalks and roots on the bulbs while they dry.

Allow the bulbs to cure for 3 to 4 weeks in either a well-ventilated room or a dry, shady spot outside. Sunlight can change the flavor of fresh garlic.

Once the tops and roots have dried, you can cut them off, if desired, or leave them on and braid the garlic into bundles of four to six plants. You can also further clean the bulbs by removing the outer skins. Just be careful not to expose any of the cloves.


For more information check out these sites:


Tuesday, August 30, 2022

If You Can't Beat 'Em, Eat 'Em - Purslane

Weeds are the bane of every gardener, but did you know that many are edible and very healthy? The common weed known as Purslane (Portaluca oleracea) is one of those. It is pretty much guaranteed that this plant is somewhere in your landscape and it is a power plant in more ways than one.

Purslane is an opportunistic plant and grows in nearly every country in the world. It has been cultivated for over 4000 years both for food and for its medicinal qualities. It is easily identified by its prostrate habit and succulent-like leaves that resemble those of a miniature Jade plant; about fingernail sized. The stems are reddish and radiate from a central point. The side stems can also root, so there may be several radians in the same plant. The taste is described as slightly tart, salty, and similar to spinach or watercress. Believe it or not, it has been found to have more beneficial nutrients than most vegetables! It is described as a "superfood" and one of the most nutritious foods on the planet.

There are some great ways to use this superfood in your kitchen. The leaves and stems are edible and can be prepared in many ways, both raw and cooked. But remember, as with all vegetables you eat, ensure that the product is clean and free from pesticides or herbicides. Give this “weed” a place on your table at least once and try it. Remember, if you can’t beat ‘em, eat ‘em! Especially when they are so good for you! 
While an internet search will yield many recipes, following are a couple I have prepared and enjoyed.

https://brooklynsupper.com/purslane-with-grilled-corn-red-onions-and-a-creamy-avocado-dressing/


https://adanmedrano.com/verdolaga-purslane-best-cooked-greens/