Thursday, March 30, 2023

Billbug Cause Major Damage to Lawns (Turf) in the Treasure Valley

Billbugs are small, snouted beetles that belong to the family Curculionidae and are considered to be major pests to lawns in the Treasure Valley. These pests are known for causing significant damage to turf grass and lawns, leading to unsightly brown patches and reduced aesthetic appeal. In this blog, we will discuss what billbugs are, their impact on turf grass, and how to control them using integrated pest management (IPM) methods.

What Are Billbugs?
Billbugs are cylindrical beetles that range in size from 3 to 10 millimeters in length, depending upon life stage. As adults, they have a hard exoskeleton and are usually brown or black in color. Their snout, which is often longer than their body, is used for boring into plant stems. Billbugs undergo a complete metamorphosis, passing through the egg, larval, pupal, and adult stages, with a one-year life cycle (Oregon State University Extension, 2018). The majority of damage from billbugs occurs during the larval stage, as they feed on stems, rhizomes, and crowns, typically just below the soil surface. Damage from billbugs is typically visible in late June or early July each year.

In the Treasure Valley of Idaho, billbugs are particularly abundant in lawns, parks, and golf courses. They feed on the stems and roots of turf grass, causing significant damage to the plant's ability to absorb water and nutrients. This feeding can lead to large areas of grass dying, creating unsightly brown patches that are not only aesthetically unpleasing but also difficult to repair (Idaho State University Extension, 2017).

Impact of Billbugs
The impact of billbugs on turf grass can be significant. In addition to the unsightly brown patches, Billbugs can reduce the health of the grass, leading to reduced aesthetic appeal and causing economic losses for lawn owners (Idaho State University Extension, 2017).

Integrated Pest Management (IPM)
Integrated pest management (IPM) is a comprehensive approach to managing billbug infestations that involves multiple control methods
. This strategy utilizes cultural, biological, and chemical control methods to promote the health of the turf and prevent billbug damage. Cultural control methods involve selecting the proper grass varieties that exhibit resistance to billbug feeding. Several cultivars of Kentucky bluegrass, such as ‘Park’, ‘Arista’, and ‘NuDwarf’, have been proven to exhibit resistance to billbug feeding. Additionally, endophyte-enhanced ryegrasses and fescues display high resistance to billbug feeding (University of Utah). IPM of Billbugs also includes implementing proper irrigation, fertilization, and mowing practices to maintain healthy turf. Biological control methods may involve releasing beneficial insects that feed on billbugs to control their population. Several nonchemical bio-pesticides exist, including purchasing and applying predatory nematodes (Stinernema & Heterorhabditis spp.), as well as a fungal organism (Beauveria bassiana) that are listed and registered for control of billbug larvae in lawns. When necessary, insecticides can be used to control billbugs, but should be used with caution to avoid harming beneficial insects and creating insecticide-resistant billbug populations (The University of Idaho Extension, 2017). 
Properly implemented IPM practices can effectively manage billbugs and maintain healthy turf.

Thursday, March 23, 2023

Early Spring Lawn Care

Spring is here! The days are getting warmer and longer. We look out at our lawn coming out of a long winter that has not been fed for a while. Its color is off and we think: if I hit it with lots of water, dump some fertilizer on it that will fix it. But wait… there are a few things to consider about feeding and watering your lawn before you start.

C:\Users\jbbow\AppData\Local\Microsoft\Windows\INetCache\Content.MSO\A278CA17.tmpWhen to Fertilize
A program that applies fertilizer four times a year, using the holidays of Easter, Memorial Day, Halloween and Thanksgiving as a guide is desirable. An application of a quick release formula, where the nitrogen is quickly available to the plants, is best in the spring and slow release formulas, where the release of nitrogen is slower can be used for the rest of the applications.  It is better if the late fall application is slow release so the nutrients are released into the soil during the winter to help with lawn recovery in the spring.
Image result for lawn fertilizerWhat Type of Fertilizer
The ratio of nutrients on any plant food is represented by Nitrogen- Phosphorus- Potassium (N-P-K) in numbers. The numbers state the amount of each. For instance, a 10-10-10 is a balanced food with equal parts nitrogen, phosphorus and potassium. A fourth number would represent Sulfur (S).
Nitrogen promotes foliar growth and color. Phosphorus is useful in encouraging flower and root growth. Potassium in lawns enhances the plant’s ability to use nitrogen.
Lawns in southern Idaho can be fertilized by following one of two strategies: soil testing or nutrient ratios. In one, fertilizer rates for the lawn are based on a laboratory analysis of a soil sample. The other is based on the fact that lawns do best when fertilized with a fertilizer having a 3:1:2: ratio of N, P, K.  Spring applications can use a ratio where the phosphorus ratio is higher to promote root growth.                                 
Watering
Water deeply and less often to promote deep roots. Apply between 1”-1 1/2” of water weekly, depending on weather conditions, soil type, and landscape terrain (slopes, etc.). Soil should be moistened to a depth of about six inches. To test sprinkler output, place empty tuna fish cans or cat food tins along the water arc to see how long it takes your sprinkler to put down this amount of water. Output is greater the farthest point from the sprinkler head. (You can allow the cans to fill 1/4” or 1/2” and multiple accordingly.) One application a week may be all that is necessary, or you can divide the time into two or three applications per week. Also, take into consideration the areas where sprinklers overlap an area, and that sprinkler output varies. During hot weather, increase the water to 2” per week and apply more frequently if necessary. Visual clues that the lawn needs watering are when the grass begins to take on a blue-green color or has lost its spring, leaving an imprint behind when walked upon.
Aeration
Core aeration opens up avenues for water and fertilizer to reach down to the root zone, thus stimulating the activity of soil microorganisms and increasing root development. Lawns that have not been aerated before or those that get heavy foot traffic may benefit by aerating twice per year, once in the spring and again in the fall for the first two or three years, then drop back to once per year. On lawns that are regularly core aerated once per year in the spring is enough. Do not rake up plugs afterwards, these are topsoil and will decompose naturally, mow over them and they will soon disappear. An application of no more than a ¼” of compost after spring aeration is beneficial for all lawns.
Thatch
Image result for lawnThatch is not caused by leaving grass clippings on the lawn, as is commonly believed. It is an accumulation of dead and partly decomposed leaves, stems and roots above the soil surface but below the green leaves. Up to 1/2 inch of thatch is beneficial, acting as natural mulch, insulating the soil, reducing water evaporation and soil compaction, and increasing the lawns spring and wear tolerance.
Too much thatch serves as a barrier preventing air and moisture from moving into the root zone of the plants, causing the turf to dry out much too rapidly. This provides a haven for insects and disease. If thatch is over 1/2 inch, power raking in early spring is advised. Power raking every year is not necessary and may actually damage the lawn.
Giving your lawn an application of a slow release fertilizer in the fall will give your lawn a jump-start in the spring.

Thursday, March 16, 2023

Pruning Correctly and Other Ways to Avoid Bitter Pit in Apples

Bitter Pit
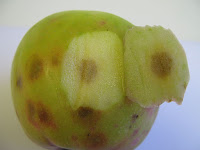
Imagine going out to harvest your apples only to find that all of your hard work has resulted in apples covered with brown sunken lesions on the skin, and brown spongy tissue below the skin surface. What caused this? Likely it was the result of a disorder called Bitter Pit!

Bitter pit can affect many apple varieties. The Granny Smith, Jonathan, Honeycrisp, Northern Spy, Gravenstein, Cortland, Fuji, Crispin, Empire, Ida Redd, and Baldwin are a few of the susceptible varieties. Rome Beauty, Winesap, Mackintosh, and Gala are all less susceptible varieties.

There are several things that can cause Bitter Pit, and a few different ways you can avoid or treat them.
  • Avoid wide fluctuations in soil moisture. Trees that have received too much or too little water are more prone to Bitter Pit. Mulch around the tree with a low nitrogen material to help retain moisture.
  • Do not over fertilize. Excessive nitrogen or potassium seem to coincide with Bitter Pit.
  • Do not over prune in the spring. Over pruning causes vigorous shoot growth. These shoots compete for calcium and it may result in Bitter Pit.
  • Do not over thin in the spring. Large apples from small crops seem to be more prone to Bitter Pit.
  • Late harvested fruit is prone to Bitter Pit. It can also develop if the fruit has been stored for a long time. Consider using the fruit quickly if bitter pit has been a problem in the past.
  • Calcium sprays should be applied carefully and according to packaging directions if none of the above methods works.
With a little extra effort and care you can avoid the dreaded Bitter Pit. It doesn’t take much effort and before you know it you will be harvesting the apple crop you always dreamed of.
Note: Bitter Pit can resemble damage caused by Stink Bugs. To learn more about Bitter Pit click here.

Thursday, March 9, 2023

Growing Shamrocks for St. Patrick's Day

Shamrocks have long been a symbol of Ireland and have even been considered a symbol of good luck. They are popular houseplants and fun gifts for friends and neighbors on St. Patrick’s Day. Shamrocks are easy to grow indoors if you follow these simple and easy to remember steps:

Light
Shamrocks prefer bright, indirect sunlight, be sure to place your plant in a window where it will receive plenty of light. Shamrocks will flower, even during winter, if they receive enough light. Each night the plant's leaflets fold up, then reopen in sunlight the following day.

Food
Shamrocks like food! Fertilize them regularly with either a liquid houseplant or a time-release fertilizer during their growing season. As always, we recommend following label instructions.

Soil
As a houseplant, they prefer moist soil. Avoid allowing your shamrock to dry out during the growing season.

Temperature
Give your shamrock a growing temperature between 50 and 70 °F during the growing season. They can be placed outside after danger of frost has passed and are a beautiful addition to your pots or in a grouping of pots.

Dormancy
Shamrocks have a dormant period. When your shamrock goes dormant, usually in late summer, don’t fret! Just place it in a cool, dry location out of direct sunlight for 2-3 months. The purple-leaf types only need one month of dormancy.

Since your shamrock grows from small bulbs, it is easy to divide and create new plants. Here's a short video showing how to propagate shamrocks.


Happy St. Paddy's Day to you!