Friday, August 25, 2023

Jelly, Jam, Preserves, and Marmalade

Fresh, spreadable fruit in the form of jam, jelly, preserves, or marmalade, might possibly be summer's sweetest reward. The best part is that they are easy to make and can be enjoyed long after you put your garden to bed. So, what is the difference between each of these spreadable options? 

Before we dive in, it helps to know that there are two main factors that turn fruit into a thick, spreadable texture: heat (from cooking) and pectin. When fruit is heated, it will lose liquid, causing the fruit to reduce to a firmer state. Pectin is naturally-occurring in fruit and happens to also make fruit thicken when cooked. However, not all fruit contains enough pectin to reach a firm texture, so many spreadable fruit recipes call for additional pectin.

Jelly:
Jelly is the firmest and clearest of the sweet, spreadable options. The fruit is cooked and strained so only the juice ends up in the final product. Jelly is so firm that you could turn the jar over and slide the jelly out in one solid piece.

Jam:
Jam is a chunkier version of jelly. Jam has more fruit pieces and is slightly looser in texture. Chopped or pureed fruit is cooked with sugar, so pieces of fruit end up in the final product. Jams are not clear and not solid like their jelly cousin.

Preserves:
Preserves are like jam but contain more and bigger pieces of fruit. Preserves have the least gel-like consistency. They are great for serving with cheeses and meat dishes.

Marmalade:
Marmalade is a preserve, but it is made only with citrus. The whole fruit, rind and all, create a bitter-sweet spreadable delight. Lemon, orange, and grapefruit make great marmalades. Marmalades are aromatic with complex flavors and oils from the citrus peels.

Jam, jelly, preserves, and marmalade start out almost the same, but take different forms depending on how they are processed. Whether you like your fruit a spreadable solid, with small pieces of fruit, with large pieces of fruit, or you want the complex flavors of citrus, there is always something good you can choose to put on your toast.

Monday, August 21, 2023

Roasted Tomato Sauce Preservation the EASY Way!

 It’s that wonderful time of year, when we are beyond the scorching hot days of our summer and we’ve settled into the 90s. This is also the time when tomatoes come on with a fury! If you’ve planted many varieties, as so many of us do, then it’s almost a sprint to keep up with the daily harvest. As an advanced Master Gardener and advanced Master Food Safety Advisor with the University of Idaho Extension program, I’m always looking for the quick and easy way to use what comes from my garden.

I’ve grown it. Now…what? Many years ago, I made and water bath canned my own tomato sauce. It was a lot of work. Since then, I’ve procured the mother of all freezers and now, what I would have canned years ago, I freeze. This way, I have the fresh taste of my garden, all year round. And, the bonus is, I know exactly what goes into what I freeze.

Making and freezing the sauce begins as soon as I have enough tomatoes for a batch. You can use any variety and any size of tomato. I’ll wash, core and quarter the big ones. The Sun Sugar cherry tomatoes, (that I’m so fond of) go into this procedure, whole.

I have peeled garlic, olive oil, salt and pepper at hand. Often, I’ll tuck basil leaves under the tomatoes, if my plan is to make the base for a drop-dead-delicious marinara sauce.

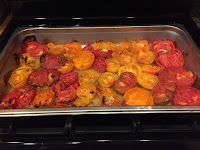
red/yellow tomatoes in roasting panI’ll use a small pan, if I have a smaller batch. I’ll save energy and roast the tomatoes in my toaster oven. Conversely, I’ll use a large restaurant size pan when roasting in my larger, convection oven.
Once I’ve filled the pan with tomatoes, garlic and (sometimes) basil, I drizzle a very conservative amount of olive oil on top. This year, I’ll use a pump atomizer to coat the ingredients with oil, I think it will be more effective and cut down on the amount of oil used. If you use fresh basil, tuck it under the tomatoes, as it can tend to burn during the roasting process.

I pop the entire pan into a preheated, 400° oven and set a timer for 20-minutes. I use this time to revel in the glory of the smells that come from the oven…even opening a window to entice neighbors. I will also tidy my work space during the roasting time. After 20 minutes, I check for signs of roasting. Look for small char marks on the tomatoes and garlic. Check for tenderness in the tomatoes.

mesh sieve with red tomato pureeNow, I’m in the home stretch! After removing the pan from the oven and letting it cool to touch, I’ll put the contents of it in my blender. I whiz it until it’s pureed.
The next step is not entirely necessary. But, I do it to achieve a velvety smooth consistency. I pour the mixture through a wider gauge strainer to catch any seed or skins that didn’t get blended. This step really does kick it up a notch in terms of quality. Because the skin stayed on the tomatoes during the entire process, there are still plenty of vitamins in the sauce.
I put my sauce in freezer-safe containers with ½ inch head space (for possible freezing expansion), and I label EXACTLY what I added to the mix. This way, I know if I’ll use the sauce for stews, chili, Italian or Mexican recipes. Plus, nothing goes in my freezer without a date. Try to use the sauce within a year’s time.  
The quality of the sauce really holds up with this procedure. The other night, I made homemade pizza. The container I thawed (from my 2016 harvest) was a bit thin for pizza sauce. I simply put the contents in a saucepan and added a small amount of cornstarch. In minutes, I had thick, delicious homemade pizza sauce. The results were delectable!

Friday, August 11, 2023

Rush Skeletonweed, an Idaho Noxious Weed

A weed is considered “noxious” when it is harmful to the environment or animals. According to Idaho's Noxious Weeds booklet, Rush skeletonweed (Chondrilla juncea) is one of the 69 plants designated as a noxious weed by Idaho’s Department of Agriculture. Equipped with knowledge, together we can help curb the spread of this harmful plant in Idaho.

What is Rush skeletonweed?
Rush skeletonweed is an invasive, non-native, long-lived biennial or perennial that is very persistent, taking years for established colonies to be eradicated.  It is not toxic, being palatable for most livestock, especially sheep and goats (only goats will eat the wiry stems). These stems are so tough that they can interfere with harvesting equipment, making them a bane for farmers raising grain crops. In the West, it is estimated that over 6 million acres are infested with Rush skeletonweed, and those numbers are likely to continue to grow.

Rush skeletonweed germinates or re-sprouts in the fall and early spring as a rosette (looking very similar to young dandelions), actively growing through the spring and early summer.  All the while it is establishing a formidable root system that can be 7’ deep with many side shoots, which can form future rosettes. In early summer, as the stem develops the leaves of the rosettes begin to die back. If it is allowed to progress to this point, it cannot be killed chemically.

The small bright yellow flowers produce ripe seeds, without fertilization, in a few days.  These seeds can then be dispersed by the wind miles away. An established, vigorous plant can produce an average of 20,000 seeds each year.

Rush skeletonweed prefers well-drained, rocky, or sandy-textured soils in climates that are cold in winter, warm in summer, and wet early in the year. Areas that have been disturbed, such as roadsides, empty urban lots, burn scars, logging sites, cultivated fields, droughty areas, and areas that have been overgrazed, seem to be favorable sites. South and central Idaho is currently the epicenter of the infestation, with wheat-growing regions and rangelands being particularly hard hit
.
How can we mitigate this noxious weed?
First, it helps to know that eradicating Rush skeletonweed is a long-term project (possibly seven years or longer), so be patient.

Spraying rosettes with herbicides both in fall and winter is preferable, and spring treatment is also effective. Unfortunately, 2,4-D, and a round-up type product won’t do the job.

Hand pulling is effective if done when seedlings are less than 5 weeks old.  Once the roots have developed, mark the spot, and return periodically to re-dig because  2 or more roots will likely re-grow in the same spot. This method is preferred in your vegetable garden or other areas where you cannot use chemicals.

As mentioned above, grazing is effective, but must be continuous or you will end up with more rosettes or more flowering stems. 
Controlling and eradicating Rush skeletonweed is a very serious issue. If you have it on your property, take proactive measures to ensure it does not flourish and spread.

Friday, August 4, 2023

Let my kids help in the garden? Why not?

Share your love and passion for gardening with your kids by bringing them into the garden to discover the pleasure of growing food. Gardening may be the solution for parents struggling to find ways to encourage their kids to eat a healthy and balanced diet. Allowing your child to pick fresh produce from your garden will increase their desire to eat fresh vegetables. Tomatoes warm from the sun are delicious. My son loved green onions and once harvested and ate an entire row! Fresh peas are so delicious.
 
Give them a small piece of ground that is their own, along with gardening tools and gloves. Provide instruction on how to plant seeds and plants. Show them the flowers, bugs, worms, and growing plants. Let them dig a hole and plant something!

Show your child the difference between weeds and plants, pull and cultivate weeds, water, fertilize and care for their plants. Don’t forget to show them the importance of bugs in the ecology of gardening. Observe the bees and teach them about making honey and pollination of plants.

Kids who participated in gardening projects scored higher in science achievement than those who did not. Seeing a garden grow may spark your kids to ask questions like: Why do the plants need sun? How does the plant “drink” water? Why are worms good for the plants? Why are spiders needed in the garden? The questions your kids will ask will provide plenty of subjects for discussion.