Showing posts with label 2C master gardeners. Show all posts

Sunday, July 27, 2025

Know How to Grow - Become a 2C Master Gardener!

Have you ever been elbow deep in dirt and wondered why or what is happening to your plant? Do you wish you knew more about your soil and how to make your plants happier? Are you looking for research-based information that will allow you to reduce pesticide use and help work together with beneficial bugs? If you said yes to any of the above, YOU ARE NOT ALONE! 

Become an Idaho Master Gardener in Canyon County - learn the art and science of horticulture! Our series of classes provide you with a variety of ways to improve your gardening skills...and share your passion and knowledge with others. Do you want to connect with other gardeners in your community? Then you will not want to miss this opportunity! 

Classroom learning
The Idaho Master Gardener program consists of TWO phases:
  
Phase One: This 50 hours of classroom training provides a stress-free, engaging learning environment. Fresh coffee, water, and tea at each session is also a great perk! Maybe even food...

Phase Two: After the classroom training, you will complete 30 hours of practicum education via volunteer service. 

Hands-on field trips
2cTurf & Team site visit
You will also have the opportunity to choose from focus areas in which you would like to complete your hands-on experiences with various teams: Tree & Turf, Integrated Pest Management, Junior Master Gardener, Outreach, Plant Sale, and Social Media. Teams build comradery and skills. FUN, too!
Start Date: University of Idaho Extension, Canyon County (Caldwell, ID) Idaho Student Master Gardener classes start September 10, 2025 and run through April 15, 2026.  Classes are held on every other Wednesday morning from 8:30am-12pm at the University of Idaho Research & Extension Center, 1904 E. Chicago Street, Caldwell, Idaho 83605.  

Cost: The cost for the 2026 Canyon County Master Gardener program is $280 to be paid by 8/29/2025 (scholarships and payment plans are available).  This cost includes a handbook, a soil test, several hands-on labs, field trips, a background check, a Master Gardener t-shirt and a name badge at the end of the course.

Application Deadline: The deadline to apply for the Canyon County Idaho Master Gardener program is August 15, 2025Get your spot early as space is limited in class.  We at the U of I Extension want everyone to be comfortable and safe while learning about horticulture. We offer in-person classes (while spots are available).  Complete your application today!

IPM Scouting Walk
The Idaho Master Gardener program is NOT a gardening class, rather a VOLUNTEER and DEVELOPMENT PROGRAM.  The University of Idaho Master Gardener Volunteer Program serves as an educational and volunteer organization. All course participants must be willing and able to contribute 30 hours of practicum volunteer service prior to September 30, 2026, to complete certification. There will be plenty of time and lots of opportunities to complete your hours. We look forward to having you join our team.
Helping people grow is what we do. 

Apply here πŸ‘‰https://forms.office.com/r/E84saNVKKatext or https://bit.ly/2025-26_MGapplication.

Call us today πŸ‘‰  (208) 459-6003 

Follow us here πŸ‘‰

Facebook @2CMasterGardeners   

 Instagram @2cMasterGardeners 

Friday, July 11, 2025

Protect your plants from Powdery Mildew

Figure 1: PM on Tomato

 Powdery mildew is a fungal disease that affects a wide variety of plants. The affected plants have a dusted-with-flour appearance with white to gray powdery spots on the surface of leaves and fruits (Fig 1). It causes cosmetic damage, and defoliation and decreases the quantity and quality of fruit (Fig. 2).

Disease and Development 
There are many different species of (Powdery Mildew) fungi. Most species only attack specific plants in the same or closely related plant families.

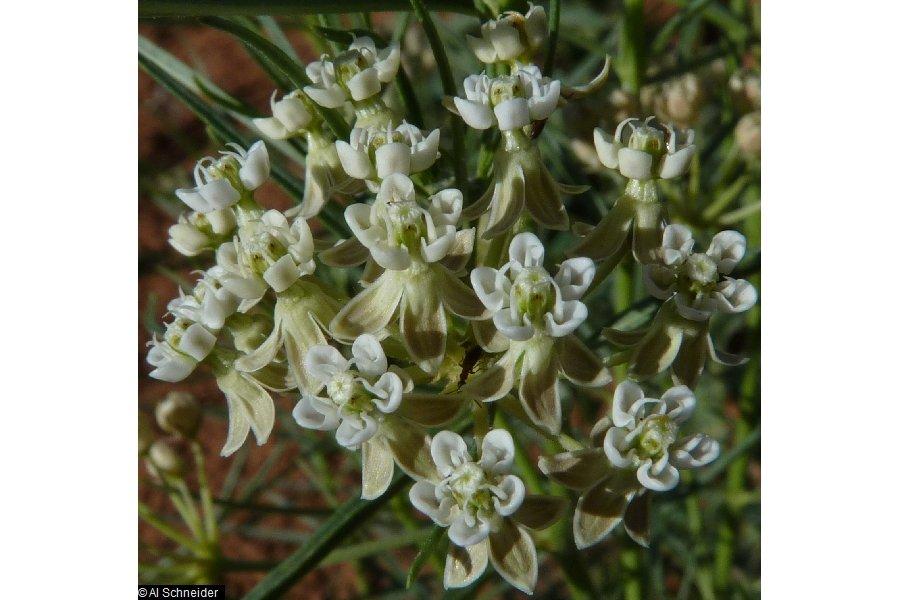
Figure 3: PM on roses
For example, powdery mildew on roses does not spread to grapes.

Powdery Mildew fungi overwinter in buds, twigs, bark, and plant debris. Their spores are carried by wind to new hosts. Low relative humidity during the day favors spore dispersal.

Fig 2: PM on grapes
The optimum conditions for spores to germinate are temperatures between 68 to 77°F and high relative humidity (> 70%). Powdery Mildew spores can germinate in the absence of water and can infect in arid conditions (40% humidity). Water on plant surfaces can kill or inhibit germination. Spores and fungal growth are sensitive to extreme heat (above 90°F) and direct sunlight. Shady conditions are favorable for PM development.

Management
The disease triangle is a useful tool to understand and manage diseases like Powdery Mildew (Fig. 3). The severity of Powdery Mildew infections is a function of the presence of the pathogen, the host susceptibility, and the environment. Powdery Mildew can be managed by good cultural practices.   

Fig 3: The Disease Triangle
The best control is to plant only resistant species or cultivars. Avoid excess fertilizer since plants with abundant succulent tissues are more susceptible to infection. The fungi can be eliminated by removing and burning all infected plant tissues and debris. Tools must be disinfected after use.

Another good control method is making environmental conditions less favorable for the disease. Avoid dense canopies by proper plant spacing and pruning to provide good air circulation, reduce humidity and increase sunlight penetration. Plants should not be planted in poorly drained soils or shady damp areas.

Overhead watering of the leaves during the day and when humidity is low can reduce infection. Water washes spores off the plant and inhibits its germination. This control method is not recommended for vegetables since it may contribute to other pest problems.

Powdery Mildew seldom needs chemical control in residential plantings, but it may be warranted in commercial plantings of susceptible crops like grapes and cucurbits. Chemicals are most effective when combined with cultural control. They should be applied before the disease symptoms appear. Further spread may be stopped or slowed with chemical treatment. Materials like horticultural oil or neem oils have a low environmental impact. Apply every 7 to 14 days throughout the season. Do not apply to drought-stress plants when the air temperature is above 85° nor within 2 weeks of a sulfur spray. Wettable sulfur is very effective in preventing infection. Like oil application, it should not be applied when the air temperature is over 90° nor within 2 weeks of an oil application.

Sunday, June 1, 2025

Blueberries in Idaho - it's work...and worth it!

 Craving fresh blueberries? It is possible to grow them here in Idaho.
 
Here's how:

  • Blueberries are compact flowering bushes that bear round bluish fruit.
  • They require full sun and only like moist acidic soil. Soils in Southwestern Idaho are commonly alkaline, so you must  use an acidic planting mix. 
  • They can be planted in a landscape with amended soil or also successfully grown in a container. 
Pruning, Maintenance and Fertilizer
Blueberries require little pruning; however, maintenance is required in terms of fertilization and sulfur. You’ll need to be patient.  For the first year you’ll need to strip off all the blossoms so the plant can use its energy to grow strong healthy canes for increased production. 

If planting in a container, you’ll need to monitor water closely because pots dry out quickly. Blueberries like moist well drained soil but not soggy conditions.  Mulching will help keep the soil moist and limit the growth of weeds.  After the first 2 springs, you’ll want to prune off older canes to encourage new growth and fertilize with an alkalizing fertilizer (21-0-0)

Which variety to choose?
There are many recommended cultivars which will grow in Idaho.
Depending on bloom time,
hardiness and height, make your choice from two different cultivars to insure pollination.
Whether you chose to grow a Northern Highbush, Southern Highbush, Rabbiteye, Lowbush
or Half-High, your plant will produce more and larger berries when cross pollinated.
There is still time to get your blueberry plants from your favorite local nursery

Quick tips and things you'll need:
Acid Loving Potting Mix
Soil Sulfur
Ammonium Sulfate 
Acid Plant Fertilizer
Bird Netting (the birds like blueberries as much as humans)
Plant in full sun
Protect with bird netting
Choose two different cultivars for cross pollination
Replace native Idaho soil with acid loving planting mix
Fertilize with 21-0-0
Fertilize with soil sulfur
Remove blossoms 1st year and additional canes 1st two springs
    Blueberry Syrup Recipe
    2 cups fresh blueberries                            
    ¼ cup raw stevia or equivalent                                  
    ½ cup water                                             
    2 teaspoons cornstarch
    1 teaspoon lemon juice
    1 tablespoon creme de cassis (optional)
    Place Blueberries in a sauce pan on the stove.  Mix water and cornstarch together until dissolved add to blueberries.  Cook over medium heat until berries start to pop.  Use the back of a spoon to mash the berries and boil 1 minute.  Add the stevia, lemon juice and CrΓ¨me de Cassis.  Store unused portion in refrigerator for up to about a week.  This sauce can also be added to plain yogurt or ice cream. 

    Friday, February 21, 2025

    Vertical Gardening: Grow Up, Not Out

    If you’ve ever felt limited by a small yard or patio but want to grow your own plants, vertical gardening is the perfect solution. Utilizing vertical space instead of ground space, a vertical garden allows you to grow flowers, fruits, and vegetables in a compact and efficient way. Also known as green walls, living walls, or eco walls, vertical gardens are now even being used in farming for crops like lettuce, tomatoes, and strawberries. With all the advantages of vertical gardening, why grow out when you can grow up? 

    Vertical gardens can thrive in a variety of settings. Whether you have a sunny balcony, a shaded patio, or a compact backyard, there’s a setup that will work for you. Some great places for a vertical garden include decks, porches, patios, small backyards, and even indoor living spaces with proper lighting.

    Choosing Your Containers and Structures
    A vertical garden can be built using many different materials, making it a fun and customizable project. Stacking containers are ideal for strawberries and herbs, while pallets work well for growing lettuce, herbs, and small flowers. Trellis fencing is a great choice for supporting squash, cucumbers, and baby butternut squash. Tripods or teepee shapes are perfect for supporting peas and beans. Upcycled materials, such as old fencing, blank walls, and repurposed containers, can be transformed into a unique and sustainable vertical garden.

    How to Start Your Vertical Garden

    To begin, choose a suitable container based on the plants you want to grow. Use a high-quality, well-draining soil mix to ensure proper plant growth. Decide whether you want to grow flowers, fruits, vegetables, or a combination of all three. Set up a watering system, such as a timed drip system for efficiency or manual watering for hands-on care. Position plants based on their light requirements to ensure proper growth, and plan for shade by strategically placing taller plants to protect lower-growing ones. Different plants require different fertilization schedules, so be sure to research your choices before applying nutrients.

    Maintaining Your Vertical Garden
    To keep your vertical garden thriving, regular maintenance is key. Fertilize plants as needed to ensure they receive the proper nutrients. Monitor the function of your watering system and adjust it as necessary. Regularly prune and trim plants to keep them healthy and encourage new growth. Train climbing plants by using ties or trellises to guide them upwards. Keep an eye out for pests and take preventive measures to protect your plants. Make sure your plants get enough sunlight and are shielded from strong winds to prevent damage.

    A vertical garden opens endless possibilities for growing a lush, thriving green space in even the smallest areas. With a variety of containers, structures, and plant choices, you can customize your vertical garden to be just right for you. Plus, repurposing materials and containers makes it a sustainable and cost-effective gardening option. At the end of the growing season, you can reuse many of the materials for the next year, making it an investment in both beauty and practicality. So why limit yourself to traditional gardening when you can take your garden to new heights? Start your vertical garden today and enjoy the benefits of growing up, not out!

    Friday, July 26, 2024

    Shade Loving Perennials

    Shade loving perennials are described as a hardy plant that persists for several years in little to no sunlight areas. These plants will grow bigger and bigger every year and some even until you can divide and split them to plant more. Shade loving perennials will take the cold a lot better and won’t need as much water compared to sun loving perennials. These perennials can be planted under trees or along a house where it is cool and moist.


    Ferns have stems, leaves, and roots but do not produce seeds. On the underside of the leaves are spores that contain the genetics needed to grow a new fern. They may be green, yellow, black, brown, orange, or red in color. Ferns are very beautiful, green, and lush plants. They have deep fibrous roots and love wet woodland type areas. Ferns will go dormant in hot, dry weather however will perk back up in the late summer to fall rain.


    Hostas can bring lots of color and texture to your flower bed. They are low growing and clump forming which means they can be divided and planted. They have large leaf coverage, and some varieties even produce flowers that are very pleasing to the eye as well as fragrant. Leaf tips of hostas will become sun scalded and scorched in full sun. They will develop deep, rich colored leaves in cool, dark areas. Leaf lengths can range from inches to feet. Their leaves can also have many well as shapes. Textures include smooth, veined, or kinds of textures as puckered. Shapes include heart shaped, cupped, or lance like. 


    Ferns and hostas will be a great addition to your flower bed. Bringing in a variety of colorful leaves are well as fragrant flowers. It will be very easy to maintain as well since you won’t have to water as much or worry about deadheading as you do most flowers. Another perk is you will save money on having to buy more plants since hostas will multiply and ferns can reproduce with their spores! Other shade perennials [see link for list] include bleeding hearts, hellebores, columbine, coral bells.


    Friday, April 12, 2024

    Earthworms for Your Garden

    Have you ever wondered what the best worms are for your garden? There are many benefits to having them, but which ones can give you the most benefits? This article will shed some light on our wriggly little garden friends and help you understand their benefits.

    In North America, we have about 180 species of earthworms, and approximately 4,000 species worldwide. They play a critical role in breaking down and decomposing plants and other organic material in our yard, garden, and compost pile. In their wake, they also leave nutrient-dense waste (called “castings”) which is second to none when it comes to improving your soil.

    Earthworms can be divided into three groups, each having unique characteristics. Anecic worms play an important role in soil formation and leaf decomposition by pulling leaves into their deep vertical permanent burros. These are also known as nightcrawlers. Endogeic worms build lateral burrows in the soil and have little effect on the surface as they are the only worms that prefer to eat large amounts of soil rich in organic material. They also play a role in the aeration and decomposition of dead plant roots. Epigeic worms, which include the common red wiggler, live on top of the soil eating rotting organic matter, and have a high rate of reproduction. They are also commonly used in vermicomposting systems.

    As much as we love earthworms, some problems can arise in their presence. The biggest complaint that homeowners have is that they create lumpy surfaces in grass and other areas that people prefer to keep level (see photo to the left). On a worldwide level, humans can create issues when we introduce worm species to new places and create an imbalance in the local ecosystems. But, generally speaking, the benefits of native earthworms far outweigh their inconveniences.

    What are the main benefits to earthworms? To start, worm castings contain concentrated humus and may contain 5 times more nitrogen, 7 times more phosphorus, and 1000 times more beneficial bacteria than the original soil that helps plants thrive. Worms aid in soil aggregation, creating pores for the movement of air, water, nutrients, and roots. Worms can also eat their body weight in food a day.

    So, what are some ways to attract and keep worms? In general, it is recommended to disturb the soil as little as possible because we have learned that we can disrupt the soil food web, release precious carbon, and more. Tilling also harms our earthworms. Reducing or eliminating tilling is a great start to keeping earthworms in your yard or garden. Additionally, covering the soil with mulch and organic matter on the surface will help feed the worms as well as reduce the need for tilling and weeding.

    Creating a welcoming place for earthworms in your garden, yard, and compost pile has many benefits that you can’t get anywhere else. These little creatures offer big payoffs if you attract and keep them around. Happy worm farming!

    Friday, March 22, 2024

    Adding Milkweed to your Landscape


    There was a time that it was common to see milkweed growing alongside ditch banks in the farming areas of Idaho. As housing developments replaced farm lands the ditch banks disappeared and the use of chemical agents became more common. You may ask, “Who cares?”  If the monarch butterfly could talk to us, you can be sure they would say that they care. Monarch butterfly larvae, or caterpillars, feed exclusively on milkweed leaves. Without the milkweed host plant the larvae are unable to develop into adult butterflies. 

    Members of the community who enjoy the presence of butterflies and understand their value as pollinators also care. Recognizing a fall in the population the U.S.Fish and Wildlife Service applied for endangered species protection for the Monarch butterfly in 2014.

    A large part of the effort to support monarch preservation is providing milkweed plants to replace those that have been lost in the environment. It is important to use milkweed native to the area in which you live. Milkweed creates toxins. Monarch butterflies have used these toxins to their benefit as anti-predator and anti-parasite defense. Milkweed plants that are not native to an area can contain larger amounts of the toxins and create harmful levels for the monarchs.


    Antelope horn milkweed  (Asclepias asperula)  is found in southern Idaho, especially in the Preston area.


    Pallid milkweed (Asclepias cryptoceras) is found on clay or gravelly soils in southwestern Idaho (Owyhees) to Utah.

    Photo ©Luis Stevens


    Narrow-leafed  or Mexican whorled milkweed  (Asclepias fascicularis) is found in Idaho’s western Panhandle. Very weedy.

    Jennifer Anderson, hosted by the
     USDA-NRCS PLANTS Database


    Swamp milkweed (Asclepias incarnata) is common in eastern U.S., also found in Idaho and in Utah.


    Robert Tatina, hosted by the
     USDA-NRCS PLANTS


    Showy milkweed (Asclepias speciosa) is Idaho's most common species. It grows up to 1 meter tall with fragrant flowers in late summer. The corona is in the shape of horns, and contains nectares. Each inflorescence usually grows only one follicle (seed pod).


    Photo ©Al Schneider
    Poison or Horsetail milkweed (Asclepias subverticillatais a weedy species with small white flowers and narrow leaves.

    Seeds for most of these milkweed species can be found from seed vendors on-line. Milkweed seeds are wild seeds. They have evolved to thrive in a natural environment, not your backyard. The seeds  require conditions that mimic environmental conditions to germinate. The LadyBird Johnson Wildflower Center has developed and tested a protocol that results in good germination rates for native milkweed species. The process involves four steps that take 4 to 8 weeks to complete. So start now!

    Recognizing the importance of the monarch butterfly, a partnership of federal and state agencies, non-governmental organizations, and academic programs, The Monarch Joint Venture, has been working to support the goals of North American Monarch Conservation Plan. They provide educational resources to the public about Monarchs and Milkweed.

    MonarchWatch is another resource for the gardener interested in supporting and attracting pollinators. They offer guidelines for gardening methods that support Monarch butterflies and offer Monarch Waystation designation when their guidelines are followed.

    The addition of milkweed to the milkweed to the environment around your home will provide needed host plants for Monarch butterflies. When nectar producing plants are also added your landscape can attract a variety of pollinators. Successful gardening is a partnership. The gardener provides the plants needed by the pollinators to survive and the pollinators give the gardener new seeds to continue the process.

    Friday, December 29, 2023

    Fungus Gnats in Your Indoor Houseplants

    Fungus Gnats can become a problem on potted house plants, especially during the holiday season because we are bringing in flowering plants from nurseries, and big box stores, as well as receiving them as gifts. They are difficult to control because of their tiny size and life cycle.

    Here are some effective ways to treat them:

    Proper Watering
    Let the potting soil dry out between watering. The dry surface is less attractive to females depositing eggs, and if eggs are deposited, they fail to hatch because of lack of moisture. This cultural approach can be very effective.

    Fly Tape or Sticky Traps 
    The gnats are drawn to the yellow color. No need to fall for the trap of buying anything with pheromones either. Simply a yellow sticky trap.

    Biological Control
    Bt is available (Sold under the names Gnatrol, Mosquito Bits) is very effective in controlling the larvae, is not harmful to beneficial insects, and is approved for organic growers. Plus, it is so easy to use! Just sprinkle it on the soil in the pot!  Nematodes are also a natural option.

    In severe infestations, you may consider washing the roots and re-potting your plant in fresh soil, or simply spraying a light application of indoor houseplant insecticide. When you use any insecticide, be sure to read and follow all label instructions! Finish by creating a tent over your plant and secure the bottom with a rubber band. Watch for a couple of weeks to see if there is still activity.  Don't worry about watering because you have created a little greenhouse but keep the plastic from touching the leaves. 

    Contact your local University of Idaho Extension office
     for more information on controlling fungus gnats in your home.

    Saturday, November 4, 2023

    Know How to Grow - Become a Master Gardener!

    Have you ever been elbow deep in dirt and wondered 
    why or what is happening to your plant? Do you wish you knew more about your soil and how to make your plants happier? Are you looking for research-based information that will allow you to reduce pesticide use and help work together with beneficial bugs? If you said yes to any of the above, YOU ARE NOT ALONE! 

    Become an Idaho Master Gardener in Canyon County - learn the art and science of horticulture. Our series of classes provides you with a variety of ways to improve your gardening skills...and share your passion and knowledge with others. Do you want to connect with other gardeners in your community? Then you will not want to miss this opportunity! 

    Classroom learning

    The Idaho Master Gardener program consists of TWO phases:  

    Phase One: This 48 hours of classroom training provides a stress-free, engaging learning environment. Fresh coffee and tea at each session is also a great perk! Maybe even food...

    Phase Two: After the classroom training, you will complete 40 hours of practicum via volunteer educational service. 

    Hands-on field trip
    You will have the opportunity to choose from areas in which you would like to complete your hands-on experiences with various teams: Tree & Turf, Integrated Pest Management, Junior Master Gardener, Outreach, Plant Sale, and Social Media. Teams build comradery and skills. FUN, too!

    Start Date: University of Idaho Extension, Canyon County (Caldwell, ID) Idaho Master Gardener classes start January 10 and run through May 8, 2024.  Classes are held on Wednesday mornings from 9am-12pm at the Canyon County Extension Office, 501 Main Street, Caldwell, Idaho.  

    Cost: The cost for the 2024 Canyon County Master Gardener program is $175 (scholarships and payment plans are available).  This cost includes a handbook (electronic or hard copy), a soil test, several hands-on labs, at least two field trips, a background check, a Master Gardener t-shirt and a name badge at the end of the course.

    Application Deadline: The deadline to apply for the Canyon County Idaho Master Gardener program is December 22, 2023. Get your spot early as space is limited in class.  We at U of I want everyone to be comfortable and safe learning about horticulture. We offer in-person classes (while spots are available). If you need another way to attend, please contact us with any questions. Complete your application today!

    IPM Scouting Walk
    The Idaho Master Gardener program is NOT ONLY a gardening class.  It is VOLUNTEER TRAINING.  The University of Idaho Master Gardener Volunteer Program serves as an educational and volunteer organization. All course participants must be willing and able to contribute 40 hours of practicum volunteer service prior to September 30, 2024, to complete certification. There will be plenty of time and lots of opportunities to complete your hours. We look forward to having you join our team.
    Helping people grow is what we do. 

    Apply here πŸ‘‰ https://bit.ly/2024_ApplicationPacket

    Call us today πŸ‘‰  (208) 459-6003 

    Follow us here πŸ‘‰

    Facebook @2CMasterGardeners   

     Instagram @2cMasterGardeners 


    Twitter  [now
    @2cUIHort

    Friday, July 21, 2023

    Why do we have so many earwigs this year?

    Why do we have so many earwigs this year? Haven't we heard this every year? Well for one thing it has been a wet and slightly warmer spring. These weather conditions have made better than ideal living and growing media for the earwig. They like wet damp hiding places and with a little mulch or loose compost to hide in during the day.

    How to identify good earwigs from bad earwigs.
    They are all the same so to speak. They are opportunistic eaters. They live on dead decaying matter, eat aphids and other small prey and love young growth of certain plants, like Marigolds. This is shown in the picture with all the cans full of earwigs and decimated marigold plants. The shallow cans were placed next to plants that the earwigs thought were the most tasty.
    Simple home remedies can be used to lower the earwigs population.  There are quite a few methods you can use depending on your preference and patience. I prefer a little beer in a small cat food can but there other preparations you can put in the cans. Since they prowl at night, they hide during the day. Place burlap bags, boards, newspapers or other materials on the ground, then daily collect individuals that congregate under the cover and discard.

    Predatory insects help control the earwigs. Believe it or not, there are other insects and animals that prey on the earwigs. Since the earwigs are nocturnal, hungry birds have to hunt them out in their hiding places during the day. Evening birds and amphibians will be able to find them out and about in the duff on their favorite plants. Knowing the life cycle will help you manage earwigs!


    Sunday, June 11, 2023

    Growing Blueberries in Idaho? Yes You Can!

    Beautiful blueberries ready to pick
    Craving fresh blueberries? It is possible to grow them here in Idaho. Here's how:
    Pruning, Maintenance and Fertilizer
    Blueberries require little pruning; however, maintenance is required in terms of fertilization and sulfur. You’ll need to be patient.  
    For the first year you’ll need to strip off all the blossoms so the plant can use its energy to grow strong healthy canes for increased production. 

    If planting in a container, you’ll need to monitor water closely because pots dry out quickly. Blueberries like moist well drained soil but not soggy conditions.  
    Mulching will help keep the soil moist and limit the growth of weeds.  
    After the first 2 springs, you’ll want to prune off older canes to encourage new growth and fertilize with an alkalizing fertilizer (21-0-0)

    Which variety to choose?
    There are many recommended cultivars which will grow in Idaho. Colorado State has
    an excellent description of every one. Depending on bloom time, hardiness and height,
    make your choice from two different cultivars to insure pollination. Whether you chose
    to grow a Northern Highbush, Southern Highbush, Rabbiteye, Lowbush or Half-High,
    your plant will produce more and larger berries when cross pollinated.
    There is still time to get your blueberry plants from your favorite local nursery

    Quick tips and things you'll need:
    Acid Loving Potting Mix
    Soil Sulfur
    Ammonium Sulfate 
    Acid Plant Fertilizer
    Bird Netting (the birds like blueberries as much as humans)
    Plant in full sun
    Protect with bird netting
    Choose two different cultivars for cross pollination
    Replace native Idaho soil with acid loving planting mix
    Fertilize with 21-0-0
    Fertilize with soil sulfur
    Remove blossoms 1st year and additional canes 1st two springs
      BlueBerry Syrup Recipe
      2 cups fresh blueberries                            
      ¼ cup raw stevia or equivalent                                  
      ½ cup water                                             
      2 teaspoons cornstarch
      1 teaspoon lemon juice
      1 tablespoon creme de cassis (optional)
      Place Blueberries in a sauce pan on the stove.  Mix water and cornstarch together until dissolved add to blueberries.  Cook over medium heat until berries start to pop.  Use the back of a spoon to mash the berries and boil 1 minute.  Add the stevia, lemon juice and CrΓ¨me de Cassis.  Store unused portion in refrigerator for up to about a week.  This sauce can also be added to plain yogurt or ice cream.