Showing posts with label Seed Saving. Show all posts

Friday, September 5, 2025

Gardener Guide to Saving Seeds

Saving seeds is sustainable and saves money. It also helps strengthen plants as they adapt to local conditions and it preserves your favorite heirloom varieties. Many gardeners love to share or swap their seeds with other gardeners. In this light, we can learn a lot about seed saving from Small-Scale Market Gardening (SMG), which is all about keeping things sustainable, encouraging variety, space-saving, and sharing among gardeners. This process helps plants become stronger and better suited to their local environment.

How to Save Seeds 
Start by selecting healthy, non-hybrid plants. 
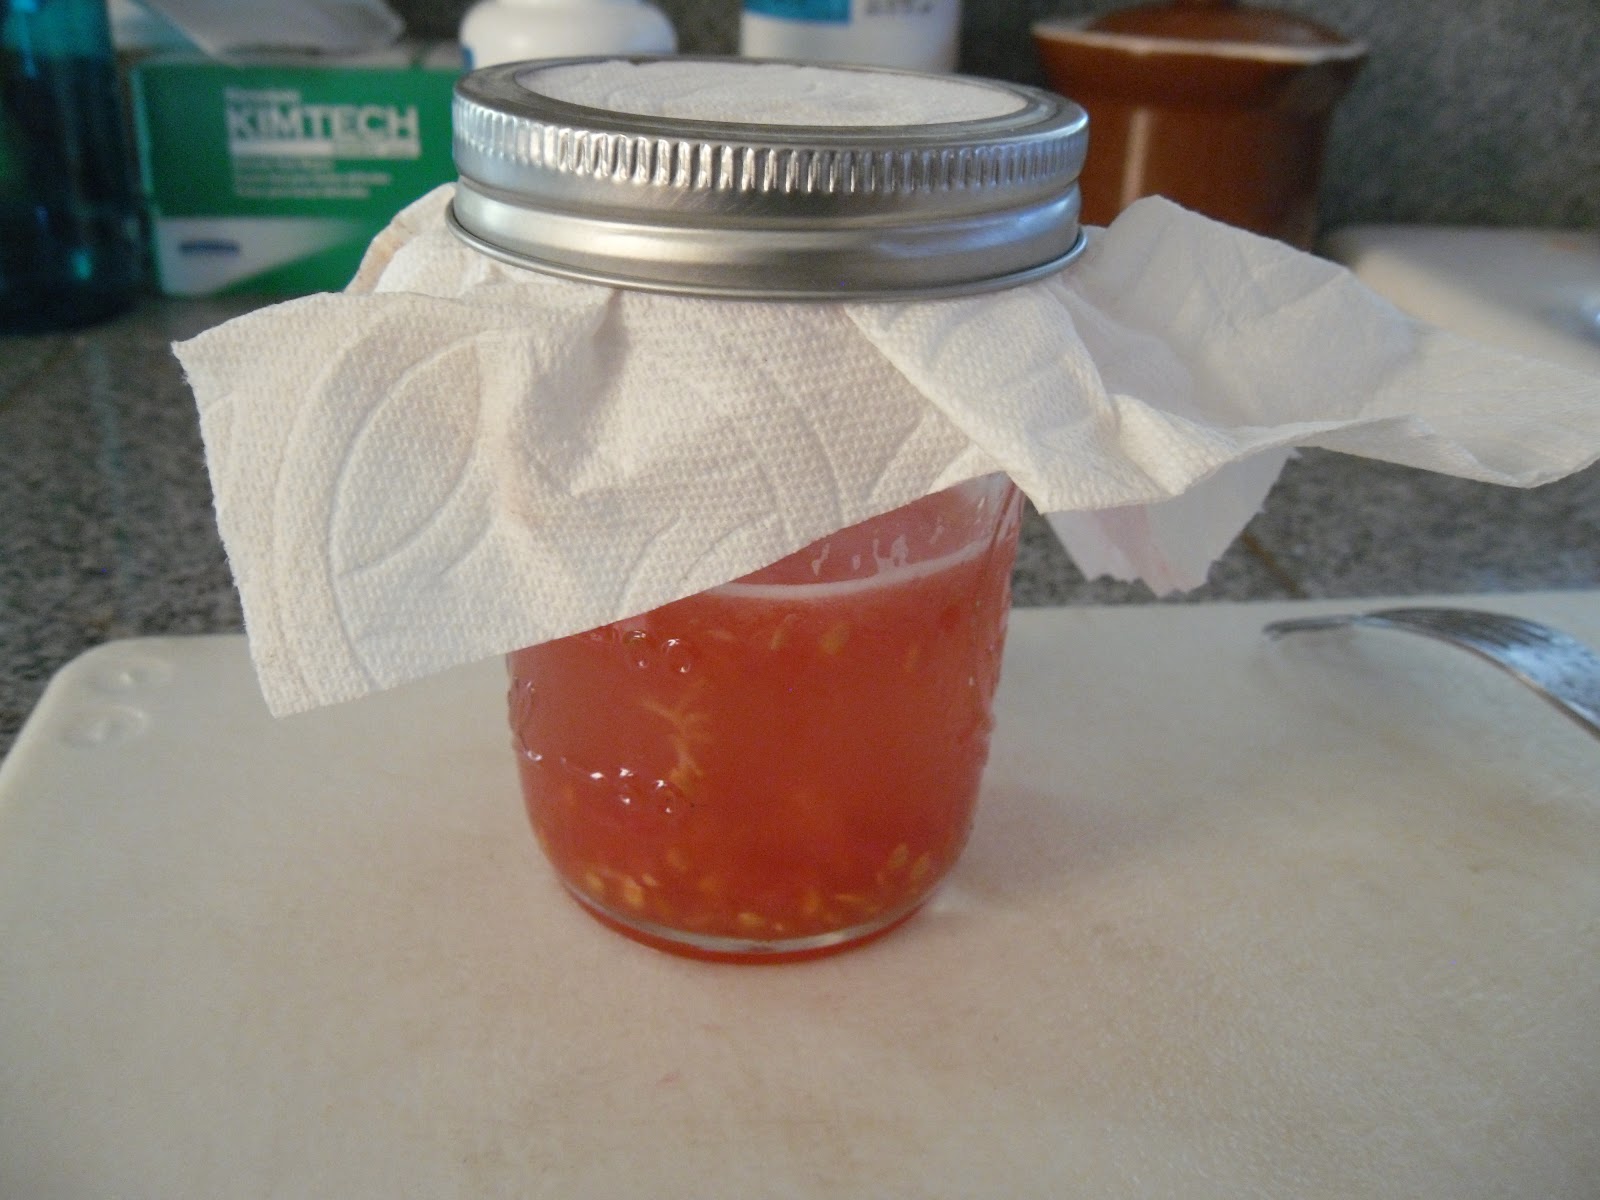
Allow fruits and vegetables to mature fully on the plant before harvesting. Wet seeds, like tomatoes, should be separated from the fruit, rinsed, fermented, and then dried. Fermenting helps remove the gelatinous coating that sometimes inhibits germination. Simply put seeds in water for a few days until a layer of mold forms, which helps break 
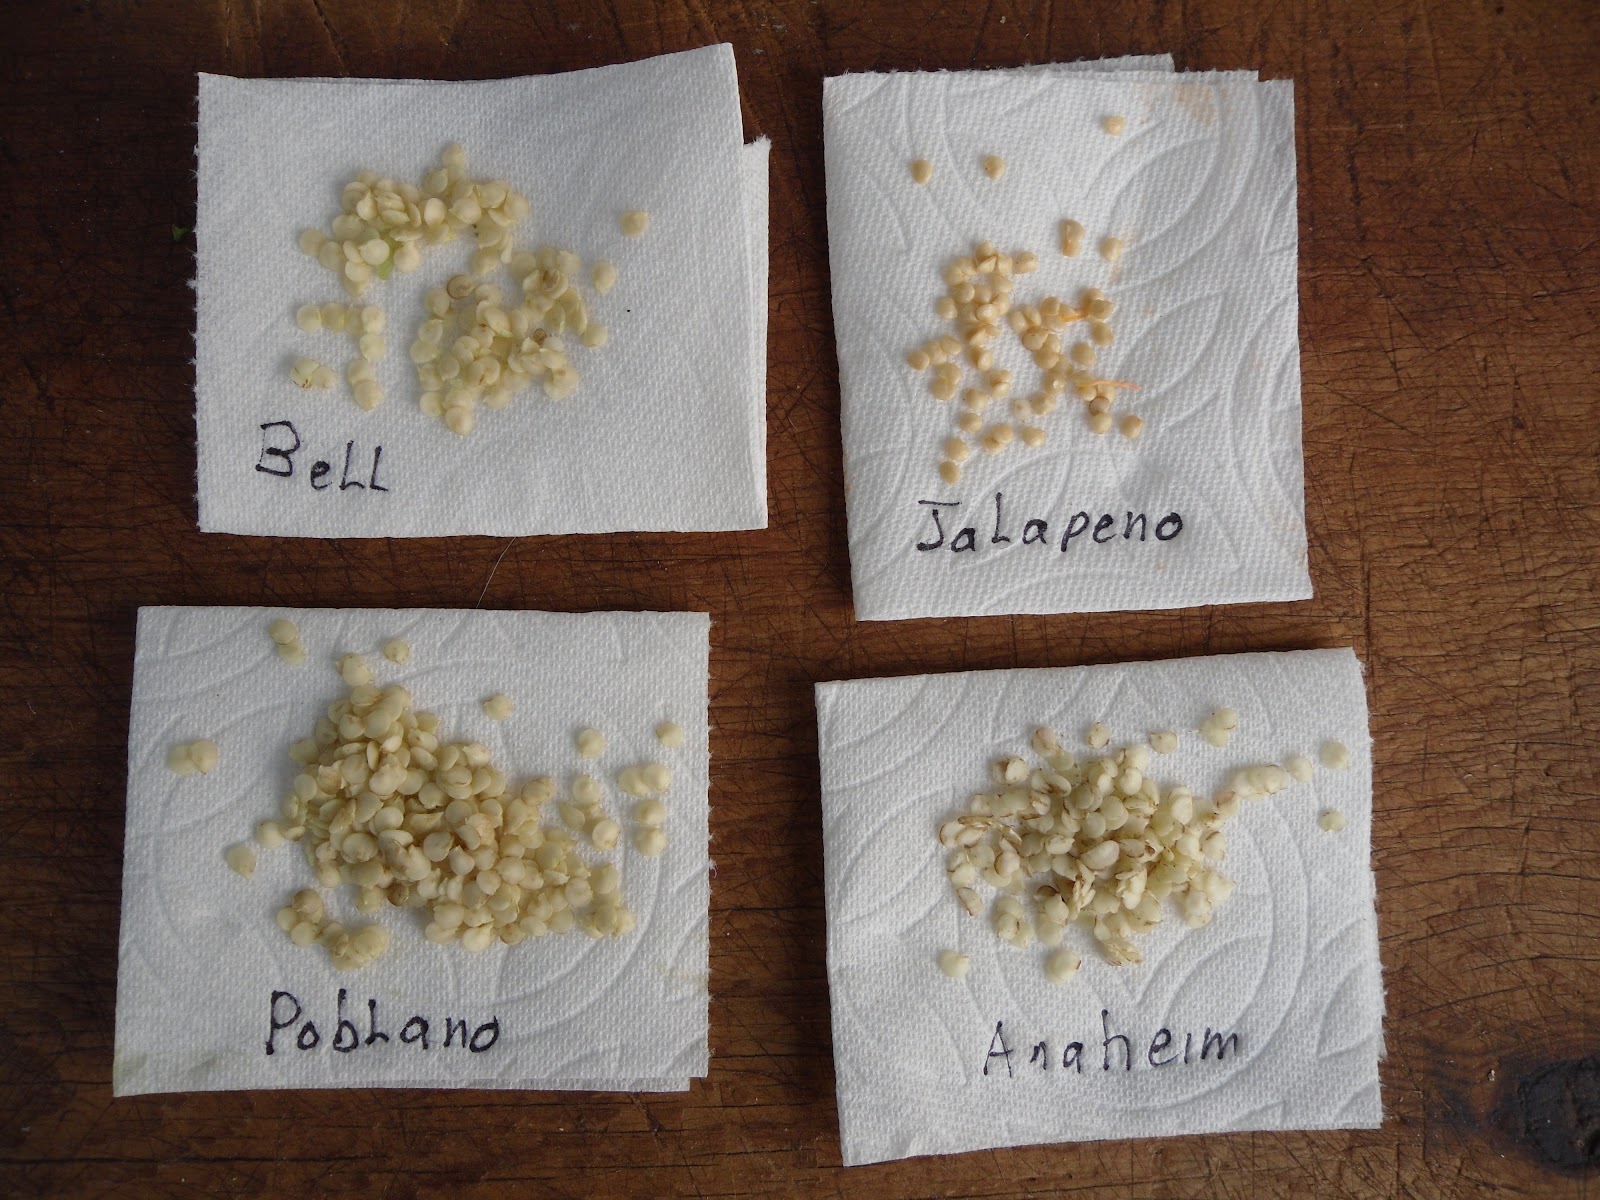
down the coating. After fermentation, rinse the seeds well and dry them. Dry seeds, like beans and lettuce, need to be removed from pods, separated from chaff, and dried. Store dried seeds in labeled envelopes or airtight containers in a cool, dry place to maintain their viability. If you want to be especially crafty, you can use pre-made templates to make your own seed packets!

Concerns About GMO Seeds
Home gardeners sometimes worry about exchanging seed with other gardeners because they don't want GMO contamination. GMOs are not likely to be found in your home garden because no retailer sells genetically engineered seeds to home gardeners. GMO crops are expensive and commercial farmers are required to sign a contract that protects the patented technology. These companies do not sell GM-crops to the home garden market or to garden centers.

The Best Plants for Beginners
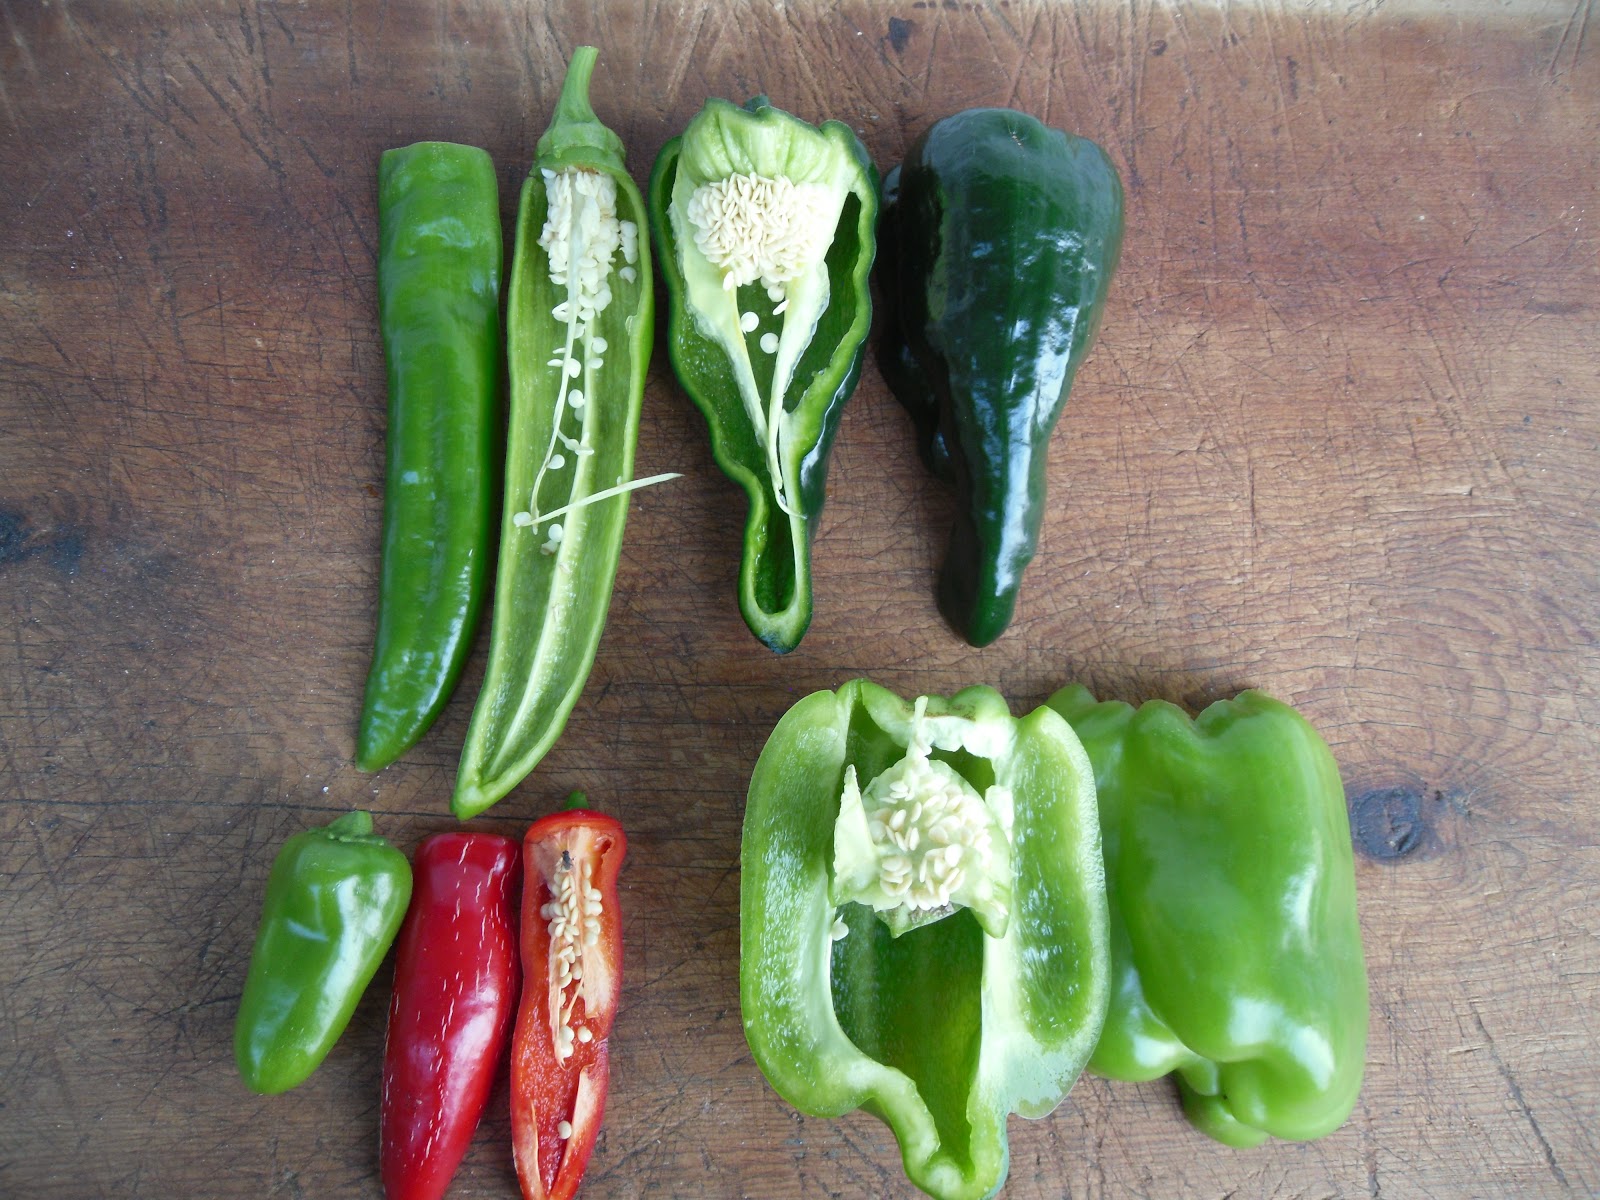
  • Tomatoes & Peppers are self-pollinating and easy to dry.
  • Beans & Peas should be allowed to dry in their pods before you harvest them.
  • Lettuce produces abundant seeds and is easy to grow.

Other Things to Consider
Be sure to prevent cross-pollination
 by isolating certain plants like squash, pumpkins, cucumbers, melons, and corn to maintain pure seed varieties. 

Test germination by sprouting a few seeds before planting. This can be done indoors before the season starts. It is also a good idea to write the date on your seed envelopes and use the freshest seeds first.

By practicing these techniques, you’ll cultivate stronger plants and preserve valuable varieties for the future. Happy seed saving!

Friday, January 31, 2025

Successful Seed Selection, Saving, and Storage

A successful garden starts with a tiny seed, but selection, saving, and storing these seeds correctly can be much more complicated, and oftentimes overwhelming. This guide will introduce the different seed types and explain effective techniques for saving and storing until they are ready to be planted in the soil.

Types of Seeds
When selecting which type of seeds to plant it is important to understand the different methods of producing the seeds. 

GMO (Genetically Modified Organisms) seeds have been genetically engineered to    introduce specific traits, such as pest resistance or herbicide tolerance. While they offer certain advantages, their long-term environmental and health implications are subjects of ongoing debate. GM seeds are not likely to be found in your home garden because no one sells genetically engineered seeds to home gardeners. GMO crops are expensive, and commercial farmers are required to sign a contract that protects the patented technology. These companies do not sell GM crops to the home garden market or to garden centers.
Hybrid seeds are produced by crossing plants of the same species. Hybrid seeds will potentially have the most desirable attributes of each variety, but they will not remain true to the parent line and therefore are not recommended for seed saving.

Open-pollinated seeds are produced through natural pollination by insects, wind, humans or other natural means. Open-pollinated varieties are well-suited for seed saving and offer a wider range of flavors, colors, and adaptations to local conditions.

How to Save Seeds
Once the plants have grown and fully matured, it is time to harvest and save the seeds. Different procedures apply whether you are collecting “wet” or “dry” seeds. 

Plants with wet seeds include tomato, eggplant, cucumber, melon, squash and pumpkin. These seeds need to be harvested when fruit is ripe and then processed to remove wet pulp or coatings. In order to do this, scoop the seeds out of fully ripe fruit and put them in a glass jar filled with water. Stir the mixture a couple of times a day. The mixture will ferment and viable seeds will sink to the bottom. Finally, pour out the liquid, rinse the seeds and set them out to dry. 

Dry seeds are much easier to save, remove any dirt or debris and spread them out to dry completely. Some of the easiest seeds to save are peas, beans, lettuce, tomatoes and arugula. Always remember to harvest from the healthiest plant with the most desired traits.

Storing Seeds

Store seeds in airtight containers in a cool, dark, and dry location 
to prevent moisture and oxygen from entering. Label each container with the seed variety, harvest date, and germination rate. Optimal storage conditions for seeds involve low temperatures (around 40°F or 4°C) and low humidity. Avoid exposing seeds to direct sunlight, as this can reduce their viability. It is a good idea to periodically check stored seeds for signs of mold, pests, or deterioration. 

By carefully selecting seeds, you can cultivate resilient and productive gardens in the Treasure Valley. Saving and storing open-pollinated seeds is a rewarding and useful way to contribute economically and sustainably to maintaining your garden.

Friday, September 8, 2023

Intro to Seed Saving

Do you want to save seeds from this year’s garden? Seed saving is easier than you might think! It just takes a little time to gather the seeds and a little space to process them. Follow the links throughout this introductory article to learn more.

Tomato Seeds
Tomatoes are a popular seed-saving choice and a good place to start. For tomato seeds, you will need a pint sized canning jar (with its ring) and a piece of paper towel large enough to cover the top. You will also want to have a sharp knife, a spoon, a fork, and a cutting board. Finally, you’ll need a  paper towel for drying, labeling paper, and an envelope to store your dry seeds.

The process starts while your tomatoes are still growing on the vine. Choose the tomato that you want to save seeds from and remember no to pick it. It will need to  continue to grow till it is just past its ripened state  before you cut it off the vine. The next steps are to cut it in half, scoop out the insides into the pint jar and add water until it is half to two thirds full. Using the fork, mash/puree the seed mixture in the jar till it is all separated. Swirl the jar to see if the mix is even. Put the paper towel over the top and fasten it in place with the ring. Let the jar sit on your kitchen counter where you can watch it and swirl it at least once a day for the first two to three days. Let it sit then until it develops a fuzzy moldy looking top. Then add a little more water, swirl, and then let it sit for a minute or so, so the heavy viable seeds settle to the bottom. You can use the fork to lift out and dispose of the slime from the top. Add water, swirl, and let it sit again, then pour off the top mixture leaving the seeds on the bottom. You may have to do this several times until clear water and seeds on the bottom are all that remain. Then pour off the water and dump the seeds on your drying towel. Once they are dry, place them in a labeled and dated envelope and store them in a cool, dry place until you’re ready to plant them next season.


Pepper Seeds
Peppers (Bell, Jalapeno, Poblano, Anaheim, etc.) are another popular seed-saving choice. Just as described above, you want to choose the pepper that you like and want to grow again next year. Cut the pepper open so you can remove the seeds. Put the seeds on a paper towel to dry. Make sure you label your seeds. When they are dry, usually in a couple weeks, soak them in water for a day or so. The seeds that sink to the bottom are your most viable seeds, these are the ones you want to save.


Tomatoes and peppers are a great place to start, but you can 
save seeds from all of your favorite plants, with a little research. Seed Sowing and Seed Saving, written by Carole Turner, is a good book on how to save seeds and plant them. Also consider your local University of Idaho County Extension Office, your local library, and your favorite bookstore.
 
The advantage of saving seeds from your garden is that you know they grow well in the microclimate of your garden. You also save money and get the satisfaction of being self-sufficient. Seed-saving year after year is called Landrace seed saving and planting. If you have extra seeds, share with your friends or join a local seed bank. 

Monday, October 3, 2022

Seed Saving 101: Saving seeds for yourself and others

Have you wanted to start saving seeds from your favorite plants? Seed saving is easier than you think. All it takes is a little time to gather and then the space to process and store the seeds. Follow the links throughout the the text to learn more as we progress through this short introductory article.

For starters we are going to use the ever tasteful and all time favorite, tomato, as our introductory example.
Items you will need, a pint jar with its ring and a piece of paper towel large enough to cover the top, sharp knife, spoon, fork and cutting board. Later items needed, paper towel for drying, labeling paper and an envelope to store your dry seeds.

First you will need to decide which tomato on the vine you want to save seeds from. Make sure everyone at home knows which ones they are. Let it continue to grow till it is just past ripe before you cut it off of the vine. Put it on the cutting board and cut it in half, scooping out the insides where the seed are. You can eat the rest, just sans seeds.

Put these seeds in the pint jar and fill it with water till it is half to two thirds full. Using the fork, mash/puree the seed mixture in the jar till it is all separated. Swirl the jar to see if all of the mix is even. Put the paper towel over the top and fasten in place with the ring. Let the jar sit on your kitchen counter where you can watch it and swirl it at least once a day for the first two to three days. Let it sit then till it develops a fuzzy moldy looking top. Now comes the fun part. Add a little more water and swirl, then let sit for a minute or so, so the heavy viable seeds settle to the bottom. You can use the fork to lift out and dispose of the slime off of the top. Add water again and swirl and let sit, then pour off the top mixture leaving the seeds on the bottom. You may have to do this several times till all you have left is clear water and seeds on the bottom. Pour off the water and dump the seeds on your drying towel.

Remember to label and date these right from the start, especially if you have more than one batch going at the same time.


Now, let's take a quick look at how to save seeds from a few types of peppers. Bell , Jalapeno, Poblano and Anaheim Peppers will be featured as the example. Here again, you want to pick the pepper that you like and want to grow again next year. Cut the pepper open so you can remove the seeds. Put the seeds on a paper towel to dry. Make sure you label your seeds. When they are dry, usually in a couple weeks, soak them in water for a day or so. The seeds that sink to the bottom are your most viable seeds, these are the ones you want to save.
You can save seeds from all of your favorite plants, with a little extra research and reading.
There you go, you are saving seeds from your garden that are suited to the micro-climate of your garden. When you do this again next year with your favorite plants and on and on, this is called Landrace seed saving and planting. If you have extra seeds, share with your friends or join a local Seed Bank.

This book is a good resource material book on how to save seeds and plant them.

Other resources are your local U of I county Extension office, the local library, your favorite bookstore and your favorite online shop.

Happy Seed Saving and Gardening. 

Thursday, September 2, 2021

How seeds saved me during the Pandemic...

Being a first-line healthcare provider during a worldwide virus pandemic, I self-quarantined, leaving me with spare time in the spring & summer of 2020. I enjoy flowers. I threw caution to the wind, mixed up my seeds, prepared my flower beds and got to sowing. What a successful experiment that resulted in colorful blooms. Seed-saving benefits include rapidly diversifying and enlarging flower beds while selecting from your favorite hearty blooms, at no cost! It delighted my soul during a very difficult time, so I had to know more
What type of flower seeds are best?
Whatever you love! Whatever you have! Best choices are annuals and easy-to-grow perennials. Consider starting with marigolds, zinnias, snapdragons, lavender, etc. For consistent blooms, choose open pollinated flowers and not hybrids, which differ from the parent plant. Check the package label on your initial flower seeds for Heirloom, or OP (open pollinated). If it says hybrid, F1 or F2, don’t save these seeds.
When choosing blooms for seed collection:
  • Use the largest and best blooms from healthy plants to ensure hearty genetics. 

  • Don’t use diseased plants. 

  • Leave the blooms on the plant until they have withered, turned brown and dried out. 

  • If you collect seeds from flowers that have not dried out on the stem, the seeds may be immature and may not germinate.

  • Be sure to label all seeds with the flower name, Latin name,

  • location and collection date as you save them.

  • Seed Saving is not just for flowers, click to learn about veggies too!

To collect, clip the dried flower heads from the stems. 

  • Marigolds and zinnias break open and remove the seeds from the center. Marigolds have long narrow seeds (bottom right) and zinnia seeds are arrow-shaped (top right). Sort out the large chaff by hand and use a small fan or just blow on the smaller bits to remove, leaving just the seeds. 

  • Snapdragons and lavender seeds will easily fall from the seed heads when shaken into a bowl. 

  • Spread seeds on paper towels to dry in a dark cool area. Make sure they are completely dried before storing to avoid mold which can ruin the seeds. 

  • Store in a labeled envelope or personalized seed packet. Mason jars, plastic baggies can be used if seeds are completely dried out. 

  • Proper, air-tight storage will help the seeds retain their viability, so choose a dark, dry, cool place protected from pests.

Sit back and watch your garden explode with flowers! Oh yes, and Christmas came early since I packaged up my seeds to share as gifts for my family and friends. Truly a gift of time and love!