Saturday, August 31, 2024

What do dahlias and corn have in common? Corn root beetle damage, that's what!

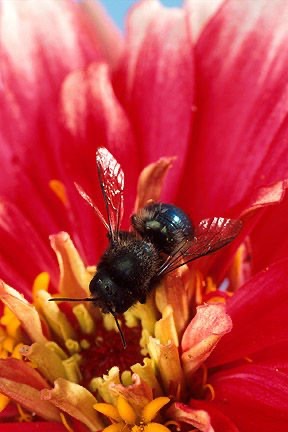
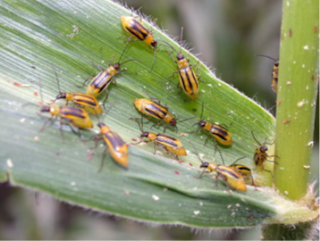
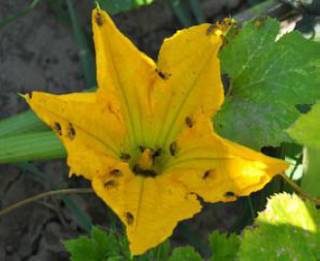
The corn root beetle is not confined to large agricultural crops; it can also invade home gardens and ornamental flowers. Fortunately, this pest has a limited life cycle, with only one generation per year. In the fall, female corn root beetles lay their eggs in the soil around corn plants. These eggs hatch the following spring, and the larvae begin feeding on the corn plant roots. By midsummer, the larvae pupate, and adult beetles emerge in search of pollen, primarily from corn silks, though they can also damage corn leaves. As the corn plants dry out later in the summer, the beetles seek other pollen sources, often targeting squash, cucumbers, pumpkins, and unfortunately, ornamental flowers such as dahlias, roses, and zinnias. They particularly favor lighter-colored blooms, causing extensive damage that can ruin the petals.

Effective management of corn root beetles involves integrated pest management strategies. Rotating corn crops annually, maintaining a distance of at least 10 feet from previous crop sites, helps break the beetle’s life cycle. Additionally, using biologics, managing weeds, and applying select soil pesticides can assist in controlling infestations. For agricultural producers, corn root beetles pose significant economic challenges, and for home gardeners, they can severely impact flower yields and health. With some planning and proactive mitigation efforts, it is possible to keep the corn root beetle populations in check


Last summer, in 2023, I undertook the task of growing the flowers for my daughter’s wedding, a project that initially seemed straightforward. I planted a variety of flowers—zinnias, dahlias, amaranth, hollyhocks, cosmos, celosia, and gomphrena—alongside corn to make the most of the garden space and to grow more vegetables. With limited experience and a constrained garden location, I didn’t realize the potential issues of planting corn so close to the wedding flowers.

At first, everything appeared to be going well. The corn germinated robustly, and the flowers started to sprout. I planted them later in the season to ensure ample blooms for the October wedding. While the dahlias were slow to start, by early August, both the corn and flowers were flourishing, with the dahlias beginning to grow in size.


However, by mid to late August, I noticed a concerning problem: the corn silks were disappearing, as if being shaved off. Upon closer inspection, I found that corn root beetles were to blame. These pests had not only damaged the corn silks but had also moved to the wedding flowers, particularly targeting the lighter-colored ones. The white and champagne dahlias suffered significant damage, as did the zinnias, hollyhocks, and amaranth.

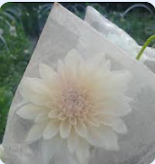
In a bid to save the flowers, I tried an insecticide, but it proved ineffective. Realizing I needed another approach, I covered the dahlias with organza bags—sheer fabric pouches designed to protect blooms from pests. These bags worked by physically blocking the beetles from reaching the flowers. Once the lighter-colored blooms were covered, the beetles shifted to other pollen sources, but the damage was already extensive.


Fortunately, my initial overplanting, due to my inexperience, ended up being beneficial. On October 14th, the weather was perfect, and my daughter’s wedding was a beautiful event. Despite the challenges with the beetles, the flowers looked lovely, thanks to the organza bags and the extra blooms from my overplanting. The day was a success, and seeing my daughter’s happiness made all the effort worthwhile.

Friday, August 23, 2024

Protecting Your Plants from Root Rot


If you’ve ever pulled up a suffering plant only to find a dying, rotting root system, you know how damaging root rot can be. However, root rot can take many forms and often causes symptoms similar to those of other plant diseases and pests. In this article, we will explore what root rot is and how to protect your plants from it.


What is Root Rot?

Root rot is a general term used to describe any disease where harmful pathogens attack and deteriorate a plant’s root system. These pathogens cause the roots to die, leading to the plant suffering and eventually dying as well.

What Causes Root Rot? Root rot is commonly caused by fungi that attack the roots of plants. Many fungi are responsible for root rot, but generally, they thrive in severely moist environments. Root rot is most likely to occur in overwatered soil or soil with poor drainage. Allowing water to pool around the root base greatly increases the chances of root rot taking hold. Additionally, if roots are damaged, they can be more susceptible to root rot because they are not strong enough to defend against fungi and other pathogens.


How Can I Tell If My Plants Have Root Rot?

Above-ground signs of root rot often resemble symptoms of nutrient deficiencies. Stunted growth, wilting, and discoloration are common indicators. If you notice these signs, check your soil moisture to see if overwatering or poor drainage might be causing the problem. Also, consider other factors that might be contributing to the issue. 

You can also inspect the roots, but be cautious, as this can cause further damage and reduce the chances of recovery for many plants. If a plant is severely damaged, examining the roots may provide useful information to help save other plants in the area or to inform future plantings.


How to Treat and Prevent Root Rot

Improving drainage and watering appropriately are the most immediate ways to prevent root rot. Once root rot has taken hold, several factors affect whether a plant can recover. There are chemicals available to treat many of the fungal causes of root rot, but accurate diagnosis of the specific fungus is necessary before applying any treatments.


Water meters can be useful for determining the moisture content of your soil. Research your specific plants to find their ideal moisture levels. Another promising prevention measure is the introduction of beneficial mycorrhizae to the landscape before planting. These organisms occupy space that harmful fungi might otherwise inhabit.


Root rot can be severely damaging to plants, but by monitoring soil moisture and taking preventive measures, you can significantly reduce the risk of root rot affecting your plants.

Photos: R. Harveson, Univ. of Nebraska

Saturday, August 17, 2024

Oops! Giant Cukes! What to do with them!

 Have you ever been surprised with a huge behemoth of a cucumber that wasn't there two days ago? What do you do with huge cukes? 

Does the flavor change as they get so large?

Super large cucumbers are often hard to transform into crispy pickle spears and are often quite seedy. However, they still have so much potential!

Here are some harvesting tips:
  • Don’t let cucumbers get too large or they will taste bitter.
  • Hot dry weather can cause bitter cucumbers. Monitor your watering.
  • At peak harvesting time, you should be picking cucumbers every couple of days. They’ll grow quickly!
  • Harvest regular slicing cucumbers when they about 6 to 8 inches long (slicing varieties).
  • Harvest dills at 4 to 6 inches long and pickles at 2 inches long for pickles.
  • The large burpless cucumbers can be up to 10 inches long and some types are even larger.
  • Cucumbers are best picked before their seeds become hard and are eaten when immature. Do not let them get yellow. A cucumber is of highest quality when it is uniformly green, firm, and crisp.
  • Any cucumbers left on the vine too long will also get-tough skins and lower plant productivity. Chickens love them, too!
Here is an easy Sweet Pickle Relish
Ingredients:
· 3 pounds Pickling Cucumbers or 4 pounds of Large Cucumbers
· 1 Large Sweet Onion
· ¼ cup Pickling or Kosher Salt
· 3 cups White Vinegar
· ¾ cup Sugar
· 4 cloves Garlic Minced
· 2 teaspoons Dill Seed
· 2 teaspoons Mustard Seed
· 2 teaspoons Celery Seed
· ½ teaspoon Turmeric

Instructions:
1. Slice the cucumber lengthwise and remove the seeds with a spoon. Discard the seeds.
2. Finely dice the cucumber and onion.
3. Place diced cucumbers and onions in a non-reactive pot
and add the salt. Stir and let sit for 2 hours.
4. Drain cucumber and onion mixture in a strainer until all the liquid is removed. You may have to press the mixture against the strainer to remove hidden moisture.
5. In a medium pot add vinegar, sugar, garlic, dill, celery, and mustard seed, and turmeric. Bring to a boil.
6. Add cucumber and onion mixture and return to a boil.
7. Reduce heat to medium low and simmer for 10 minutes.
8. Remove from heat.
9. Cool and store in refrigerator for up to a month or process in water bath for 10 minutes.

Friday, August 9, 2024

Embrace the Buzz: Mason Bees in Idaho

If you’re exploring the diverse landscapes of Idaho, from its lush forests and towering mountains to sprawling farmlands, you might come across a tiny but mighty pollinator—the mason bee. These solitary bees, part of the genus Osmia, are not just fascinating but also crucial for keeping our ecosystems and gardens thriving.

Unlike honeybees, which live in large colonies, mason bees prefer to go solo. They nest individually in natural cavities or man-made sites like hollow reeds or wooden tubes. What’s really cool is that mason bees are super active in early spring, just when many of our native and agricultural plants start to bloom. This makes them fantastic at pollinating fruit trees, berries, and wildflowers, especially in Idaho’s often chilly and wet spring weather where they excel.

Mason bees have a special talent for working in cooler and wetter conditions—something Idaho's springtime frequently dishes out. They collect pollen on their bellies instead of their hind legs like honeybees. This means they’re incredibly effective at moving pollen around, which helps ensure your garden or orchard gets the pollination it needs even when the weather’s being unpredictable.

These bees get their name from their unique nesting habits. Female mason bees use mud to build and seal up individual compartments in their nests. Each compartment is packed with a mix of nectar, pollen, and an egg. The mud walls keep predators out and create a cozy environment for the developing larvae. Because natural nesting spots might be scarce due to habitat changes, setting up artificial nesting sites—like mason bee houses—can make a big difference in supporting local populations.

Setting up a mason bee house is easy and rewarding. Place it in a sunny spot and make sure it’s sheltered from heavy rain and strong winds. Bees are pretty low-maintenance and don’t require much additional care, but keeping an eye on their nesting materials and occasionally cleaning out old nests can help keep them healthy and productive.

Getting mason bees to visit your garden or orchard is a simple and effective way to boost local biodiversity and improve plant productivity. You can help by planting a variety of flowering plants and skipping the pesticides. Adding a few mason bee houses will not only attract these hardworking bees but also enhance pollination in your garden or farm.

In summary, mason bees are a key player in Idaho’s ecological and agricultural scenes. Their ability to thrive in early spring and their impressive pollination skills make them essential for healthy plants. By embracing the buzz and creating a welcoming environment for mason bees, you’re helping ensure that Idaho’s plants stay vibrant and productive.

Photo Credits - Osmia lignaria - Photo (BY-NC 3.0) USDA. Adams Gardens.


Friday, August 2, 2024

Organic Pest Control For Your Home Garden

The definition of Organic Pest Control is very broad. Generally, organic pest control means discouraging or destroying insects or pests without using manmade or synthetic chemicals that will be harmful to humans or animals. There are many means of pest control beyond the use of synthetic or natural chemicals. The following methods can reduce or eliminate the expense, preparation, storage and general need for any chemicals.

Crop Rotation
Crop rotation is an excellent way to manage pests, enhance soil health, and has been used for centuries. Since many pests rely on specific crops as a food source and for reproduction, removing or moving a crop can eliminate the food source and habitat for those pests. The simple act of moving a crop or plants from one area to another every year can confuse pests and reduce their population when they lose a favorite or familiar spot.

Companion Planting

Couple crop rotation with Companion planting for double duty! This method of planting not only enhances nutrients available, but can attract pollinators, and deter pests of surrounding plants. For example, planting nasturtiums near kale, cabbage or other brassicas. Nasturtium’s beautiful and edible blooms naturally draw in pollinators. Nasturtiums also draw cabbage worms to feed on blooms and leaves that helps keep those pests away from nearby brassicas. Nasturtiums are self-seeding and easy to grow too!

Biological Pest Control
Another chemical free method, biological pest management, is achieved by using natural enemies to regulate pests. A classic and well-known example would be the use of ladybugs, which feed on aphids, to control aphids that are destroying plants in the garden. The focus of biological control is minimizing the damage caused by pests by reducing or suppressing them. Another benefit to biological pest control is eliminating the potential of developing pesticide resistant pests. Biological pest control can be implemented to control insects, weeds or pathogens that affect plants or animals.

Mechanical Pest Control
There are many methods of mechanical pest control that provide a targeted approach to removing pests. This method of physical control can be time-consuming, but also very efficient. Handpicking harmful insects from plants can take significant time and energy but can be the quickest and most direct option for removing pests. An example would be removing visible squash bugs from spaghetti squash plants along with eggs laid on the underside of plant leaves. Locating and removing the pests before damage is done to plants can be a bit difficult.

The use of covers, barriers, or screening are mechanical options that can also be very effective if implemented before pests, or their larvae, are present in the garden. These barriers can save the time of hand-picking pests, but since some insects are very, very small, barriers may be breached by those very determined pests!

Often it is the combination of one or multiple control options that can reduce or eliminate garden pests, allowing the usage of any type of chemicals to be the last resort
.