 When it comes to
shopping, my friends all know it takes me a long time to make a decision. I
methodically research out what I want. Then I narrow it down to a few items.
After I look over my choices carefully, I may go home to get on the internet
and look at consumer reviews; I may go from store to store and check out
prices. I look for quality and I look to make sure I am getting a product that
is worth the money I am spending on it. I want to make sure my investment will
last. Sometimes, my shopping experience will last hours, days, or in the case
of a car or computer, it could be months.
My yard is no different. When I need yard work done, such as lawn aeration or
tree trimming, I am insistent on high quality work. As a homeowner you are the
first and the last line of defense when it comes to making sure that a quality
job is done, and done correctly! Knowing what to expect in landscape
maintenance and being armed with a small amount of knowledge as a consumer can
play in your favor.
Always hire a
certified professional to do your work. Would you seek medical advice from an
individual who was not licensed to practice medicine? Of course not! Why then
would you do it with your yard? I recommend that you check into the individual
or company before hiring them. Do some homework. How have they been trained?
Where is their certification from? Are they insured, licensed, and can they
provide you documentation? Are they registered with the Better Business Bureau?
If so, what is their rating? Drive around and check on some of their previous
work. Is it the kind of quality you would want in your own yard? Ask for
references. Ask questions! This is, after all, a job interview for the contractor.
Just because they are the cheapest does not mean they should get the job, and
just because they slap a business magnet on the side of their pick-up truck
does not mean they know what they are doing! In the following I will be
talking with you about what to look for when hiring a contractor to do yard
work and how certain procedures should be done. Armed with this knowledge, you
will be better able to ensure the work done in your yard is of the quality you
deserve for the money you pay.
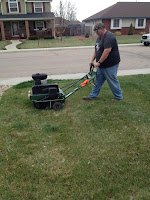
 Lawn Aeration is
perhaps one of the best things that you can do for your lawn. Done twice a
year, once in the spring and once in the fall, core aeration combats soil
compaction. Soil compaction is a problem in nearly 80% of all landscapes. In
addition, aerating your lawn helps combat thatch accumulation and reduces the
amount of water you need to apply to your lawn. The reason for this is because
when your soil is compacted oxygen and water can’t penetrate into the soil.
Fertilizer can’t get penetrate the soil either. As a result, roots are often
shallow, and the lawn will need more frequent irrigation. (1, 2, 3, 4)
Core aeration
removes small plugs, about 1-3 inches long from the soil. A single aeration
using a machine with 1/2-inch diameter tines removes as much as 10 percent of
the thatch if enough passes are made to achieve average 2-inch spacing between
holes. Remember the key is 2-inch spacing. This may mean that multiple passes
on the lawn are required. This small investment of an extra $10 will pay
dividends in the end.
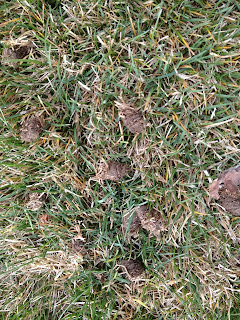
What do you do with the cores after you have had the lawn aerated?
That really is a personal decision. Some people do not like the little plugs
being left on their lawn, although there may be benefits to allowing them to
disintegrate into the lawn again.
If you do decide
to remove them, they are great for the compost bin. Other options may be to
power rake the lawn after aeration, watering, or simply running a lawn mower
over the lawn after you aerate (although this practice will cause the blades on
your lawn mower to dull). Once you have aerated your lawn if you need to
reseed, this is the optimum time to do it. The best part of reseeding now is
there is no need to top dress the lawn, as the lawn seeds will have nice little
holes in which to germinate!
Another type of
aeration being marketed by many lawn care companies these days as a replacement
for core aeration is liquid aeration. While different ingredients make up
this popular lawn service, the main ingredients seem to be liquid humates
(organic matter) and sodium lauryl sulfate (soap). These are nothing more than
snake oil remedies and are no substitution for the real deal of removing the
plugs from your lawn by core aerating. There is no scientific research which
has shown chemical aeration to be effective. You may as well throw dirty dish
water out on your lawn. (5) (Cultural and Chemical Controls of Thatch and Their Influence on Rootzone Nutrients in a Bentgrass Green
Lloyd M. Callahan, William L. Sanders, John M. Parham, Cynthia A. Harper, Lori D. Lester and Ellen R. McDonald
Crop Science
1998 38: 1: 181-187
doi:10.2135/cropsci1998.0011183X003800010030x)
The thing to remember from all of this is that you want
to have your lawn aerated twice a year; in the spring, and again in the fall.
The plugs removed should be 2-3 inches long, and on 2 inch centers, which may
require multiple passes on your lawn. If you have further questions, please
call your local University of Idaho Extension Office
TreePruning is
something I take seriously. It is a science which should not be left to a
novice and is far more than could be covered in one article. For me, spotting a
bad tree pruning job is as easy as spotting a bad haircut. The only difference
is a bad hair cut grows back and has no adverse side effects on your health.
However, a pruning job can have enormous effects on the health of a tree,
either for good, or for bad. When you hire an arborist, make sure they are ISA
certified, licensed, and insured. To find an ISA certified arborist, visit http://preview.tinyurl.com/d44d9rp
The key points for a good pruning job really come back to structurally pruning
the tree correctly when the tree is young. Improper or lack of pruning when the
tree is young can greatly increase the likelihood of tree failure when the tree
is older. Cuts on branches larger than 4 inches increase the possibility of
decay and disease. If possible, prune trees when the branches are smaller than
4 inches in diameter.
When pruning
trees, it is important to prune the branch back to the branch collar. Don’t
leave stubs, or what I call “hangars” where you can hang your coat. Leaving
these nubs will cause decay and disease to move into your tree.
The last key
component to pruning is to always remove a smaller branch back to the parent
branch, never the other way around. When you remove a parent branch, unless the
wood is dead, you greatly increase the risk of beginning the downward
spiral of death and decay in the tree. While this is great for your
tree-trimming company who will have to come back year after year to remove an
ever increasing amount of dead wood from the canopy of the tree, it is hard on
your pocketbook; more importantly, your tree's life is shortened! By knowing some pruning basics, you can ensure that you are
hiring a professional who knows what they are doing, and will extend the value
and life of your landscape.
For more information, contact your local University of Idaho Extension Office. Our Master Gardeners Turf/Tree Team will be glad to assist you.
1. Carrow, R. N., B. J.
Johnson, and R. E. Bums. 1987. Thatch and quality of Tifway bermudagrass turf
in relation to fertility and cultivation. Agronomy Journal, 79: 524-530.
2. Dunn, J. H., D. D. Minner, B. F. Fresenburh,
S. S. Bughrara, and C. H. Hohnstrater. 1995. Influence of core aerification,
topdressing, and nitrogen on mat, roots, and quality of "Meyer"
zoysiagrass. Agronomy Journal, 87: 891-894.
3. Erusha, K. S., R. C. Shearman, and D. M.
Bishop. 1989. Thatch prevention and control. Turfgrass Bulletin, 10(2):
10-11(Carrow et a1., 1987; Erusha et a1., 1989; Dunn et a1., 1995; Lederboer
and Skogley, 1967; Shildrick, 1985; White and Dickens, 1984)
4. Murray, J.J., & Juska, F.V. (1977). Effect
of management practices on thatch accumulation, turf quality, and leaf spot
damage in common Kentucky bluegrass [Poa pratensis]. Agronomy Journal, (3),
365-369.
5. Lloyd
M. Callahan, William L. Sanders, John M. Parham, Cynthia A. Harper, Lori D.
Lester and Ellen R. McDonald. Cultural and Chemical Controls of Thatch and Their
Influence on Rootzone Nutrients in a Bentgrass Green. Crop Science, 1998 38: 1: 181-187
doi:10.2135/cropsci1998.0011183X003800010030x


