Wednesday, September 26, 2018

Growing Good Kids: Junior Master Gardener Program NOTE: schedule for spring 2019 (february?)


Dig In! Let's get Growin'
Level I Mascot
Fun and educational gardening activities for Kids!


What is the Junior Master Gardener Program?


"The Junior Master Gardener program is an international youth gardening program of the University Cooperative Extension network. JMG engages children in novel, “hands-on” group and individual learning experiences that provide a love of gardening, develop an appreciation for the environment, and cultivate the mind."  (jmgkids.us)  The curriculum is designed to facilitate teaching life skills, math skills, observation skills and social skills through ecology, gardening, reading, and leadership.
How does the program work?

The curriculum offers two levels: elementary (Level I) and middle school (Level II).Level 1 (elementary children) Level 2 (middle/jr. high students) http://jmgkids.us for curriculum and website.
Because the JMG materials are creative, well-researched, horticulturally robust and readily available through the Texas A&M University Extension, the materials have been used by a wide range of people and organizations. They are considered a treasure trove of experiential gardening activities, its applications seem limitless. (Fleming)

In Level I, The Literature in the Garden Module features award winning books!
The 2018 Growing Good Kids Excellence in Children’s Literature Award Winners were announced at the National Children & Youth Garden Symposium on July 13, 2018 at Cornell University. http://jmgkids.us/bookawards/

Always a favorite among all age groups: Tops and Bottoms by Janet Stevens on you tube

Who can participate? Any children's activity groups: 4-H, after school, in school (the curriculum is approved for state standards), nature field studies, gardening clubs, home-schooled children, library programs, wildlife centers, faith-based groups groups. The possibilities really are limitless!


Decorated Potted Grasses
Community Garden Activity
In 2008, the Canyon County Extension Master Gardeners sponsored events at the Middleton Community Center, Nampa Public Library, Veteran’s Therapeutic Garden, Trinity Community Garden, and the Canyon Hill Community Garden. Over 250 youth participated!


*
Mr. Thistle
Level II Mascot


For more information contact:

University of Idaho Canyon County Extension 208-459-6003
or
http://jmgkids.us for curriculum and website

"The terms, Junior Master Gardener, JMG and Golden Ray Series, and associated logos, are service marks of the Texas A&M AgriLife Extension Service."


Wednesday, September 19, 2018

Tomato Taste Off 2018! And the winner is...


/Users/Dian/Documents/Outreach/pics/20180915_104514.jpg/Users/Dian/Documents/Outreach/pics/20180915_104443.jpgCongratulations to the 2018 Tomato Taste-Off winners! Thirty one tomatoes were entered in 3 categories. There were 7 cherry tomato entries. First place was taken by Doug Ranck with a Black/Chocolate Cherry and second place by Mary Van de Bogart with a Sungold Hybrid. The slicer category had 14 entries. Richard Ames won first place with a lovely orange tomato variety named Persimmon. Clara Flynn took second place with the Celebrity tomato. The last category was the paste tomatoes with 10 entries. First prize went to Mary Van de Bogart with a San Marzano Redorta paste tomato. It was huge!
Then Pat Flynn took second with the good old stand by Roma Paste. The first prize winners received $50 gift certificates to a local plant nursery and the second prize winners received $25 gift certificates. Thank you to everyone who entered for all you hard work growing such yummy tomatoes this year!
/Users/Dian/Documents/Outreach/pics/20180915_111926.jpgThe tomato taste-off was facilitated by the University of Idaho Master Gardeners from Canyon County and done in conjunction with the annual Indian Creek Festival that the City of Caldwell puts on every fall. This was the second year that the Canyon County Master Gardeners put on this event. Tomatoes are brought in from community members and master gardeners. The festival attendees were very enthusiastic in their tomato tasting and judging. It was fun to hear all the comments and interact with so many tomato lovers. The biggest surprise was that the same variety of tomato could taste so different from different gardens. For example, we had 4 entries of the Black/Chocolate Cherry tomato grown by 4 different people and they all had very distinct flavors.


/Users/Dian/Documents/Outreach/pics/20180915_155914.jpgTomato classes were held in the afternoon. Attendees learned tomato basics, how to grow tomatoes on a trellis and how to can tomatoes.

It's never too early to start picking out that perfect tomato to grow for the contest next year!

The Master Gardeners look forward to seeing you at the 3rd annual Tomato Taste off 2019!

Wednesday, September 12, 2018

September Community Newsletter

In case you missed this issue - here's what's happening in September with Canyon County Master Gardeners! Newsletter link

Keep informed! Sign up for our monthly newsletter here

Monday, September 3, 2018

Turf/Tree Team Part 2

The Tree and Turf Team has been busy so far this summer. Part 2


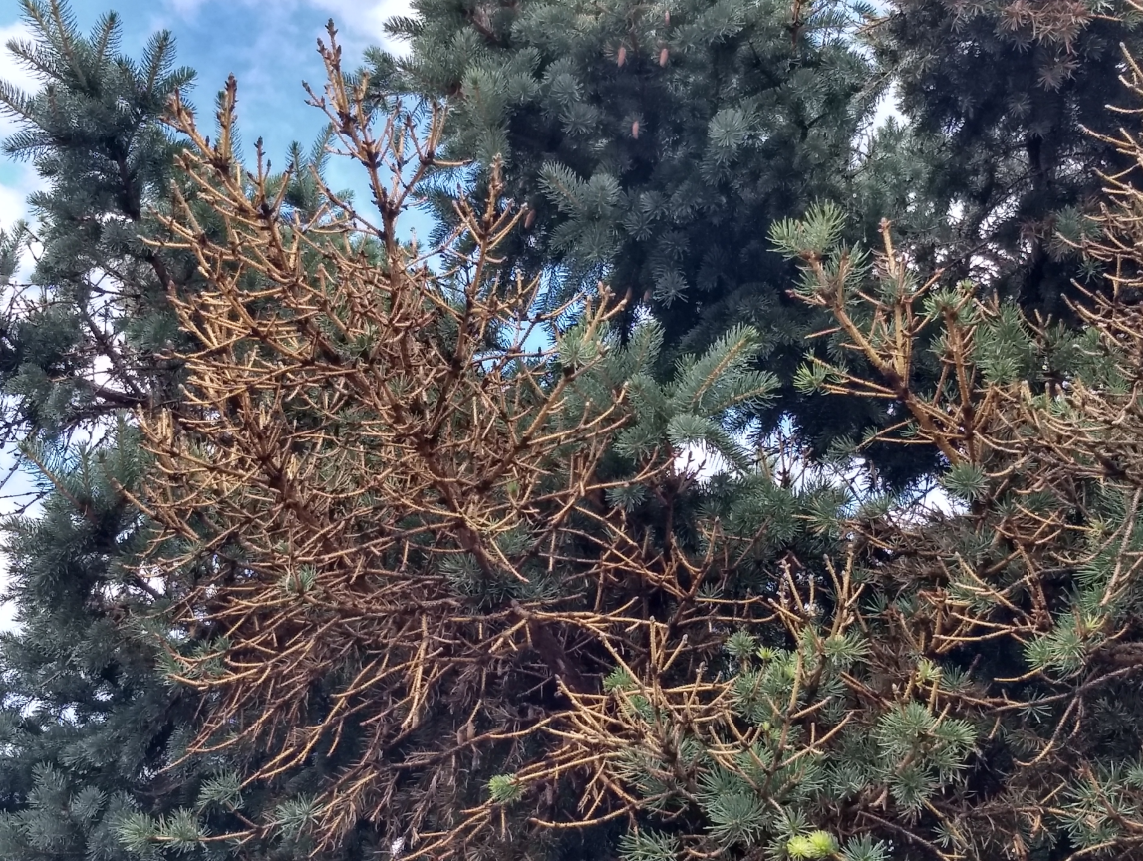
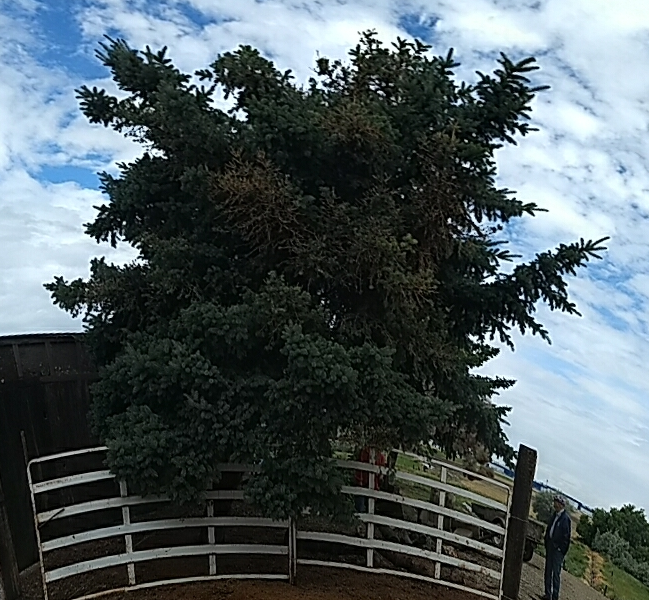
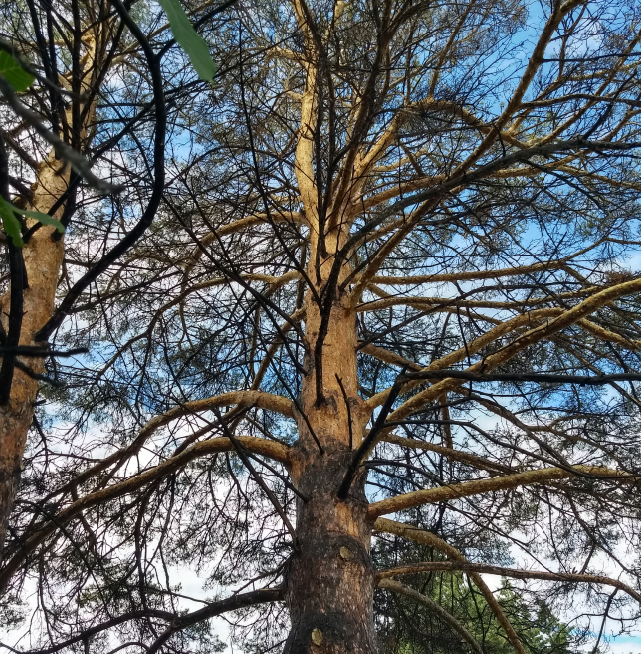
Our next site visit was near Greenleaf to help answer the question on why a resident’s spruce tree was showing signs of failing health. What we found was a single spruce tree next to a barn where it was starving for water, which was making the tree unhealthy. That in turn attracted Spruce Beetles which started their slow death of the tree. Look at 3rd photo below where bark is missing, also notice the 4th photo below of a neighbor’s spruce tree with severe beetle damage. We took a small walk around and noticed several more spruce trees in neighborhood with similar signs of beetle damage.
Signs of beetle damage are where the needles on infested trees may turn a pale yellowish-green color and tend to drop to the ground after high winds, but rarely turn rust colored on the tree. Needles typically drop from branches the second summer after the tree has been infested. Boring dust, produced when beetles bore new entry holes, may accumulate in bark crevices and around the base of the tree. Streams of resin along the main trunk are often associated with recently attacked trees.
What can you do to help protect your spruce tree?
  • Maintain the health and vigor of trees: The Spruce Bark Beetle prefers to attack weaker trees or ones that have fallen so maintaining the health and vigor of your trees is important. Tree culturing activities such as watering and fertilizing trees early in the growing season will help develop and maintain healthy trees.
  • Prune lower branches to retain a fully crowned tree. Topping mature evergreen trees as illustrated in the pruning link, page 6, sets a tree up for disease and damage: Pruning should be done in the fall and the branches removed from the site if disease is present.
  • Spray the tree with an insecticide registered for use on spruce trees to prevent Spruce Beetle attacks: This should be done in spring by early May to protect the tree prior to the beetle’s emergence and dispersal flight.

Severe dieback
Spruce tree next to barn
   
Neighbors tree with severe beetle damage
Noticeable beetle damage
           
Spruce beetle impact: from Colorado State forest management

Sunday, August 19, 2018

It’s Squash Week!

Squash has ancient history dating back as far as 12,000 years, American Indians called squash the “the apple of God”. In the 17th century squash was introduced to Europe; however, it was not commonly eaten until the 19th century. Iroquois American Indians had three main crops squash, beans, and maize, also known as the “Three Sisters”.


Summer squash grows on non-vining bushes. The three main types include: the yellow straight neck or crooked neck, the white scallop or patty pan, and the oblong, green, gray or gold zucchini.

Winter squash matures on the vine and is covered with a hard rind that permits winter storage. It is categorized according to its fruit size: small fruits (1 to 4 pounds) include acorn types, butternut types, and some true winter squash types; intermediate fruits (6 to 12 pounds) include banana squash, Cushow, Hubbard and some Sweet Meat varieties; large fruits (15 to 40 pounds) include Blue Hubbard, Boston Marrow and Jumbo Pink Banana varieties; jumbo fruits (50 to 100+ pounds) include Big Max and various Mammoth varieties.

If planting squash from seed, plant them either in a garden bed or in a hill. In the garden bed, they’ll need to be planted 2-3 feet apart at about a 1-inch depth. However, if planting them in a hill, take 3-4 seeds and place them together. Then mound dirt in around them. The hills will need to be 5-6 feet apart. Most summer squash varieties now come in bush form. Winter squash varieties are in vine form. So, plan accordingly if you are growing a vine. Vines need to be planted about 8-12 feet apart.
The final step to planting squash is to water regularly and consistently. One time a week, you’ll need to water the plants deeply. Give the squash plants about an inch of water so the water will reach the roots.

Care: 

Mulch - After planting squash plants place mulch around each plant. This will protect the roots of the plant and keep weeds from becoming a problem.

Fertilize - After first bloom appear on your squash plant, it is time to fertilize to the side of the plant. Fertilize regularly. Like with most gardens, fertilization once every 4-6 weeks should be ample.

Water - Water your squash plants heavily. Water them one day a week with one inch of water along with regular watering on other days.

Squash Bugs look like smaller stink bugs. They live on the squash plant and kill it by sucking the
sap right out of the plant. This sucking action releases a toxin from the bug into the plant and kills your plant. Prevention is key. Rotate crops yearly, use insecticides, and pay attention to your plants. If you can catch them while they are still small, it is much easier to get under control. Remember to dispose of all squash plants at the end of the grow season so the bugs don’t overwinter in them.


Blossom-End Rot. You think your plants are doing great, you see fruit forming, and then
you see that the end of the fruit is black which means that your fruit is inedible. This is an issue because of a calcium deficiency or your soil has uneven moisture levels in it.

Stink Bugs They are an issue because they will nibble on your plants. Clean up plants and weeds in your yard, and do not give them a place to overwinter.


Squash Vine Borer The eggs are laid at the base of a squash plant. When the eggs hatch, they begin to gnaw through the plant. This will obviously kill your squash plant. You need to clean up your garden beds every winter, so they don’t have anywhere to overwinter. Seeing signs or finding eggs, sprinkle diatomaceous earth around the base of the plant. It is more about preventing this bug than defeating it because once you see it, then it is probably too late for your plant.


The best companion plants for squash are corn, peas, beans, icicle radishes. These plants help deter certain pests that often attack squash plants.

Summer squash can be harvested about 55 days after planting. For optimum quality, harvest while fruits are tender and still have a shiny or glossy appearance. When growing conditions are favorable, harvest the crop daily or every other day. Harvest crookneck and straight neck varieties when fruit is 1½ to 2 inches in diameter. Harvest zucchini when fruit is 7 to 8 inches long and scallop types when they are 3 to 4 inches in diameter. All these squashes can be harvested at smaller sizes for extra tenderness. Do not leave large fruit of summer squash on the plant because this will inhibit the development of additional fruit. Store summer squash in a plastic bag in the refrigerator for up to 1 week.

Tuesday, August 14, 2018

Turf/Tree Team Part 1

The Tree and Turf Team has been busy so far this summer.
Part 1.

There hasn’t been a slow down with mid-summer fast approaching for Tree & Turf Team.
The team has been all over the valley visiting multiple issues impacting resident’s trees and lawns. We’ll cover a few of our visits in detail, giving what we found, we will show some photos of damage and what advice we gave to help the owners.
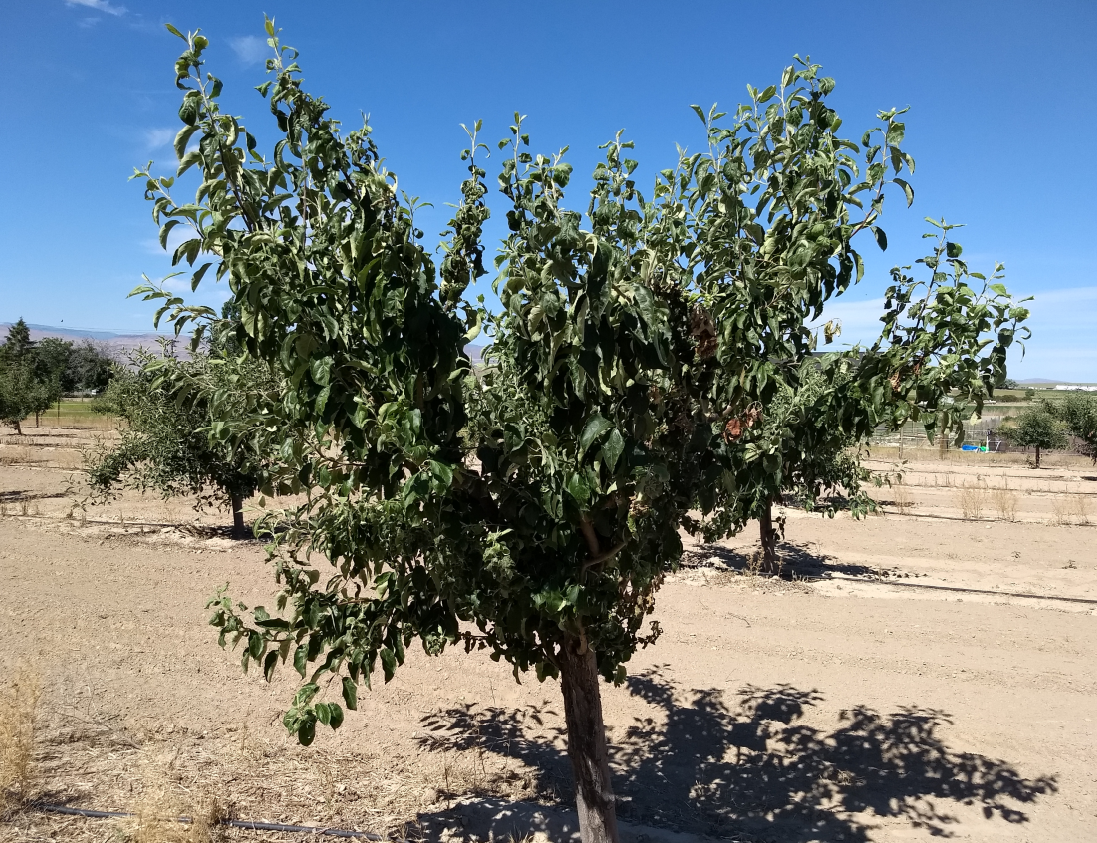
Our 1st visit takes us out to Melba where a couple have 2-acre 180 fruit tree orchard that turned out to be a lot of note taking. The couple called into Canyon County Extension Office asking for help with their apple, pear and cherry trees, each with a different problem. The apple trees were being impacted by a severe aphid infestation. “see photo’s 1 and 2”. At this point there wasn’t much we could do because the aphids would soon be gone for the summer eating grasses but they  could return in fall. We made comments about using horticultural oil before bud break next year to help control future outbreaks.  
Aphids causing the leaves to curl
Notice small black spots on the back of leaf
The second tree variety “pears” appeared to be impacted by fireblight. Fireblight is a really nasty bacteria that ends up killing large areas of the tree. The only way to try saving what’s left of the tree is cutting the impacted branch below the infected area and disposing of it. It’s important to get these limbs removed right away because the bacteria can move from blighted spurs and shoots through the vascular system into larger limbs and tree trunk. Death of the tree could result within one season if not properly taken care of.

Signs of fireblight is wilted leaves turning black
Several branches impacted with fireblight               
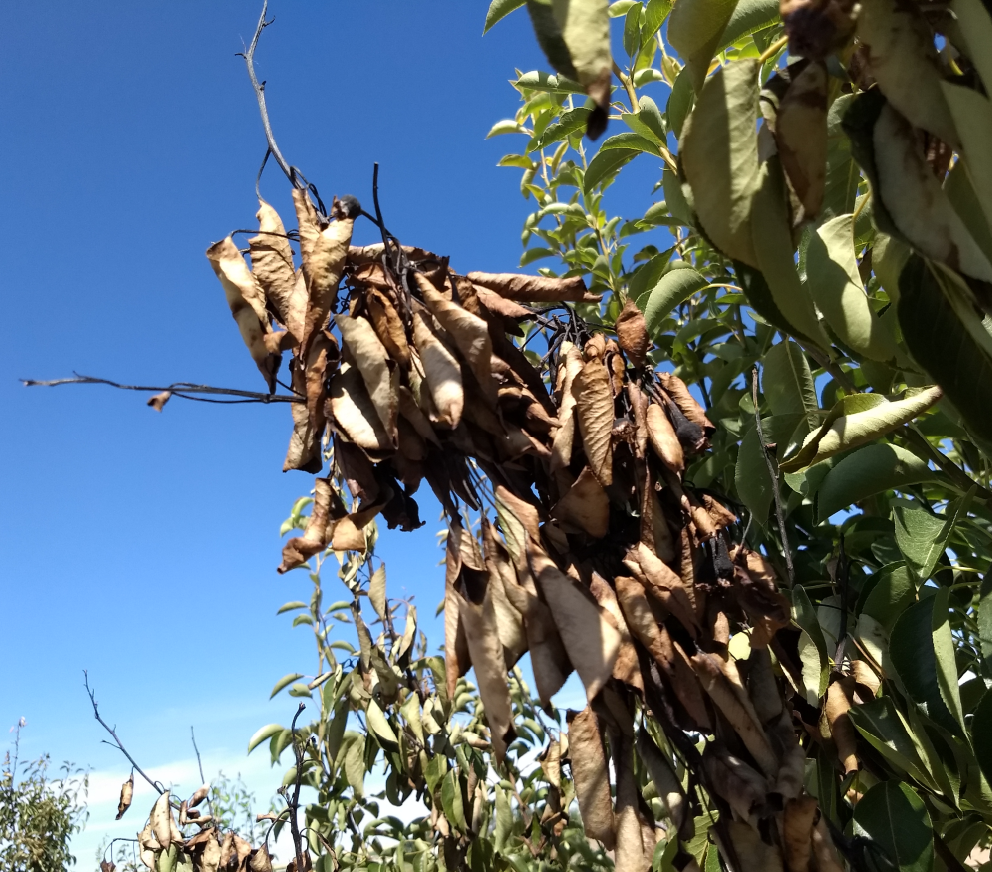
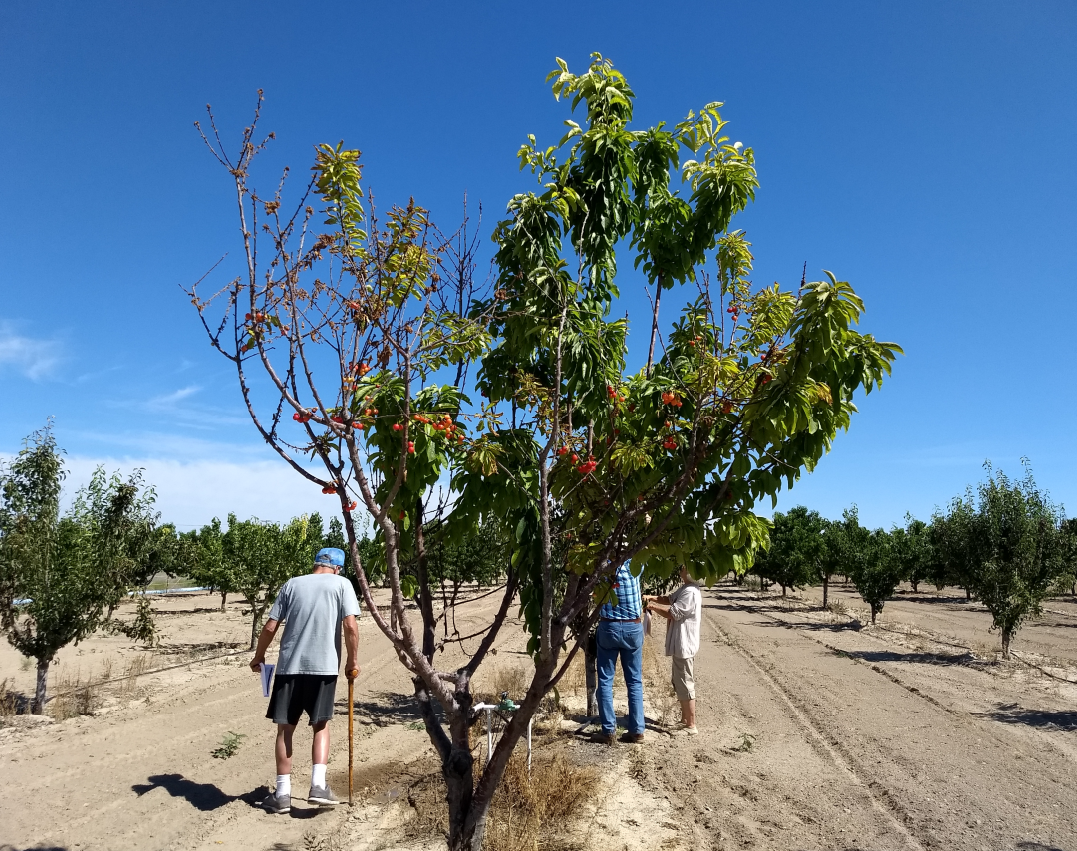
The third tree issue impacting the orchard was their cherry trees. Research is still ongoing, but we are suspecting a fungal disease called Brown Rot Blossom Blight. The branch tips die back, leaving clusters of dead, brown leaves. Fungus spores infect the tree blossoms in the spring, when the blooms begin to age. Many tiny black spores begin to cover the dying flowers. The spores become active and start to kill the branch tip and work back towards the trunk. Once the dieback begins, the disease cannot be controlled. The only recourse is to prune off the dead portions of the branches and dispose of them in the trash. However, you can help prevent the reinfection of your plants by cleaning up all ground litter from all around the base of the tree.
Clusters of brown dead leaves
Backed off to notice dead branch dieback
Last pieces of advice we gave them was about their drip water system, which was to move emitters out further toward tree drip line instead of directly next to trunk. The 2nd item was to bring in a few truck load of wood chips that could help in retaining moisture and better temperature control under the tree canopy.

Check out some of these links.


Data Reference:
Aphids impact on apples trees:  from Utah State Extension


Fire blight on pear trees: from University of California Extension


Cherry tree fungus blight: from Penn State Extension

Tuesday, July 31, 2018

Growing Hops in Your Backyard


Growing hops in the backyard is fun, easy, and rewarding. Hops can be grown in any moderate climate with proper care. Hop vines called bines grow from a rhizome. Within a few weeks of planting, noticeable growth happens. Several hop shoots start peeking out of


the ground. Growth can be vigorous, bines growing up to two feet per week until mid-summer when the growth slows, and the plant enters the flowering stage.  Hop bines can reach upward of 20 feet in height.  

Hops were first introduced into Massachusetts from Europe in 1629. Commercial hop yards in the United States were reported to have been established in New York in the early 1800s. Commercial hops production was pushed westward during the 1920s by plant diseases encountered in the east, primarily downy mildew. Modern hops production is currently in the western United States in Oregon, Washington, and Idaho—areas less conducive to plant diseases of the humid east.

Selecting Hops:

There are two basic groups and more than 100 varieties of hops plants. Hops can grow in most moderate climates, but they do best in zones 5 through 9.  

Bittering hops have high levels of specific acids that produce bitterness in beer. 

Aroma hops have a lower content of bittering acids and a more balanced essential oil that produces pleasant aroma and flavor properties to beer.

Warning: Hops cones can be toxic to dogs. Do not allow your dog to eat the cones, either fresh or dried. 

Planting and Caring for Your Hops:

Hop plants begin as rhizomes that require well-drained soil with a pH of 6 or 7 and long periods of full sun exposure. In early spring, plant the rhizome about two inches deep with buds pointed up.

Frequent shallow watering will help establish a healthy root system. After the roots are established, less frequent, deep watering helps increase root growth and drought tolerance. Water directly at the base of the plant, wetness on the leaves will encourage disease 
formation.

Hop bines are heavy feeders and will need a supplemental feed of compost, manure, or fertilizer to remain strong.


Train your plants to grow on a trellis system. The training process helps the bines stay healthy and strong. Use twine to train the bines to the trellis. Select only vigorous bines to train and prune away the less vigorous bines.


If the texture is papery, and the cones is between one to two inches, the cone is ready to pick. Inside the cone are small, yellow particles, called lupulin, that give beer its flavor and aroma. Over the next few weeks the cones will mature at different times. To avoid losing the lupulin use scissors or pruning shears.

Note: Hop plants can cause skin irritation, so wearing gloves and long sleeves will help to prevent any skin irritation.


Your cones are ready for brewing when the central stems are brittle and lupulin powder falls out easily. You can use the cones right away for brewing or stored in a sealed container in
the freezer for later use.

  • Spread the hops out in the sunshine in a single layer protecting from wildlife.
  • Dry hops in the oven, set the temperature at 140 degrees and leave the oven door slight open to allow moisture to escape.
  • Electric food dehydrator at its lowest setting 90 to 100 degrees
After Harvest

Cut back bines to about three feet. After first heavy frost, cut the remaining bines at the soil surface and apply several inches of mulch over the grown plant.