Showing posts with label Dallas Budden. Show all posts

Saturday, September 21, 2024

Jelly, Jam, Preserves, and Marmalade - Yummy!

Fresh, spreadable fruit in the form of jam, jelly, preserves, or marmalade, might possibly be summer's sweetest reward. The best part is that they are easy to make and can be enjoyed long after you put your garden to bed. So, what is the difference between each of these spreadable options? 

Before we dive in, it helps to know that there are two main factors that turn fruit into a thick, spreadable texture: heat (from cooking) and pectin. When fruit is heated, it will lose liquid, causing the fruit to reduce to a firmer state. Pectin is naturally-occurring in fruit and happens to also make fruit thicken when cooked. However, not all fruit contains enough pectin to reach a firm texture, so many spreadable fruit recipes call for additional pectin.

Jelly:
Jelly is the firmest and clearest of the sweet, spreadable options. The fruit is cooked and strained so only the juice ends up in the final product. Jelly is so firm that you could turn the jar over and slide the jelly out in one solid piece.

Jam:
Jam is a chunkier version of jelly. Jam has more fruit pieces and is slightly looser in texture. Chopped or pureed fruit is cooked with sugar, so pieces of fruit end up in the final product. Jams are not clear and not solid like their jelly cousin. Here's a video for strawberry freezer jam!

Preserves:
Preserves are like jam but contain more and bigger pieces of fruit. Preserves have the least gel-like consistency. They are great for serving with cheeses and meat dishes.

Marmalade:
Marmalade is a preserve, but it is made only with citrus. The whole fruit, rind and all, create a bitter-sweet spreadable delight. Lemon, orange, and grapefruit make great marmalades. Marmalades are aromatic with complex flavors and oils from the citrus peels.

Jam, jelly, preserves, and marmalade start out almost the same, but take different forms depending on how they are processed. Whether you like your fruit a spreadable solid, with small pieces of fruit, with large pieces of fruit, or you want the complex flavors of citrus, there is always something good you can choose to put on your toast.

Saturday, April 20, 2019

Steps to a Healthy Lawn and controlling Weeds

The first step to having a healthy and attractive lawn and controlling weeds is choosing a grass variety best adapted to your life style and available resources. Factors to consider would be high traffic, shaded and sunny areas, type of soil, available water and amount of time available to care for the lawn.

Irrigate properly to help reduce annual weed infestation. Light frequent irrigation encourages weed seed germination, even if a pre-emergence herbicide has been applied. Water 1- 1.5 inches per watering. Do not water again until you see signs of wilt. Turf will also turn a shade of blue green when it is water stressed. The best time to irrigate your lawn is between 10 pm and 6 am.

Mowing The preferred mowing height for all species of grass is 2 ½ - 3 inches. The minimum height that any lawn should be mowed is 2 inches. Mowing to heights less than 2 inches results in decreased drought and heat tolerance plus higher incidences of insect, disease, and weed problems. The seeds of some weeds require high light intensity to germinate. The shaded environment near the soil surface in high mown lawn helps deter weed germination. Mow frequent enough that no more than one third of the grass height is removed at any single mowing. If the mowing height is two inches. the grass should be mowed when it is 3 inches tall. If the mowing height is 3 inches, it should be mowed when it's about 4 inches. Keep your mower blade sharp to avoid shredding and fraying leaf blades. Grass clippings should be allowed to fall back into the yard to provide natural nitrogen.

Pre-emergence herbicides. A Pre-emergent is activated in the top layer of soil, where the weed seeds sprout, and by design it stops the plant from growing. A pre-emergent is NOT effective once the weeds are showing. Spreading out the herbicide so that it is evenly distributed is critical. It must also be watered into the soil within the appointed time period. The soil must remain undisturbed in order to maintain the barrier. A pre-emergent has to be replaced, or replenished. Pre-emergence should be applied two to four weeks before when seeds germinate in mid March to early April depending on weather. Warm moist springs cause earlier germination The temperature of the soil ( 55-60 degrees) as it starts to warm up in the spring, will be the primary indicator of the pending arrival of various weed species. With normal weather patterns, pre-emergence herbicides give good to excellent control of crabgrass, foxtail, and barnyard grass. Do not over seed into areas that have recently been treated with pre- emergence.

Post- emergence herbicides. Perennial broadleaf weeds can be controlled by post emergent herbicides. It is important to properly identify the weed before choosing an herbicide. Some common perennial broadleaf weeds in lawns are dandelion, field bindweed ( morning glory) White clover, curly dock, ground ivy, Canada thistle, broad leaf plantain, buckhorn plantain and yarrow. The best time to control perennial weeds is in late summer or early fall when weeds are preparing for winter.

Core cultivate (aerate) the lawn at least once a year to reduce compaction and to control thatch.
Fertilizer may be needed if lawn has poor color and vigor, doesn’t recover from traffic or has more weeds present. Nitrogen is the most important nutrient for lawns. Do not use Phosphorus or Potassium unless a soil test indicates it is needed. Cool season grasses should be fertilized in fall, late spring and little in the summer. Warm season grasses should be fertilized late May, June, avoid late summer and fall.

Check out the resources below:

Monday, November 12, 2018

Building a Worm Bin


Don’t have the space, location, or time for an outside compost bin? Have you heard about composting with worms (vermicomposting)? Vermicomposting is a convenient way to dispose of vegetable peelings, paper wastes and other organic materials. Worms eat the organic materials and create great compost, which is recycled into rich dark soil conditioner. The worm compost can be used for gardens and house plants to feed and nurture your plants.


There are 3 main types of earthworms:
  • Compost worm – 4 main species 1 Eisenia fetida (Tiger); 2.Dendrobaena venta (Blue Noses); 3. Lumbricus rubellus (red wiggler); 4. Eisenia Andrei (Reg Tiger)
  • Earthworker worm most likely seen in your garden, busy at work tilling the soil making it airier and nicer for plants to grow in.
  • Root Dwelling worms are deep burrowers, inhabiting the areas around plant roots, rich with decaying roots and fungi and are widespread in farmlands. You won't see these worms, as they never venture above ground.

The best types of worms for vermicomposting are red wigglers (Eisenia fetida) and redworms (Lumbricus rubellus). These two species make great worms for the compost bin because they prefer a compost environment to plain soil, and they are very easy to keep. Worms that feed on vegetable waste, compost, and organic bedding produce richer casting than those that feed on plain soil. You won’t find red wigglers in garden soil. You may find red worms in compost, under rotting logs, and in other organic situations. The problem is identifying them. You won’t be able to tell the difference between Lumbricus rubellus and other worms, so it’s best to buy them. If you don’t have a local supplier, you can order them on the Internet. It takes one pound of worms (1,000 individuals) to start a good-sized compost bin.

Location for Worm Bin
Where will you be keeping your worm bin? Worms thrive in temperatures between 55F and 77F degrees.
  • Indoors - A well-tended worm bin is odorless. You can keep it in a pantry, utility room, or under the kitchen sink. A garage, basement, or carport is also a potential site.
  • Outdoors - The north side of a structure (such as a house, shed, or garage) is preferred, because temperatures there don’t fluctuate as much. The bin also needs protection from rain and wind. Place it under the eaves or a deck or build a cover that repels rain but still allows good air circulation. An outdoor bin must also be secured against rodents, raccoons, and other animals.

You may choose to place your worm bin outside during the warmer months and bring it in undercover during the cooler months.

It is okay to touch and handle worms with your bare hands as you work with them. Remember that they are photophobic (sensitive to light), so they will tend to move away from you as you add new food waste and new bedding, or when you harvest the vermicast.

What size of bin?

To figure out the bin size you need, you must first determine the amount of food waste your family generates in 1 week. Your worm bin must contain 1 cubic foot of space for each pound of kitchen waste. Note that this does not mean that the bin would always be full, but rather that it would provide ample space for worms to work at the right moisture and oxygen levels.


What materials do I use to build my bin?
You can use a variety of materials to build a worm bin. Plastic totes, wooden bins, and commercial, stackable worm towers all are popular. You also can use a shipping crate or food storage barrel (a great way to repurpose and recycle one). Just be sure that the wood was not treated with chemicals and that other toxic materials have not been stored in the containers (food grade is best).

Bedding
The bedding in your worm bin provides a balanced diet and a damp, aerated home for your
worms.
  •  Shredded newspaper or recycled printer paper (do not use glossy paper)
  • Corrugated cardboard
  • Straw
  • Coconut Fiber
  • Shredded leaves


Other tips for your bin

  • Worms need 75 to 85 percent moisture in their bedding. Lightly mist the bedding when needed.
  • When feeding pull aside some bedding and make a hole where you can put food scraps.


NC State University Extension created this great troubleshooting chart.


For more help creating your worm bin visit University of Idaho Extension office at 501 Main Street, Caldwell, or call (208) 459-6003.

Sunday, August 19, 2018

It’s Squash Week!

Squash has ancient history dating back as far as 12,000 years, American Indians called squash the “the apple of God”. In the 17th century squash was introduced to Europe; however, it was not commonly eaten until the 19th century. Iroquois American Indians had three main crops squash, beans, and maize, also known as the “Three Sisters”.


Summer squash grows on non-vining bushes. The three main types include: the yellow straight neck or crooked neck, the white scallop or patty pan, and the oblong, green, gray or gold zucchini.

Winter squash matures on the vine and is covered with a hard rind that permits winter storage. It is categorized according to its fruit size: small fruits (1 to 4 pounds) include acorn types, butternut types, and some true winter squash types; intermediate fruits (6 to 12 pounds) include banana squash, Cushow, Hubbard and some Sweet Meat varieties; large fruits (15 to 40 pounds) include Blue Hubbard, Boston Marrow and Jumbo Pink Banana varieties; jumbo fruits (50 to 100+ pounds) include Big Max and various Mammoth varieties.

If planting squash from seed, plant them either in a garden bed or in a hill. In the garden bed, they’ll need to be planted 2-3 feet apart at about a 1-inch depth. However, if planting them in a hill, take 3-4 seeds and place them together. Then mound dirt in around them. The hills will need to be 5-6 feet apart. Most summer squash varieties now come in bush form. Winter squash varieties are in vine form. So, plan accordingly if you are growing a vine. Vines need to be planted about 8-12 feet apart.
The final step to planting squash is to water regularly and consistently. One time a week, you’ll need to water the plants deeply. Give the squash plants about an inch of water so the water will reach the roots.

Care: 

Mulch - After planting squash plants place mulch around each plant. This will protect the roots of the plant and keep weeds from becoming a problem.

Fertilize - After first bloom appear on your squash plant, it is time to fertilize to the side of the plant. Fertilize regularly. Like with most gardens, fertilization once every 4-6 weeks should be ample.

Water - Water your squash plants heavily. Water them one day a week with one inch of water along with regular watering on other days.

Squash Bugs look like smaller stink bugs. They live on the squash plant and kill it by sucking the
sap right out of the plant. This sucking action releases a toxin from the bug into the plant and kills your plant. Prevention is key. Rotate crops yearly, use insecticides, and pay attention to your plants. If you can catch them while they are still small, it is much easier to get under control. Remember to dispose of all squash plants at the end of the grow season so the bugs don’t overwinter in them.


Blossom-End Rot. You think your plants are doing great, you see fruit forming, and then
you see that the end of the fruit is black which means that your fruit is inedible. This is an issue because of a calcium deficiency or your soil has uneven moisture levels in it.

Stink Bugs They are an issue because they will nibble on your plants. Clean up plants and weeds in your yard, and do not give them a place to overwinter.


Squash Vine Borer The eggs are laid at the base of a squash plant. When the eggs hatch, they begin to gnaw through the plant. This will obviously kill your squash plant. You need to clean up your garden beds every winter, so they don’t have anywhere to overwinter. Seeing signs or finding eggs, sprinkle diatomaceous earth around the base of the plant. It is more about preventing this bug than defeating it because once you see it, then it is probably too late for your plant.


The best companion plants for squash are corn, peas, beans, icicle radishes. These plants help deter certain pests that often attack squash plants.

Summer squash can be harvested about 55 days after planting. For optimum quality, harvest while fruits are tender and still have a shiny or glossy appearance. When growing conditions are favorable, harvest the crop daily or every other day. Harvest crookneck and straight neck varieties when fruit is 1½ to 2 inches in diameter. Harvest zucchini when fruit is 7 to 8 inches long and scallop types when they are 3 to 4 inches in diameter. All these squashes can be harvested at smaller sizes for extra tenderness. Do not leave large fruit of summer squash on the plant because this will inhibit the development of additional fruit. Store summer squash in a plastic bag in the refrigerator for up to 1 week.

Tuesday, July 31, 2018

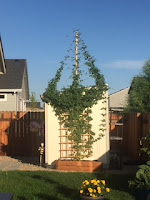
Growing Hops in Your Backyard


Growing hops in the backyard is fun, easy, and rewarding. Hops can be grown in any moderate climate with proper care. Hop vines called bines grow from a rhizome. Within a few weeks of planting, noticeable growth happens. Several hop shoots start peeking out of


the ground. Growth can be vigorous, bines growing up to two feet per week until mid-summer when the growth slows, and the plant enters the flowering stage.  Hop bines can reach upward of 20 feet in height.  

Hops were first introduced into Massachusetts from Europe in 1629. Commercial hop yards in the United States were reported to have been established in New York in the early 1800s. Commercial hops production was pushed westward during the 1920s by plant diseases encountered in the east, primarily downy mildew. Modern hops production is currently in the western United States in Oregon, Washington, and Idaho—areas less conducive to plant diseases of the humid east.

Selecting Hops:

There are two basic groups and more than 100 varieties of hops plants. Hops can grow in most moderate climates, but they do best in zones 5 through 9.  

Bittering hops have high levels of specific acids that produce bitterness in beer. 

Aroma hops have a lower content of bittering acids and a more balanced essential oil that produces pleasant aroma and flavor properties to beer.

Warning: Hops cones can be toxic to dogs. Do not allow your dog to eat the cones, either fresh or dried. 

Planting and Caring for Your Hops:

Hop plants begin as rhizomes that require well-drained soil with a pH of 6 or 7 and long periods of full sun exposure. In early spring, plant the rhizome about two inches deep with buds pointed up.

Frequent shallow watering will help establish a healthy root system. After the roots are established, less frequent, deep watering helps increase root growth and drought tolerance. Water directly at the base of the plant, wetness on the leaves will encourage disease 
formation.

Hop bines are heavy feeders and will need a supplemental feed of compost, manure, or fertilizer to remain strong.


Train your plants to grow on a trellis system. The training process helps the bines stay healthy and strong. Use twine to train the bines to the trellis. Select only vigorous bines to train and prune away the less vigorous bines.


If the texture is papery, and the cones is between one to two inches, the cone is ready to pick. Inside the cone are small, yellow particles, called lupulin, that give beer its flavor and aroma. Over the next few weeks the cones will mature at different times. To avoid losing the lupulin use scissors or pruning shears.

Note: Hop plants can cause skin irritation, so wearing gloves and long sleeves will help to prevent any skin irritation.


Your cones are ready for brewing when the central stems are brittle and lupulin powder falls out easily. You can use the cones right away for brewing or stored in a sealed container in
the freezer for later use.

  • Spread the hops out in the sunshine in a single layer protecting from wildlife.
  • Dry hops in the oven, set the temperature at 140 degrees and leave the oven door slight open to allow moisture to escape.
  • Electric food dehydrator at its lowest setting 90 to 100 degrees
After Harvest

Cut back bines to about three feet. After first heavy frost, cut the remaining bines at the soil surface and apply several inches of mulch over the grown plant.

Monday, July 16, 2018

Behemoth Cucumber

Have you ever been surprised with a huge behemoth of a cucumber that wasn't there two
 days ago? What do you do with huge cukes? Does the flavor change as they get so large?


Super large cucumbers are often hard to transform into crispy pickle spears and are often quite seedy, but still have much potential!


  • Don’t let cucumbers get too large or they will taste bitter.
  • At peak harvesting time, you should be picking cucumbers every couple of days. They’ll grow quickly!
  • Harvest regular slicing cucumbers when they about 6 to 8 inches long (slicing varieties).
  • Harvest dills at 4 to 6 inches long and pickles at 2 inches long for pickles.
  • The large burpless cucumbers can be up to 10 inches long and some types are even larger.
  • Cucumbers are best picked before their seeds become hard and are eaten when immature. Do not let them get yellow. A cucumber is of highest quality when it is uniformly green, firm, and crisp.
  • Any cucumbers left on the vine too long will also get-tough skins and lower plant productivity.
Here is an easy Sweet Pickle Relish

SweetPickle Relish 

Ingredients:

·         3 pounds Pickling Cucumbers or 4 pounds of Large Cucumbers
·         1 Large Sweet Onion
·         ¼ cup Pickling or Kosher Salt
·         3 cups White Vinegar
·         ¾ cup Sugar
·         4 cloves Garlic Minced
·         2 teaspoons Dill Seed
·         2 teaspoons Mustard Seed
·         2 teaspoons Celery Seed
·         ½ teaspoon Turmeric

Instructions:


1.  Slice the cucumber lengthwise and remove the seeds with a spoon. Discard the seeds.
2.  Finely dice the cucumber and onion.
3.  Place diced cucumbers and onions in a non-reactive pot
and add the salt. Stir and let sit for 2 hours.
4.  Drain cucumber and onion mixture in a strainer until all the liquid is removed. You may have to press the mixture against the strainer to remove hidden moisture.
5.  In a medium pot add vinegar, sugar, garlic, dill, celery, and mustard seed, and turmeric. Bring to a boil.
6.  Add cucumber and onion mixture and return to a boil.
7.  Reduce heat to medium low and simmer for 10 minutes.
8.  Remove from heat.
9.  Cool and store in refrigerator for up to a month or process in water bath for 10 minutes.


Monday, July 9, 2018

Stay sharp when mowing your lawn with these lawn mower maintenance tips.

To keep your mower in tip-top running condition, have a competent service professional thoroughly inspect your mower at least once a year.

Inspection areas:

Sharpening and balancing the blade [youtube]. A dull blade tears grass and can leave in prone to disease, and an unbalanced blade can cause your mower excess wear and tear.
     Check the air filter. If you are using the mower in dry or dusty conditions, you will need to replace the air filter more often.


                               Check the spark plug. Always ensure that the spark plug is clean and gapped correctly.


     Check the carburetor and have it adjusted if necessary.


                                Check to oil, and have it changed if needed.  


      Check the wheels, bags, and
belts and replace as needed.


Your lawn mower is likely the most frequently used piece of outdoor power equipment that you own - here's a maintenance calendar that's handy to use. Proper maintenance is extremely important to maximizing efficiency, reducing emissions, preventing costly repairs and extending the life of your lawn mower. By keeping your mower in proper working order, you can help maintain a healthy environment, pocketbook and lawn.

For more information on lawn care, contact your local University of Idaho Extension office!