Monday, December 28, 2020

Winter: The best time to ponder the bones of your yard & garden - old

With the leaves on deciduous plants gone, you can see where you need structure, where you need evergreens and where you need to prune. Here's 10 suggestions. 
You also have time out from planting and harvesting when you can think about building structures, such as walkways, decks, raised beds, trellis/gazebos, or seating areas. 
Are you thinking of creating or converting to a backyard forest garden. Here's a bridge over a dry river rock bed that flows through a wildlife area...even in a small yard! 

Dr. Douglas W. Tallamy has written a seminal book, Bringing Nature Home, on how to plan for the best ecosystem in your own yard. He has followed it with a second book, Nature's Best Hope, outlining how we can help grassroots conservation with native plants! While he is from the NE USA, his ideas are applicable here. This is the time..."one yard at a time!" 

Our winter sunshine is a plus in this, as you can get outside even in January and February to mess with lumber, edging or stepping stones (unless the snow hits). 

Go out and stare at your gardening space and draw a map of what is already there.

Consider what you’d like to keep and what isn’t working. Refer to your garden journal for successes and failures.
  • Envision what you’d like to see there and draw it in on your map. 
  • Draw a plan for how to build what your mind’s eye sees and make a materials list. Watch this video for a simple plan. 
  • Gather the materials and get started. 
  • Then, any day that’s warm enough to work, you’re ready.

Sunday, October 25, 2020

Soil, the living world beneath our feet

Everyone is curious about the life in the soil and the food web, 
yet we can’t see the "microbiome" in the soil. Gardeners love soil and have so many questions about it – how to test it, how to compost, how to enhance soil structure and fertility. For those in the "growing" world, we wonder if the difference between dirt and soil is just semantics. Turns out, it's not just semantics! Soil is a living environment...whereas dirt is basically dead soil, according to scientists. Soil is the earth’s delicately structured biological skin(video). Every terrestrial ecosystem and the food you eat sprouts from soil. (95% of food comes from soil).
  • Soil anchors and feeds forests, prairies, and farmed fields.
  • The amazing difference between dirt and soil is that soil contains mycorrhizae, a beneficial fungi, which lives beneath our feet. Click here for Dr. Linda Chalker-Scott photos and description of this beneficial fungi.
  • Soil is habitat for many burrowing animals and harbors an amazing biodiversity of microbes, insects, arthropods, and worms, many yet to be scientifically described. 
Growing a Revolution
  • Soil is essential to the water cycle as it filters and gradually releases water year-round to streams, rivers, and lakes.  
  • Soil decomposes fallen leaves, feces, dead animals and plants into soil organic matter while recycling the nutrients that plants need to grow. Increasing soil organic matter is one way to sequester atmospheric carbon dioxide and address climate change.
  • David Montgomery talks about bringing our soil back to life, and with one third of the arable land laying dormant, soil is a lifeline to healing the planet and feeding the hungry.
  • Whether one is a serious scientist, or food activist, a farmer or a backyard gardener, the following references and link resources will open a new world, one going on right under our feet. 
To understand how Canyon County soils influence plant growth, check out this class  https://bit.ly/2cSoils    offered on Zoom.

Further links: 
Great videos, interactive games from Smithsonian Environmental Research Center http://forces.si.edu/soils/ 

Soil Health Awareness: Sponsored by the US Government, this site provides information for educators. USDA Natural Resources link

Sunday, October 11, 2020

Frost, Freeze, or Hard Frost? It's that time of year...!

 According to the National Weather Service, here are the definitions of a Frost, Freeze and Hard Freeze.

Frost:  Frost occurs when there is a solid deposition of water vapor from the air. Frost will form when solid surfaces are cooled below the dew point. An air temperature range of 33°- 36°, along with very light winds, is usually needed to initiate frost formation. At least minor damage is possible to plants. One must keep in mind that a frost is not guaranteed at these temperatures if moisture in the air is lacking and/or winds are strong.


Freeze:  Freeze occurs when the air temperature drops to 32°-or-lower. A freeze will result in significant damage to many unprotected plants, especially if the temperature remains at-or-below the freezing mark for several hours.

Hard Freeze:  Hard freeze occurs when the temperature reaches 28°-or-lower for at least a few hours. It usually means that many types of plants and most seasonal vegetation will be destroyed.

Mark Longstroth with Michigan State University Extension posted the following information explaining the differences more clearly than just a definition.

A frost is when we get a visible frost. A freeze is when the air temperature drops below freezing. Sometimes we get frost when the temperatures are above freezing and we often have a freeze without frost. It all has to do with the amount of water in the air.

At the dew point, water vapor in the air condenses on the ground and other surfaces as dew. If the dew point is below freezing, the water vapor condenses as ice, freezing as frost. So the air can be above freezing and the surface of your car (or the roof of your house) can be colder than the air and colder than freezing causing a frost even though the air temperature is above freezing. That is how we get a frost without a freeze. If the dew point is much below freezing then we can get freezing temperatures cold enough to freeze plants without any frost. This is also called a black frost, a freeze without a frost. When frozen plants thaw they have a water-soaked, black appearance as they die.
Sometimes we get a freeze under windy conditions. This is caused by the movement of a cold air mass into the area with subfreezing temperatures. These freezes are called wind freezes.

Idaho Average First Frost Date Map will give you accurate information for your county.

Steps to take to help your plants survive as long as they can.
1.    Of course cover your plants with a frost fabric or sheets or plastic.
2.    Bring what plants you can indoors
3.    Water extra with warm water
4.    Keep water running at a trickle if possible for a few days.  Be careful not to over water.
5.    Wrap the trunks of young trees.
6.    Wrap pots that cannot be moved indoors.
Your plants are counting on you...Protect them!

Sunday, September 27, 2020

So, you’ve thought about composting?

Good for you! Composting is a great way to Reduce, Reuse &  Recycle. Food scraps and yard waste together currently make up more than 28 percent of what we throw away.  Composting enriches soil, helping retain moisture and suppress plant diseases and pests.  In addition composting reduces the need for chemical fertilizers and encourages the production of beneficial bacteria and fungi that break down organic matter to create humus, a rich nutrient-filled material.  Check out this website to see what the EPA says about at composting at home along with several helpful links.

Has the idea of composting and compost bins been a bit overwhelming? Do you have questions like “Will it be difficult or expensive to set up this operation?”  “What exactly should I put in my compost piles?”  “Is this project going to be labor intensive?” Do you have other questions?  Well just as we approach other aspects in our lives, if we break down the project into smaller parts the task becomes more manageable.

First thing’s first. Put your compost pile close to where you will use it. Away from drying winds, but in partial sunlight to help heat the pile. You should choose a place where water is available and adequate drainage.

 What types of materials do you need to set up composting bins? 

Well you can set your operation up as fancy or as simple as you like. An area that is about 3’x3’x3’ is a great start. You may use inexpensive materials such as wire mesh, old pallets and trash cans or buy a composting system from your local or on line retailers.  Here are two photos for examples. Consider buying a kitchen composting bin for kitchen scraps, paper towels, coffee grounds, egg shells and other things for your convenience.


What kind of material does your compost pile need?  Here is a list of safe materials.


Materials NOT to add.


Ideally, a compost pile should be made up in layers.  

The first layer should be coarse plant material to allow oxygen to circulate up through the pile. 

The second layer should be 6 to 10 inches of finer plant material such as leaves, grass clippings, and kitchen scraps.

The third layer should be a 1 inch layer of soil or manure. Consider adding 1/3 cup of nitrogen in the form of ammonium nitrate, blood meal, or bone meal for every 25 square feet of compost pile material. This will help the breakdown of plant material. Repeat layers as necessary. 

If you are interested in adding worms to your composing regimen check out this interesting article on “Vermicomposting” 

Next – ADD WATER.  Keep the pile moist but not waterlogged (think wet sponge).  You may need to add water in the summertime. As microorganisms begin to break down the organic material, heat is generated. Within a few days the compost pile should reach an internal temperature of 90 to 160 degrees F. You may want to cover your pile with a tarp to help control moisture and temperature.

Turn the pile over occasionally (every 2-4 weeks) this aerates the material for more rapid decomposition.

Composting is a process of several months to a year depending on size, conditions and maintenance of your pile.  The process is well worth it. 

For more information on basic backyard composting there are several university websites that offer great information, tips, tricks and thoughtful solutions to backyard composting.  Here is a link to a guidebook titled “Composting at Home.”

Monday, August 24, 2020

Canada Thistle: The Good the Bad and The Ugly


Flower
Canada thistle (Cirsium arvense) is an invasive weed found in almost every state, including Idaho. Everywhere it occurs it is problematic and in many areas is on the invasive-noxious weed list. The University of Idaho Extension has published a handbook: Idaho’s Noxious Weeds. See the link below for the full printable 9th edition. Canada thistle is listed on page 22. So how can this plant be considered “good,” “bad,” and “ugly” all at the same time? The following discussion will answer this question as well as offer methods of control.
Quick Identification
Canada thistle, also known as Creeping thistle, is an herbaceous perennial in the Asteraceae family that grows to 5 feet tall. It grows in roadsides, cultivated fields, pastures and non-croplands landscapes.

Rosette Stage
Leaf

Stem
This thistle is most known for the following characteristics: 
·    -toothed and spiny oblong leaves
·    -purplish-pink flower heads, which grow in numerous clusters and vertical and lateral to 20 feet deep and 15 feet across


Canada thistle – What’s Good About It?


There are some benefits to nature and for the environment.     
Image result for painted butterfly larvae site:.edu

This thistle is beneficial to pollinating insects, butterflies, predatory insects and some moths and birds.The caterpillar of the painted lady butterfly (Vanessa cadui) feeds on the leaves. 

Canada thistle is a good food source to many songbirds which feed on the nectar and seeds including the American Goldfinch and Indigo Bunting. An extensive root system can also help break up compacted and heavy-clay soil.
                                                       
Beautiful Weed with Bad Habits
Canada thistle is hard to control and kill because of its extensive root system. It likes to form dense colonies that often crowd out and replace native grasses and other desirable plants. In pastures and range lands cattle generally will not graze near infestations of Canada thistle. It produces nitrate, which can be toxic to horses if ingested in large quantities. In cropland, Canada thistle causes extensive yield losses.

Noxious weeds are non-native, invasive plants. At first glance they may appear pretty, but invasive plants can pose serious environmental threats such as the displacement of native species, and the destruction of crop land.
Canada thistle Infestation/Colony 
Canada thistle can be said to be ugly because it is on the noxious weed list in 43 states. In fact, it is one of Idaho’s most damaging noxious weeds. The Wikipedia definition is as follows: “A noxious weed is a weed which is considered to be harmful to the environment or animals, especially one which may be subject of regulations governing attempts to control it.”

Management and Control of Canada Thistle
Management and control of Canada thistle can be very difficult. It takes repeated efforts using several methods done over several years.  A task that requires consistency!  An “Integrated Management Plan”  that combines different techniques and actions may work. 
One important principle is to stress the plant and force it into exhausting nutrients stored in the roots. The second important principle is that Canada thistle resists any stress or attack by trying to produce new shoots from any little piece of root left in the ground. Consistent efforts can bring success!

Integrated Methods
Manual, Hands-On: If you have a small infestation, digging with a garden fork or hoeing should be done when the plant is young and not flowering. But this may just encourage new shoots because most of the root(s) go deeper than the fork can reach. You can also use scissors or a hoe to cut the whole plant off at the ground level. Doing these actions repeatedly and before Canada thistle blooms will keep it from seeding and stress it enough to discourage some new plant growth.

Cultural: Canada thistle generally likes poor quality soil. Improving fertility of the soil may discourage this thistle and make it more advantageous for desired plants. The first thing to do is to have the soil tested. The results will indicate what your soil needs to improve fertility.  
Mechanical: This involves mostly mowing in lawns, gardens, croplands, and non-croplands. This should be done once a week every 3-6 weeks from mid-June to September. Mowing in the spring should be done at early bud stage and before the thistle flowers and sets seed. Mowing can be done in the fall when there is a second flush of shoots. This may be the best time to mow because plant growth is slowing down and energy is going to the roots.

Chemical: Herbicides have been used to control and eradicate Canada thistle in gardens, croplands and in non-croplands. If you are using herbicides be sure to read and follow the product label instructions including precautions and warnings. Additionally, make sure Canada thistle is listed on the product’s label.

Organic: Also known as mechanical Many people want to avoid chemicals and use more natural methods in their garden such as weed management and solarization. Solarization is a great option for home landscapes

Here's the link for the complete .pdf of Idaho's Noxious Weeds.

Now is the time to or mow, mow, mow to eradicate this non-native invasive plant! 

Sunday, July 26, 2020

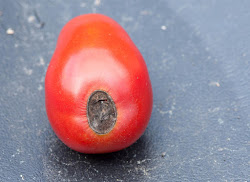
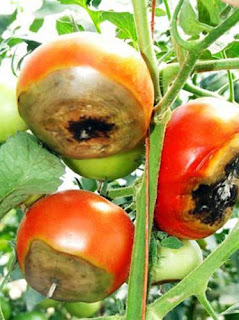
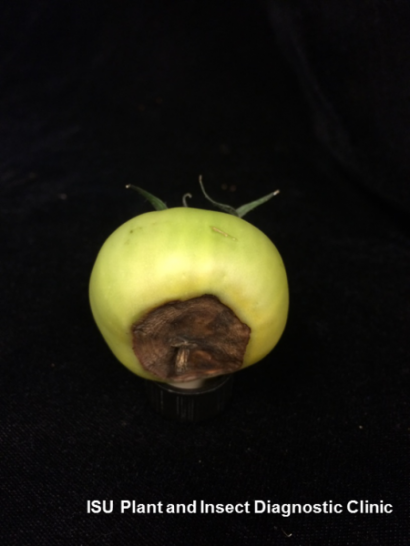
Blossom End Rot

Blossom End Rot - A Common Disease in Southern Idaho Tomatoes.

Few things are more discouraging than babying your tomatoes all season only to find that the new fruit
has developed brown, leathery bottoms. To be a tomato grower in Southern Idaho is to know this
discouragement at some point. The good news is that this physiological disease, called Blossom End Rot,
is not contagious and is preventable.

Prevention,
If you are still planning your garden and have not yet planted your tomatoes, preventing Blossom End Rot starts with ensuring that your soil has good drainage and contains enough available calcium. It is recommended that you get a soil test to understand the nutrient content of your soil before you plant anything or attempt to make any adjustments. For more information on conducting a soils test. If a soil test determines that your garden is low in calcium, you can add pulverized limestone to the top 8-12 inches of your garden soil and mix it in thoroughly before planting.

Once your tomatoes are planted in well-draining soil, your next preventative measure will be to focus on consistent watering throughout the growing season. Soil should be consistently moist to the depth of 2 feet below the surface-- not too wet nor too dry. This can be tricky in Southern Idaho where summer often starts out cool but quickly becomes very hot and dry. This requires deep soaking rather than shorter, shallow watering cycles. Applying mulch can help hold moisture in the soil as well.

If I Already Have Blossom End Rot, Can My Plants Recover?
The above pointers are great if you’re reading this in the early spring before your garden is planted, however, if you found this article after discovering that the disease has already affected your tomatoes, not to fear! The following tips will help salvage your tomatoes mid-season after discovering Blossom End Rot:
1. Pick and discard the tomatoes that have Blossom End Rot. This will stop the plant from sending any more energy to the damaged fruit.
2. Address you're watering immediately to ensure the plants get consistently moist soil to the depth of 2 feet.
3. Avoid deep cultivation around tomato plants as root damage leads to insufficient water uptake and subsequent risk of Blossom End Rot.
4. Tomatoes require a lot of nutrients as they grow, so to keep them healthy and growing, be sure to fertilize your tomatoes with a balanced fertilizer.
5. Foliar calcium can be sprayed on leaves to help increase tissue calcium in plants affected with
Blossom End Rot.

Blossom End Rot is certainly not a fun thing to discover in your tomatoes, but it is also not the end of the world. Like all gardening adventures, you can learn to manage and hopefully prevent this disease so you can enjoy many tomatoes from your garden.


Friday, July 10, 2020

Does your tree look like this?

Damage is often patchy.
Have you ever noticed a tree with a branch that turns brown midway through the season while the rest look fine? Or a vegetable plant with stems turning yellow and brown?

What is it?  
Verticillium Wilt (Vw) V. dahliae  and Verticillium albo-atrum  is a soil borne disease that spreads through the roots to a plant’s vascular system. It can stump a gardener with early drought-like symptoms. It is a fatal disease of many important agricultural and horticultural crops. It is particularly present wherever potatoes and mint were farmed. And it can even kill a tree.

What does Verticillium Wilt look like? 
Vw symptoms can include wilt, chlorosis, reddish to purplish discoloration of leaves or stems and brown-stained or stunted leaves and vary widely between species.See video.
Vw on Maple

If you think your plant is infected, first find out whether that species is a host. Plants Resistant Or Susceptible To Verticillium Wilt, developed by the University of California, is a good resource
Proper diagnosis requires laboratory testing to rule out other organisms. Homeowners can submit a sample of soil to find out the level of Vw in the soil. The cost is $50.00 for plant material sample and $105.00 for the soil testing at the University of Idaho Plant Disease Diagnostics Lab in Parma, Idaho. Be sure to contact the lab first for specific instructions at (208) 722-6701.

What Types of Plants are susceptible?
Vw affects over 300 species. Trees most commonly and severely affected are maple and ash. The list also includes red-bud, lilac, catalpa, and smoke-bush.
Vw on dahlia
Vw on blackberry
Annuals, including dahlia and sunflower can be infected, as well as garden plants like cantaloupe, tomato, and asparagus. Once affected, roots may not develop normally again.
Dr. James Woodhall, Assistant Professor and Plant Pathologist with the U of I Parma Research Center says Vw is patchy – particularly in maples, but also as it appears throughout your property. Not every inch of ground will have it.

How do I save a tree or shrub with Verticillium wilt?  
Trees and shrubs infected with this systemic disease cannot be cured. They may die quickly in one season or slowly over several years. However, you can extend the life of your plants by making sure that you water and fertilize properly. 
In woody host plants, pruning of symptomatic limbs to remove all discolored sapwood, followed by burning, has prolonged the life expectancy of some trees.

If you remove a plant or tree because of this, be sure to plant a high value tree in some other field. This fungal genus may remain alive in the soil for many years in a resting state.

Can I Prevent Verticillium damage in the future?
The best way to avoid Vw is to plant deciduous trees and shrubs that are immune or resistant. You may have seen some or all of the letters VFNT next to the names of hybrid plant varieties in catalogs and on seed packets. The name will have a V following the variety name if it is resistant to Vw. Always test the soil before planting, especially with high value trees. Purchase disease tolerant trees and plants.

Brian Hudelson, UW-Madison Plant Pathology advises not to use mulches that may have been produced from infected trees or have unknown composition. Finally, immediately collect and discard leaves that have fallen from symptomatic trees.  Both mulch and leaves are potential sources of Verticillium.