Saturday, September 28, 2024

Almost Time to Put Your Garden to Bed for the Winter

"Every gardener knows that under the cloak of 
winter  lies a miracle  ... a seed waiting to sprout, a bulb opening to the light, a bud straining to unfurl.  And the anticipation nurtures our dream."                      -  Barbara Winkler

Some of you, at the end of the gardening season, are so ready to be done and put your tools away.  However, placing your garden to rest for the winter is planting the best seed for success in the next year.  Help your garden thrive, not just survive, with these few tips to get ready for next spring...  

Clean Up – Leave seeded flower stems for winter food and places for native bees to overwinter. If it’s healthy, not only are you allowing all of the remaining energy left in the plant to feed the roots, but you are also providing valuable habitat for many of our native pollinators. They will use these structures to overwinter, perhaps having already laid their larvae within the stems. Structures from grasses and other hollow-stemmed perennials are especially valuable. Old vines provide places for insects and diseases to hide. Throw away plants that are suspect for bugs and disease to avoid passing them on to the next season.  Designate an area for a compost pile if you don’t already have one.  Add what you can to the compost pile or leave as mulch on the soil.  

Soil Testing – This is a great time to get your soil analyzed because if you find out now that your soil needs amended, you can apply it in the fall so that it has all winter to work its way into the soil.  

Crimson Clover Cover Crop
Cover Crop – In some areas of your garden you might consider planting a cover crop.  They improve soil fertility, structure, water retention, and suppress annual winter weeds.  

Leaves – Rake fallen leaves into areas of the garden that do not have a cover crop.  Leaves can be used as a mulch in vegetable gardens, flower beds, and around shrubs and trees. Leaves rot very quickly and you will be surprised how many you can work into your soil.  Leaf mulch encourages beneficial earthworms, soil microbes, and overwintering bumblebees.  They are also a great compost addition. 
Tools – Clean up your tools before storing them.  A wire brush can help get the dirt off and oil can maintain the metal parts to keep from rusting.  

Garden Journaling – Keep adding notes to your journal so you can keep track of your successes or what you could have done better, what you might want to try again or simply remove from the list. 

Tend your crops in your cold frames - carrots, lettuce, spinach, etc. Easy Peasy! 

Now relax, close your eyes, dream about spring, and await those seed and gardening catalogs!  

Friday, September 27, 2024

Growing Raspberries in Southwest Idaho

Southwest Idaho provides an exceptional climate for cultivating raspberries, making it an excellent region for growing these delectable fruits. The area's climate, characterized by warm summers and well-draining soils, is particularly well-suited to raspberry cultivation. Raspberries can be divided into two primary categories: summer-bearing (floricane) and fall-bearing (primocane). Summer-bearing varieties produce one bountiful crop in early to midsummer, while fall-bearing varieties offer two harvests—one in mid-summer and another in late summer or early fall. Additionally, raspberries come in four distinct colors: red, yellow, black, and purple, each bringing unique flavors and aesthetic appeal to your garden.

For optimal growth, raspberries thrive in sandy loam with excellent drainage. Avoid planting in areas prone to standing water or poor drainage, as these conditions can lead to root rot. A location that enjoys at least 6 hours of full sun each day is ideal for robust plant development. To ensure a successful start, prepare the planting site by removing any perennial weeds that could compete with the raspberries for nutrients. Plant raspberries as soon as the ground is workable in spring, and use a low-chloride fertilizer to promote healthy growth. A balanced “complete” fertilizer containing phosphorus, nitrogen, potassium, and possibly other essential nutrients is highly recommended. For detailed information on fertilizing raspberries, refer to this excellent publication.

Consistent watering and proper annual pruning are key to a successful raspberry harvest. Maintain regular irrigation from the bloom stage through harvest to achieve the best berry size, but be cautious of overwatering. Raspberries are particularly sensitive to excessive moisture and can develop root rot in overly wet conditions. Watering directly at the base of the plants is preferable to using overhead sprinklers, which can increase the risk of fruit and cane diseases. Effective pruning enhances light and air circulation around the plants, helps remove dead or weak canes, and minimizes disease and pest issues.

Summer-bearing raspberries should be pruned twice a year: once in late fall to early spring and again following the summer harvest. Fall-bearing raspberries should be pruned in late fall after the final harvest. For comprehensive pruning techniques, the University of Idaho’s College of Agriculture and Life Sciences YouTube channel offers valuable instructional videos.

With the right care and attention, cultivating raspberries can be a deeply rewarding experience. By adhering to these practices, you can look forward to a plentiful and satisfying harvest, bringing the joy of homegrown raspberries to your table.

Saturday, September 21, 2024

Jelly, Jam, Preserves, and Marmalade - Yummy!

Fresh, spreadable fruit in the form of jam, jelly, preserves, or marmalade, might possibly be summer's sweetest reward. The best part is that they are easy to make and can be enjoyed long after you put your garden to bed. So, what is the difference between each of these spreadable options? 

Before we dive in, it helps to know that there are two main factors that turn fruit into a thick, spreadable texture: heat (from cooking) and pectin. When fruit is heated, it will lose liquid, causing the fruit to reduce to a firmer state. Pectin is naturally-occurring in fruit and happens to also make fruit thicken when cooked. However, not all fruit contains enough pectin to reach a firm texture, so many spreadable fruit recipes call for additional pectin.

Jelly:
Jelly is the firmest and clearest of the sweet, spreadable options. The fruit is cooked and strained so only the juice ends up in the final product. Jelly is so firm that you could turn the jar over and slide the jelly out in one solid piece.

Jam:
Jam is a chunkier version of jelly. Jam has more fruit pieces and is slightly looser in texture. Chopped or pureed fruit is cooked with sugar, so pieces of fruit end up in the final product. Jams are not clear and not solid like their jelly cousin. Here's a video for strawberry freezer jam!

Preserves:
Preserves are like jam but contain more and bigger pieces of fruit. Preserves have the least gel-like consistency. They are great for serving with cheeses and meat dishes.

Marmalade:
Marmalade is a preserve, but it is made only with citrus. The whole fruit, rind and all, create a bitter-sweet spreadable delight. Lemon, orange, and grapefruit make great marmalades. Marmalades are aromatic with complex flavors and oils from the citrus peels.

Jam, jelly, preserves, and marmalade start out almost the same, but take different forms depending on how they are processed. Whether you like your fruit a spreadable solid, with small pieces of fruit, with large pieces of fruit, or you want the complex flavors of citrus, there is always something good you can choose to put on your toast.

Friday, September 13, 2024

Gardening - Art or Science?

Gardening is a fascinating blend of art and science, combining elements of both in a way that makes it uniquely compelling. On the scientific side, gardening involves an understanding of plant biology, soil chemistry, and environmental conditions. Gardeners need to grasp how plants grow and what they need to thrive—such as the right balance of water, light, and nutrients. Soil health is a critical aspect; knowing its pH level and nutrient content helps in choosing the correct fertilizers and amendments. Understanding plant life cycles, pest management, and climate patterns also plays a vital role in ensuring a garden’s success. For instance, selecting plants that are well-suited to local weather conditions and soil types can make a significant difference in their health and productivity.

But gardening isn’t just about science. It also has a strong artistic component. Many gardeners view their gardens as living canvases where they can express creativity and design skills. Garden design involves more than just planting seeds; it’s about creating a visually appealing and harmonious space. This includes choosing plants with a variety of colors, shapes, and textures and arranging them in a way that pleases the eye. Artistic principles such as balance, proportion, and unity are applied to ensure that the garden is not only functional but also beautiful. Gardeners might design pathways, select garden furniture, and incorporate decorative elements like sculptures or water features to enhance the overall aesthetic.

Moreover, gardening has a personal and emotional dimension. Creating a garden can be a deeply rewarding experience, providing a way to connect with nature and express oneself. Many find that tending to a garden is therapeutic, offering a peaceful retreat from the stresses of everyday life. The satisfaction of watching plants grow and thrive as a result of one’s efforts adds a sense of accomplishment and joy.

Gardening also contributes positively to the ecology. By cultivating a garden, gardeners support local biodiversity and create habitats for beneficial insects, birds, and other wildlife. Sustainable gardening practices, such as using native plants and reducing chemical inputs, can help conserve resources and protect the environment. Gardens can also play a role in improving air and soil quality, managing stormwater, and reducing the urban heat island effect. In essence, gardening is a harmonious blend of science and art. The scientific knowledge helps ensure plants grow well and the garden remains healthy, while the artistic touch brings beauty and personality to the space. This combination makes gardening a rich, multifaceted activity that offers both practical benefits and creative fulfillment. Whether meticulously planning the layout or simply enjoying the results, gardening allows for a unique mix of technical skill and personal expression, making it a deeply satisfying and enriching experience.

Friday, September 6, 2024

Enjoy the Pleasure of Homegrown Tea

Imagine savoring a cup made from your own garden's bounty, crafted from dried leaves and blossoms of beautiful seasonal plants. With a bit of planning and knowledge, you can create a tea garden that provides a personalized tea blend year-round. Here’s a guide to some delightful tea plants and tips for cultivating them:

Lavender
(Lavandula angustifolia)
Part Used: Buds
Lavender is not only a charming addition to your garden but also a source of relaxing tea. This plant thrives in full sun and alkaline soil, and it's relatively low maintenance. English lavender is hardy to Zone 5, blooms twice a year, and is drought tolerant. Annual pruning is essential to keep the plant healthy. Lavender is generally pest-resistant, though it can be prone to soil diseases like Phytophthora, so ensure proper drainage and avoid waterlogging.
Harvesting: Pick the flowers and buds when they are one-third to fully open. Hang them in a cool, dry, and shaded area to dry.
Brewing Tip: To brew a calming lavender tea, steep fresh or dried buds in hot water until it reaches your desired strength. Enhance the flavor with a touch of honey for added sweetness.

Mint
(Mentha sp.)
Part Used: Leaves
Mint offers a variety of flavors depending on the variety. Spearmint is a delicious tea, while peppermint provides a sweeter taste. Other options include apple mint, chocolate mint, and orange mint. Mint is a vigorous grower that can spread rapidly, so it’s best to grow it in containers or confined beds to prevent it from overtaking your garden.
Harvesting: Pick the leaves during the summer and dry them for year-round use.
Brewing Tip: Brew dried mint leaves for a refreshing iced tea in summer or a comforting warm tea in the colder months.

Calendula (Calendula officinalis)
Part Used: Petals
Calendula's vibrant yellow and orange blooms brighten any garden while offering a flavorful tea.
Harvesting: Dry the petals after picking them to preserve their flavor.
Brewing Tip: Infuse dried calendula petals with hot water and steep to your preferred taste.

Lemon Balm
(Melissa officinalis)
Part Used: Leaves
Lemon balm adds a delicate lemon flavor to tea and is an easy-to-grow perennial. It prefers full sun to partial shade and produces subtle white, pale yellow, or pink flowers. To control its spread, regular pruning is necessary to prevent it from seeding everywhere.
Harvesting: Collect and dry the leaves for use throughout the year.
Brewing Tip: Combine lemon balm leaves with other dried herbs like oat straw, rose hips, orange peel, and lavender for a delightful blend that brightens even the dreariest fall day.

Chamomile
(Chamaemelum nobile)
Part Used: Buds
Chamomile’s tiny, daisy-like flowers are perfect for a calming tea. Hardy to Zone 3, this plant prefers light, dry soil and is easy to grow. The two most common types for tea are German chamomile (Matricaria recutita) and Roman chamomile (Chamaemelum nobile).
Harvesting: Pick the buds from June to August and dry them for later use.
Brewing Tip: Combine fresh chamomile buds with boiling water, apple slices, and a touch of honey for an, aromatic tea on chilly fall evenings.

By cultivating these herbs, you can enjoy the pleasure of homegrown tea throughout the year. Happy gardening and brewing!


Note: This information is intended for educational purposes only and has not been evaluated by the Food and Drug Administration.


Saturday, August 31, 2024

What do dahlias and corn have in common? Corn root beetle damage, that's what!

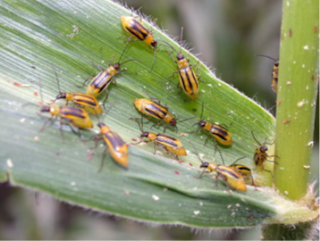
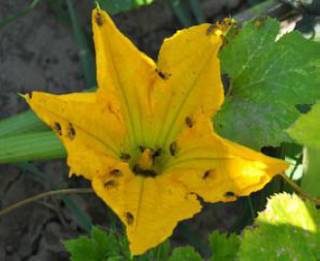
The corn root beetle is not confined to large agricultural crops; it can also invade home gardens and ornamental flowers. Fortunately, this pest has a limited life cycle, with only one generation per year. In the fall, female corn root beetles lay their eggs in the soil around corn plants. These eggs hatch the following spring, and the larvae begin feeding on the corn plant roots. By midsummer, the larvae pupate, and adult beetles emerge in search of pollen, primarily from corn silks, though they can also damage corn leaves. As the corn plants dry out later in the summer, the beetles seek other pollen sources, often targeting squash, cucumbers, pumpkins, and unfortunately, ornamental flowers such as dahlias, roses, and zinnias. They particularly favor lighter-colored blooms, causing extensive damage that can ruin the petals.

Effective management of corn root beetles involves integrated pest management strategies. Rotating corn crops annually, maintaining a distance of at least 10 feet from previous crop sites, helps break the beetle’s life cycle. Additionally, using biologics, managing weeds, and applying select soil pesticides can assist in controlling infestations. For agricultural producers, corn root beetles pose significant economic challenges, and for home gardeners, they can severely impact flower yields and health. With some planning and proactive mitigation efforts, it is possible to keep the corn root beetle populations in check


Last summer, in 2023, I undertook the task of growing the flowers for my daughter’s wedding, a project that initially seemed straightforward. I planted a variety of flowers—zinnias, dahlias, amaranth, hollyhocks, cosmos, celosia, and gomphrena—alongside corn to make the most of the garden space and to grow more vegetables. With limited experience and a constrained garden location, I didn’t realize the potential issues of planting corn so close to the wedding flowers.

At first, everything appeared to be going well. The corn germinated robustly, and the flowers started to sprout. I planted them later in the season to ensure ample blooms for the October wedding. While the dahlias were slow to start, by early August, both the corn and flowers were flourishing, with the dahlias beginning to grow in size.


However, by mid to late August, I noticed a concerning problem: the corn silks were disappearing, as if being shaved off. Upon closer inspection, I found that corn root beetles were to blame. These pests had not only damaged the corn silks but had also moved to the wedding flowers, particularly targeting the lighter-colored ones. The white and champagne dahlias suffered significant damage, as did the zinnias, hollyhocks, and amaranth.

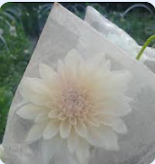
In a bid to save the flowers, I tried an insecticide, but it proved ineffective. Realizing I needed another approach, I covered the dahlias with organza bags—sheer fabric pouches designed to protect blooms from pests. These bags worked by physically blocking the beetles from reaching the flowers. Once the lighter-colored blooms were covered, the beetles shifted to other pollen sources, but the damage was already extensive.


Fortunately, my initial overplanting, due to my inexperience, ended up being beneficial. On October 14th, the weather was perfect, and my daughter’s wedding was a beautiful event. Despite the challenges with the beetles, the flowers looked lovely, thanks to the organza bags and the extra blooms from my overplanting. The day was a success, and seeing my daughter’s happiness made all the effort worthwhile.

Friday, August 23, 2024

Protecting Your Plants from Root Rot


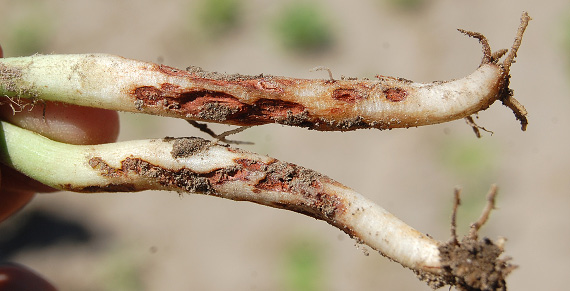
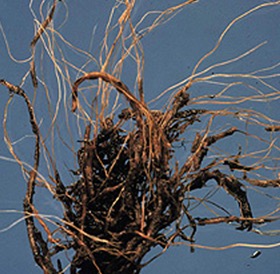
If you’ve ever pulled up a suffering plant only to find a dying, rotting root system, you know how damaging root rot can be. However, root rot can take many forms and often causes symptoms similar to those of other plant diseases and pests. In this article, we will explore what root rot is and how to protect your plants from it.


What is Root Rot?

Root rot is a general term used to describe any disease where harmful pathogens attack and deteriorate a plant’s root system. These pathogens cause the roots to die, leading to the plant suffering and eventually dying as well.

What Causes Root Rot? Root rot is commonly caused by fungi that attack the roots of plants. Many fungi are responsible for root rot, but generally, they thrive in severely moist environments. Root rot is most likely to occur in overwatered soil or soil with poor drainage. Allowing water to pool around the root base greatly increases the chances of root rot taking hold. Additionally, if roots are damaged, they can be more susceptible to root rot because they are not strong enough to defend against fungi and other pathogens.


How Can I Tell If My Plants Have Root Rot?

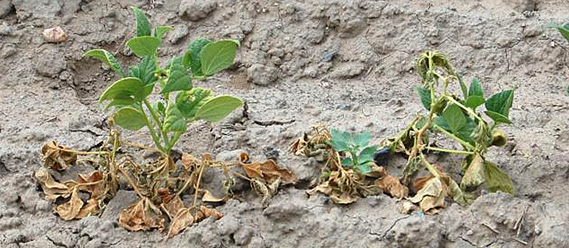
Above-ground signs of root rot often resemble symptoms of nutrient deficiencies. Stunted growth, wilting, and discoloration are common indicators. If you notice these signs, check your soil moisture to see if overwatering or poor drainage might be causing the problem. Also, consider other factors that might be contributing to the issue. 

You can also inspect the roots, but be cautious, as this can cause further damage and reduce the chances of recovery for many plants. If a plant is severely damaged, examining the roots may provide useful information to help save other plants in the area or to inform future plantings.


How to Treat and Prevent Root Rot

Improving drainage and watering appropriately are the most immediate ways to prevent root rot. Once root rot has taken hold, several factors affect whether a plant can recover. There are chemicals available to treat many of the fungal causes of root rot, but accurate diagnosis of the specific fungus is necessary before applying any treatments.


Water meters can be useful for determining the moisture content of your soil. Research your specific plants to find their ideal moisture levels. Another promising prevention measure is the introduction of beneficial mycorrhizae to the landscape before planting. These organisms occupy space that harmful fungi might otherwise inhabit.


Root rot can be severely damaging to plants, but by monitoring soil moisture and taking preventive measures, you can significantly reduce the risk of root rot affecting your plants.

Photos: R. Harveson, Univ. of Nebraska