There are as many designs of tomato cages as there are preferences to their use. There is a variety of materials to use for tomato cages, as well. You need to consider what you want out of your tomato supports. How long do you want them to last? Wooden crates can be built or purchased and are relatively inexpensive but the wood will eventually rot so you may get fewer years of use from this type of support. Wire supports will last longer but sometimes they aren’t strong enough to support large tomato plants. PVC works well but sometimes take longer to put together and the sun will eventually weaken them. You also have to consider where you will store the cages when they aren’t being used.
How much room do you have?
Can the cage be dismantled so it will store in a smaller spot?
Now you need to consider design:
How easy will it be to prune and harvest your tomatoes in the cage you use?
Do you need the bottom open to allow for easy weeding and watering?
Do you need the top more open to make harvesting your ripe tomatoes easier?
Once you have determined what design and material you want to use, there are numerous sites that will give you detailed instructions on building your tomato cages and pros and cons of the multitude of designs available. One thing is certain, you will need to support your tomatoes to get a healthier and more abundant harvest. Enjoy!
Coleus (Coleus blumei)Coleus plants are eye-dazzlers and easy to grow with impossibly
colorful leaves. They are not grown for their flowers but for their leaves.In fact you should pinch flowers off when they appear so that plant energy goes to the leaves. The leaf patterns and
colors are distinctly on the wild side — spotted, splashed, and edged in shades
of color ranging from purple, yellow, pink, intense red, and
luminous chartreuse. Coleus thrives in heat
and part shade and only need regular watering to flourish all summer. Some coleus trail so they make the perfect “spiller” for shady area pots.
Coleus can stand
alone in the shade garden but are spectacular added to the Hostas or Ferns in
the shade garden.Coleus come in so many
colors and shapes that they can be placed from the back to the front of your
shade garden and make a statement or blend nicely with the perennials you
already have planted.
Coleus are fairly
easy to start indoors from seed or plants are readily available just about
anywhere nursery plants are sold.Coleus
will be the first plant to succumb to fall frost but if you move them indoors
prior to that frost they make colorful houseplants over the winter.
With signs of Spring all around, you look out at the patch of dirt you put to bed last Fall and feel excited at the prospect of what you might plant there.
Then one beautiful, warm day you plant seeds and starts then stand back and admire your work. You are soon discover your work has only begun. The primary hurdle in keeping your garden alive will be to provide adequate amounts of water throughout the dry, arid Southwest Idaho Summer.
Keeping your plants wet may not seem like a big hurdle in May but, trust me, if you do not have a good plan in place you’ll be very frustrated by mid-July.
It turns out, there are a few different ways you can effectively keep your garden watered. Let’s summarize 3 basic methods for watering and analyze pros and cons for each method.
Probably the simplest and most straight forward way to water a garden is to strategically set up an overhead sprinkler. Of course, there are different styles of sprinklers many with a moving head that can provide water to a large garden area. Two advantages of using an overhead sprinkler system are of course ease of installation and low cost.
Another advantage for this method is the ease with which you can measure the amount of water being applied to your garden. You can see the water hitting your garden then place bowls or buckets throughout to catch and measure the amount emitted.
There are some disadvantages and cautions to keep in mind when using overhead sprinklers. First, with most overhead sprinklers it is estimated that only about 30% percent of water coming from the sprinkler is utilized by the plant due in part to evaporation.
Also, along with providing water to your plants you are also refreshing the weeds that share the garden space allowing those to thrive as well. You will find that you have bigger, happier weeds alongside your plants.
Finally, overhead watering provides water to the plant leaves which, especially if wet through the night, encourage mold and fungal disease.
Another popular way to water a garden is to utilize the drip system. A drip system was invented to combat all the dangers of overhead watering by applying water directly to the base of the plants.
A visit to your local hardware store will reveal the various types of tubing and attachments available to apply a drip system. One type of tubing comes with holes 12-18 inches apart so that when attached to your hose and laid in rows the water runs onto the plant’s base.
Drip irrigation provides water near the base of the plant, leaving the upper foliage dry and less susceptible to fungi.
You can also utilize a type of thick black tubing that does not have pre-made holes. With this you purchase smaller “feeder tubes” then puncture them through that main tube. You can customize exactly which plants you’d like to receive the water by placing the emitter tube at the base of the plant. This works especially well in flower beds or with the bigger plants in your garden such as tomato plants.
Drip systems are great for weed prevention by watering the plant and not the entire garden area. They use less water because less is obstructed by leaves and lost to evaporation and/or wind.
As a disadvantage, installing a drip system can be costly, especially if you have a large garden area. It can also be labor intensive at the start to purchase and install. Incorporating a drip system into your sprinkler timing zones adds another level of labor and requires some expertise. Yet this can sure save precious time and allows you to go on vacation without worrying about your garden.
Also, a drip system will require that you dismantle and store the parts in your garage every Autumn. You will also need to keep an eye on your system to be sure the tubes remain unclogged and the parts in good working order, then replace or maintain parts as necessary. Because the holes that emit water in the tubing are small they can become clogged from sediments in the water. Installing a filter at the water’s outlet source or hose bib.
Finally, another watering method that replicates the drip is the use of a soaker hose. A soaker hose attaches to your main hose and when the water is turned on it literally seeps out of the hose wetting the area around it. Like the drip tubes, a soaker hose is applied to the base of plants so its roots receive needed moisture and the leaves stay dry. It can also wrap around an area making it useful for a crop of small shoots like carrots.
A soaker hose will apply more water between plats than the drip tube so you may find a trail of weeds there.
Soaker hoses are generally less expensive than drip tubes but because of their woven fabric and depending on your water type, soaker hoses don’t last through multiple seasons. This means you’ll have to expect the regular purchase of replacements.
You may find that you use more than one method for your garden area depending on each plant. Or, you may enjoy the ease of staying with one method.
The task of developing an ideal system for watering that fits your needs and matches your time and budget will be a process. Don’t be afraid to explore different methods, get out there and enjoy what you create!
There are many hydroponic
growing systems on the market in various price ranges but using inexpensive
canning jars is a budget-friendly option. With a little creativity, your
hydroponic mason jar garden can be an essential part of your kitchen.
Follow these simple steps to
make your hydroponic mason jar garden:
Plant the seeds in the rockwool growing cubes. (See Hydroponics Part 1)
While they are germinating, you can prepare the mason jars.
Once the seedlings have roots extending out of the bottom of the cube, it’s time to plant your hydroponic garden in glass jars
Wash the mason
jars and rinse the clay pebbles.
Prepare the
mason jar by spray painting it black, coating it with tape or enclosing it in a
fabric sleeve.
Place the net
pot in the jar. Screw the band onto the jar to hold the net pot in place.
Fill the jar
with water, stopping when the water level is about ¼ inch (6 mm.) above the
bottom of the net pot.
Filtered or
reverse osmosis water is best.
Add hydroponic
nutrients. (for more information see Nutrients below)
Place a thin
layer of clay pellets in the bottom of the net pot.
Next, put the
rockwool growing cube containing the sprouted seedling onto the clay pellets.
Continue
carefully placing clay pellets around and on top of the rockwool cube.
Place your
hydroponic mason jar garden in a sunny location or provide adequate artificial
light.
Nutrients: Without soil, the nutrients that plants need to live and thrive must be delivered directly to their roots (or occasionally, their leaves). Doing this in a practical, effective way is the goal of any hydroponic grower. But the goal of delivering the ideal amount of each nutrient to plants is not as simple as dumping hydroponic fertilizers into the system water.
To be ‘complete nutrients’ for hydroponic plants need to have the essential elements for growth these are:
Nitrogen (N)
Potassium (K)
Phosphorus (P)
Calcium (Ca)
Magnesium (Mg)
Sulphur (S)
Iron (Fe)
Manganese (Mn)
Copper (Cu)
Zinc (Zn)
Molybdate (Mo)
Boron (B)
Chlorine (Cl)
The
levels that these elements are present in your hydroponic nutrient tend to vary
between brands, since there is no one single recommendation for concentrations.
Many nutrients may also contain some of the ‘beneficial elements’ such as
Nickel (Ni), Cobalt (Co), Silica (Si) or Selenium (Se). While these are not
‘essential’ (plants will still grow without them), they can be beneficial to
many plants.
Selecting and Preparing Nutrient Solutions:
You can create your own nutrient mix or get a
Hydroponic nutrient package from the store. For beginners, I highly recommend
you buy it, saving the experimenting and mixing your own nutrients when you get
a bit experience.
Normally, you will see listed in the
ingredients and formula of the solutions sold at the store are 3 numbers in
percentages. These are the 3 most important minerals that listed above -
Nitrogen (N), Phosphorus (P), Potassium (K). For example, they come at the
ratio 10-10-10, meaning that each the nutrient is composed of 10% of the
solution. The rest of 70% is water, micro-nutrients, and other chelates that
assist the nutritional process.
Of course, that ratio will be different,
depending on a variety of criteria:
Plants types
Plant growth stage
Parts of plants you want to bring the most yields (leaf, fruit,
root)
Light intensity, weather, temperature, the season of the
year.
If you are to choose
available solutions for your hydroponic garden, the one thing to keep in mind
is that you should get the nutrient designed specifically for Hydroponics only.
Forget all about the all-purpose package which can be used in both soil and
hydroponics. Common fertilizers used in soil do not contain necessary
micro-nutrients that Hydroponics plants require.
Second, it is recommended to
use the 2 or 3 parts solution in the liquid. Normally, a liquid solution is
easier to work with than powder form because it easily digests in water, and
most of the liquid solution comes with pH buffers.
And you should buy the 3 part because it does help you later
when you need to blend and mix in different combinations for the plant's growth
purpose, and specific stage of growth.
Check which stages of growth
your plants are in order to mix the 3 parts with the correct ratio. Check
the manufacturer instruction of your nutrient products.
Start by adding fresh water to
the reservoir.
Add the Micro part first to the
water. It contains elements like Calcium, Copper, Boron, Iron,
Manganese and Zinc and some Nitrogen. Stir the solution
Next is the Grow part. This
contains ammoniacal nitrogen, nitrate nitrogen, phosphate, potassium, and
magnesium. Stir well.
Add the Bloom Hydroponics
solution. This contains phosphate, potassium, soluble magnesium and sulfur.
Again, stir the solution.
It's very important to Check the pH of the nutrient mix after getting all nutrients
into your nutrient tank. Plants fail to take up important nutrients when
the pH level goes out of its recommended range. The ideal one is between
5.5 to 6.5
Don't forget to check the
temperature of the solution. About 64 to 66 degrees Fahrenheit is ideal.
Harvest:
The growth rate on a hydroponic plant is 30-50 percent faster than a
soil plant, grown under the same conditions. The yield of the plant is also
greater. Scientists believe that there are several reasons for the drastic
differences between hydroponic and soil plants.
Hydroponics means “working water” (hydro means water and ponos means labor). Many different civilizations have utilized hydroponic growing techniques throughout history. As noted in Hydroponic Food Production by Howard M. Resh: "The hanging gardens of Babylon, the floating gardens of the Aztecs of Mexico and those of the Chinese are examples of 'Hydroponic' culture. Egyptian hieroglyphic records dating back several hundred years B.C. describe the growing of plants in water." While hydroponics is an ancient method of growing plants, giant strides have been made over the years in this innovative area of agriculture. Throughout the last century, scientists and
horticulturists experimented with different methods of hydroponics. One of the
potential applications of hydroponics that drove research was growing fresh
produce in non-arable areas of the world and areas with little to no soil.
Hydroponics was used during World War II to supply troops stationed on
non-arable islands in the Pacific with fresh produce grown in locally
established hydroponic systems.
Later in the century, hydroponics
was integrated into the space program. As NASA considered the practicalities of locating a society
on another planet or the Earth's moon, hydroponics easily fit into their
sustainability plans. By the 1970s, it wasn't just scientists and analysts who
were involved in hydroponics. Traditional farmers and eager hobbyists began to
be attracted to the virtues of hydroponic growing.
Where can hydroponic
grow?
Anywhere. Indoors, in a
greenhouse as well as outdoors. Any plant can be grown with hydroponics, though
some are more delicate than others. If there is enough light for the plant to
grow, you can probably bet somebody has grown it using hydroponics.
Supplies needed to
grow hydroponic plants in a jar.
You’ll also need a way to block light from
entering the mason jar in order to prevent algae growth. You can coat the jars
with black spray paint, cover them with duct or washi tape or use a
light-blocking fabric sleeve.
Steps for starting seeds with Rockwool Cubes:
Preparing
Rockwool Cubes
a.Rockwool Cubes have a PH of roughly 7.8. This is
pretty alkaline, yet plants prefer to grow in a slightly more acidic
environment (between 5.5 – 6.5). In order to prepare our Rockwell cubes for the
seeds, we need to soak them in some PH adjusted water, that way they have
everything the seeds need to germinate and sprout; water and a slightly acidic
environment. b.Fill the container/bowl with water from your tap.
You may also choose to use water filtered through a Britta or reverse osmosis
(R/O) water, I’ve had success with all 3 of them so whichever you have on hand
will work fine.
c.Using either a PH test kit or a Ph meter,
determine the Ph of the water. Water comes out alkaline, usually around 7.4, so
you will need to acidify it a little bit to bring that Ph down to the desired
level. Aim for as close to a Ph of 5.5-6 as you can get.
d.To accomplish this, use either Ph down chemicals,
or lime juice (as it’s acidic). Add these to the water in small increments
(VERY SMALL) and test the water to see where the Ph is. Continue doing this
until you have a Ph of 5.5-6. Important: Do not let the PH of the water go below 5. A Ph this
low will damage the fibers of the Rockwool Cube
e.It’s time to stabilize and hydrate the Rockwool
cubes in it. Insert the Rockwool Cubes into your container and let them soak
for roughly 1 hour. Once the hour is up, the cubes will be big and fat with
water. Take them out of the bowl of water and put them somewhere you don’t mind
getting a little wet. Save the remaining water for step 3.
DO NOT SQUEEZE THEM TO DRAIN ANY
WATER f. Rockwool Cubes are designed to maintain the
correct water to air ratio and squeezing them may damage their structure.
2.Plant the Seeds
a.Most Rockwool cubes come with holes in them, if
yours did not, than create a hole in one side that is approximately a quarter
inch (0.75 cm) deep.
b.Take 1-2 seeds and insert them carefully into the
holes. Use a toothpick or similar object to push them down to the bottom, as
you want them to be at the bottom of that hole. Rip or push a piece of the
Rockwool over the hole (you don’t have to fill it completely), so that the seed
can germinate in a dark moist environment.
c.If you can, place them in a tray with a dome on
it. This will help create a little humidity in there which seedlings like. This
is not mandatory, but it helps.
d.Put the container in a cool dark place and leave
them alone. The temperature should be roughly 68 degrees F. e.Check in 2 or 3 days, if seedlings sprouted and
are touching the dome, remove dome.
3. Let them Grow
a.If you put more than one seed in your cube (just
in case one didn’t make it), than you probably have several seeds sprouting up
in each cube at the end of 2~3 days. Once the first true leaves emerge, we want
to select for the strongest one (the one that grew the tallest) and cut off the
tops of all other seeds that are growing next to it. Do not pluck them out, as
you may uproot it’s neighbors. Simply cut it off as close to the hole as you
can without messing with the stronger one that you plan on keeping alive.
b.Depending on how hot it is (and other factors)
you may need to water your cubes 1-4 times a day. Use the Ph adjusted water
when doing so (that’s why I had you save the leftovers from step 2). If you
already threw that water out, go make another batch of Ph adjusted water and
keep it in a separate bottle or container for watering. Note:Do not over water andDo not add any nutrients to your
Rockwool Cubes.
4. Transplant
About
2-3 weeks after germinating, you are ready to transplant these babies into the
hydroponic system of your choice. A good rule of thumb to go by is that you
want to transplant them once the first roots begin poking out of the Rockwool
cube. Don’t wait too long though, as eventually the roots will begin tangling
around the cube since it is their only source of water. You want to catch them
right as they pop out, so that when you transfer them into your hydro system
the roots will grow down into the system, and not just try to feed off the
Rockwool cube alone. See Part 2 for steps in creating a Hydroponic Glass Garden
Asparagus is a
shining gem of springtime in Southwestern Idaho. Packed full of nutrition and
boasting a delightful flavor, asparagus will give you 15 years or so of
production from one well thought out planting. When mature, one plant produces
about ½ pound of asparagus a year. It is an early producer, so you can plan on
fresh vegetables gracing your table much sooner than neighbors who haven’t
established asparagus in their garden planning. Getting this productive
perennial started growing in the right spot and with the right preparation, is
the most important step for the home gardener with regard to their plans to
grow asparagus.
Where to Plant?
Due to it being a perennial, planting it at the
side or center of your garden can be ideal so it doesn’t interfere with plot
preparation and cultivation of annual crops. It can grow to a height of 3 to 8
feet tall, so a bed on the north or east side of your regular garden plot in a
spot that gets approximately 7 hours of full sun each day is ideal. Because asparagus roots can be deeper than 6’, even raised beds are an option.
Consider that a 25’ to 50’ row will supply the typical family with enough
asparagus for regular use.
Site Preparation
Asparagus prefers deep, well-drained loam or
sandy loam with a pH of 6.5 to 7.5. If the soil retains too much moisture,
asparagus can die from root rot. It will grow in soil conditions that are not
ideal, but the life of the plant and the production will be reduced. It is best
to begin site preparation in the fall by breaking up the soil to around 18”
deep and working in rich organic matter like mature compost or aged manure.
Simultaneously, add 4 to 5 pounds of 5-10-10 fertilizer per 100 square feet.
Prepare an area that is 3’ to 4’ wide and as long as necessary to supply the
amount of asparagus you wish to reap from your harvest each year, after plants
mature.
Planting
You can start growing asparagus from seed or crowns. Most choose to start with one year old crowns to get to harvest faster.
Choose large crowns that have not dried out - male crowns are more productive than female crowns. Older crowns can be purchased, but
they are more expensive and much harder to plant successfully. If you are
working with prepared good soil, dig a trench 12” to 18” wide and 6” to 8”
deep. If you are working with heavier soil, use the more shallow depth. Spread
mature compost or aged manure in the bottom and cover with about an inch of garden
soil. Place crowns in trench about 18” apart, while spreading roots to insure
they lie flat. During the growing season, continue adding soil or aged manure
until the trench is full, being careful not to cover foliage.
Maintenance
For ongoing high spear yields, it is recommended
to fertilize before plants start growing each spring and again in the fall
after harvest using 1 ¼ pounds of 5-10-10 fertilizer per 100 square feet each
time. A deep watering once every couple of weeks during dry season is plenty
due to the deep root system. Weeding should be done somewhat regularly, but do
not cultivate deeply as you can encourage disease if crowns are damaged. Adding
a thick layer of mulch will help reduce weeds. You may use herbicides approved
for asparagus, but mulching and hand cultivating is favored. Take the time to
learn about dealing with pests like Asparagus Beetles and diseases
like Fusarium Wilt and Root Rot.
Harvest
The reward for taking
the time to plan and prepare your plot, and the patience you exhibit for
several years is the harvest! It is recommended not to harvest any asparagus
until the third year to allow the crowns to be mature. You may remove a small
harvest for approximately 3 weeks during the third year. You can harvest for 6
to 8 weeks for every year after that. Harvest in the morning when spears are
crisp. Spears should be 5” to 7” when harvested. Snapping the spears is advised
over cutting to avoid damaging emerging spears. Refrigerate spears promptly
after harvesting. An excellent, simple recipe for asparagus is Oven Roasted Asparagus
This is Turf and Tree teams 3rd season where we meet every Monday morning to go through local residents call-ins or emails asking for help with their turf or tree problems. So far we have stayed quite busy with site visits to clients properties throughout the county and steady stream of call-ins/emails to extension office. Unfortunately the team is having to struggle again with a small group of dedicated members to get through a long list of clients needing help. But we have been able to manage and so far the folks we have visited and talked with on the phone seems very much appreciative of what we are doing for them.
This update will cover a couple of site visits we did recently that took us to large acre home site in south Caldwell and winery in Sunnyslope area. We’ll cover what looks to be our biggest issues so far this season.
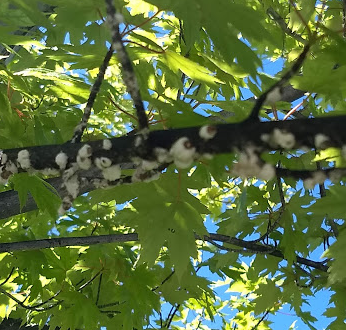
The cottony scale name comes from the shape and color that is on the tree branches that looks like cotton balls glued to branches. These so called cotton balls are egg sacks filled with harmful insect. This issue seems to be more prone to silver and red maple trees. There are multiple ways to control this issue by cultural control or Biological control.
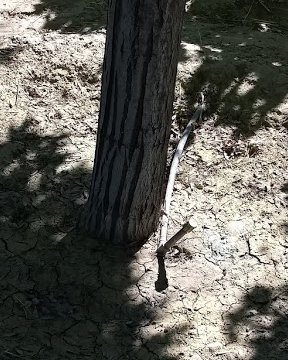
The other big issue we are seeing is either severe over watering or having your water emitters/sprinklers in the wrong spot. The picture on the left shows maple tree where the water emitter is in the wrong spot for the tree to take in water. It should be at the tree's dripline near the end of the branches where they extent out. This is where our trees are taking in and release vidal water and nutrients. The picture in the middle shows this tree under stress and trying to protect itself by releasing sap to try to drive the attacking insects out. The picture on the right shows signs of severe overwatering causing iron nutrient not to be taken up through tree roots that causes iron chlorosis.
Emitter in wrong spot Sap from tree Over watering causing

 There are as many designs of tomato cages as there are preferences to their use. There is a variety of materials to use for tomato cages, as well. You need to consider what you want out of your tomato supports. How long do you want them to last? Wooden crates can be built or purchased and are relatively inexpensive but the wood will eventually rot so you may get fewer years of use from this type of support. Wire supports will last longer but sometimes they aren’t strong enough to support large tomato plants. PVC works well but sometimes take longer to put together and the sun will eventually weaken them. You also have to consider where you will store the cages when they aren’t being used.