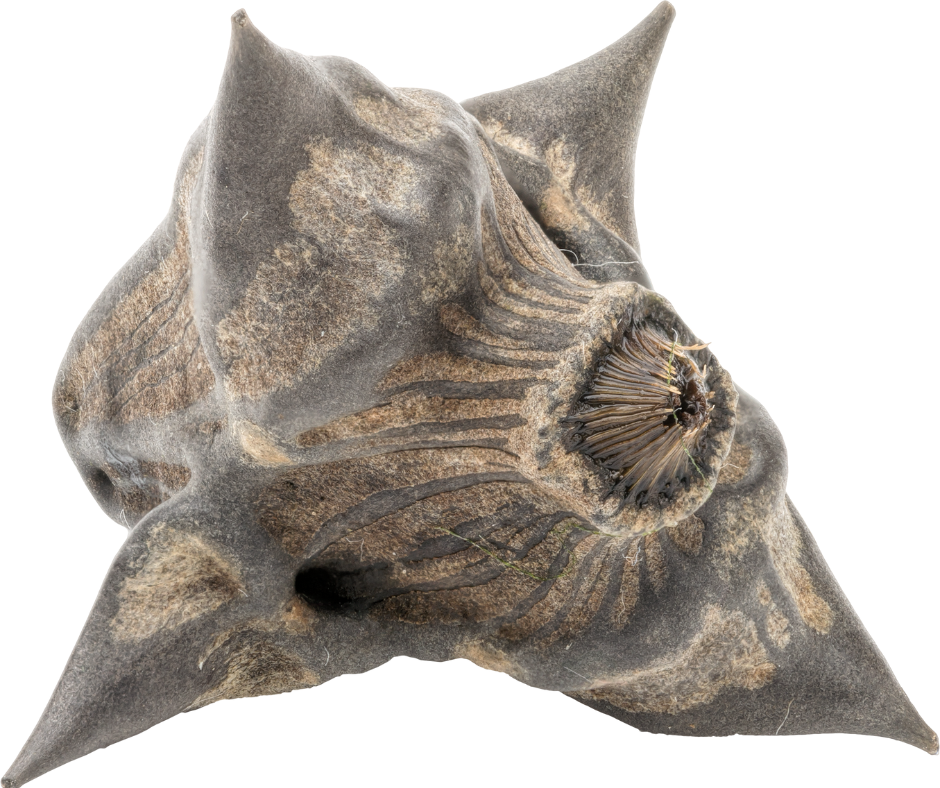
Friday, August 15, 2025

Late Summer Perennial Division: Give Your Plants a Fresh Start

By mid- to late August in Boise, most of our early summer blooms have finished their show. The garden settles into a slower, late-season rhythm: greens deepen, seed heads form, and those long, golden evenings hint at autumn’s arrival. It’s the perfect time to give some of your hard-working perennials a fresh start by dividing them.

Division is like a spa day for plants—it reinvigorates growth, prevents overcrowding, and even gives you extra divisions to plant elsewhere or share with friends. In our high-desert climate, with hot summers and fast-cooling autumn nights, late-summer division is a smart move. The warm soil helps roots reestablish, and cooler evenings reduce transplant stress. As the University of Minnesota Extension points out, dividing perennials stimulates new growth, encourages more vigorous blooming, and improves airflow to help reduce disease pressure. 

The best candidates for this timing are spring- and early summer-bloomers. Day-lilies, bearded iris (divided right after their flowers fade), cheerful Shasta daisies, and peonies all respond well to late August or early September division. Creeping phlox, shade-loving hostas, and sturdy yarrow also benefit from this seasonal refresh. Fall bloomers like asters and mums are best left until spring so their floral display isn’t interrupted.

Some of our native perennials can be treated the same way. Coneflowers and goldenrod both respond beautifully to late-summer division, sending up vigorous new shoots the following spring. Blanket flower and prairie smoke also divide well now. Others—like penstemon, globe mallow, and showy milkweed—tend to resist root disturbance and are better propagated from seed or cuttings rather than being dug and split.

Your plants will often tell you when they need attention. A thinning or bare center in the clump, smaller or fewer blooms, or an enthusiastic spread that’s crowding out its neighbors are all signs that a division is in order. When you’re ready, start by watering thoroughly the day before so the roots are well-hydrated. Work carefully with a spade or fork to lift the entire root ball, keeping as much root intact as possible. Then gently tease the clump apart by hand or use a sharp knife to create new sections, each with healthy roots and several strong growing points. Prepare the planting area with compost to give your divisions a nutrient boost, and replant promptly at the same depth they were growing before. If you’re not ready to place them in the garden, you can also pot up divisions in containers, keeping them watered and sheltered until you’re ready to plant, donate, or share them. Water deeply, and keep the soil consistently moist until you see new growth.

For the smoothest recovery, work in the cool of morning or evening, and if the sun is intense, offer a bit of temporary shade for a few days. A light mulch will help regulate soil temperature and hold in moisture.

By tending to this now, you’ll set the stage for stronger, healthier plants next spring—and perhaps even have a few extras to share with friends or donate to a community plant sale. Sometimes, the best way to help a plant thrive is to give it the gift of space and a fresh beginning.

We've included links to show you more:

Friday, August 8, 2025

Repurpose your Wine Corks in the Garden - Fun!!!

7 Easy Ways to Repurpose Wine Corks in Your Garden

By Viveka Neveln  Published on July 23, 2025, in Better Homes & Gardens   


Don't toss your wine corks—put them to use in your garden! Whether you have a whole collection saved for that craft project you keep putting off, or just one or two, corks can enhance your outdoor space right now in lots of clever ways. With just a few tools and supplies, here's how to reuse wine corks for pretty and practical purposes around your garden.


1. Plant Markers

Turn wine corks into simple DIY plant markers with just a permanent marker and wooden skewers. Write the plant's name on the side of the cork with your marker, or you could get fancy and use a wood-burning pen, if you have one. Then stab the sharp end of a skewer into one end of your cork, depending on if you want to read the word from the top going down or starting at the bottom end of the cork.


Your new plant markers will add rustic, homespun charm to veggie beds, herb gardens, and container gardens. The cork will hold up well to the elements, lasting at least a growing season.


2. Pot Feet

Pots and planters drain better when raised up a little from a flat surface. You can buy pot feet or plant stands to do the job, but wine corks offer another simple solution. Cut a few corks in half the short way, then glue them to the bottom of your pots before filling with soil.


Make sure to cut the corks so the pieces are exactly the same height so you can keep the pot level. The extra space allows water to flow away from the pot's base, which helps avoid root rot as well as staining on patios or decks. You can also set the pot in a saucer, where the cork feet will prevent the bottom of the pot from sitting in water, which can keep the soil too wet.


3. Mulch for Pots

Natural corks (as opposed to the synthetic ones) are made from the bark of cork oak trees, and like the bark from other trees, you can use it as mulch. Break up your leftover wine corks into small chunks, then layer them around the base of your plants as DIY mulch. Because cork is buoyant, it's best to use this mulch in container gardens where the rim of your pot will stop them from floating away in a downpour. Just like other types of organic mulch, your cork mulch will help conserve moisture, stop weeds, and eventually will break down into the soil.


4. Make a Garden Kneeling Pad

If you have a large collection of corks, or have some wine-drinking friends who'd like to contribute to the cause, you can make a simple kneeling pad for gardening. Hot glue the corks side-by-side in a rectangular shape. Aim for your total surface to measure 21-36 inches long and 14-18 inches wide. Glue your cork rectangle on top of an inexpensive outdoor waterproof mat for extra stability. Trim the mat to fit the corks if necessary. The corks will help cushion your knees next time you need to weed or plant.


5. Fairy Garden Accessories 

Let your imagination loose to wine corks in all
sorts of fanciful ways for fairy gardens. For example, you can stand the corks on end to serve as edging for a tiny garden path, shown above. Or you can slice them into coins that can serve as stepping stones. Halve your corks lengthwise, and use them to create adorable, log-like steps. Give one of these half cork pieces four toothpick legs, and you have a rustic garden bench perfect for a fairy scene.


6. Topper for Stakes

Bamboo poles or other types of stakes make sturdy supports for tall veggies and flowers. But they can become a safety hazard when you're working around them. Top the ends with wine corks to help make them less damaging if one does poke you in the eye. Plus, you can paint the corks with bright colors to help make the ends of stakes more visible.


7. Compost Your Corks

If you're not feeling crafty but you don't want to just throw out your wine corks, simply add them to your compost bin. Cut them up into small pieces to help them break down faster. They count as a "brown" material in your compost, which should be layered with "green" materials for the composting process to work best.

Monday, August 4, 2025

Happy Lawn, Happy Gardener!

     The first step to having a healthy and attractive lawn and controlling weeds is choosing a grass variety best adapted to your lifestyle and available resources. Factors to consider would be high traffic, shaded and sunny areas, type of soil, available water and amount of time available to care for the lawn.

Irrigate properly to help reduce annual weed infestation. Light frequent irrigation encourages weed seed germination, even if a pre-emergence herbicide has been applied. Water 1- 1.5 inches per watering. Do not water again until you see signs of wilt. Turf will also turn a shade of blue green when it is water stressed. The best time to irrigate your lawn is between 10p.m and 6a.m. 

Mowing  The preferred mowing height for all species of grass is 2 ½ - 3 inches. The minimum height that any lawn should be mowed is 2 inches. Mowing to heights less than 2 inches results in decreased drought and heat tolerance plus higher incidences of insect, disease, and weed problems.  The seeds of some weeds require high light intensity to germinate. The shaded environment near the soil surface in a high mown lawn helps deter weed germination. Mowing frequently enough that no more than one third of the grass height is removed at any single mowing. If the mowing height is two inches the grass should be mowed when it is 3 inches tall. If the mowing height is 3 inches, it should be mowed when it's about 4 inches. Keep your mower blade sharp to avoid shredding and fraying leaf blades.  Grass clippings should be allowed to fall back into the yard to provide natural nitrogen in the soil. 

https://bugwoodcloud.org/images/768x512/1391355.jpgPre-emergence herbicides   A Pre-emergent is activated in the top layer of soil where the weed seeds sprout, and by design it stops the plant from growing. A pre-emergent is NOT effective once the weeds are showing. Spreading out the herbicide so that it is evenly distributed is critical. It must also be watered into the soil within the appointed time period. The soil must remain undisturbed in order to maintain the barrier. A pre-emergent has to be replaced, or replenished. Pre-emergence should be applied two to four weeks before the seeds start to germinate in mid  March to early April depending on weather. Warm moist springs cause earlier germination. The temperature of the soil ( 55-60 degrees)  as it starts to warm up in the spring is going to be the primary indicator of the pending arrival of various weed species. With normal weather patterns pre-emergence herbicides give good to excellent control of crabgrass, foxtail, and barnyard grass.  Do not over seed into areas that have recently been treated with pre- emergence.

https://bugwoodcloud.org/images/768x512/1120214.jpgPost- emergence herbicides Perennial broadleaf weeds can be controlled by post emergent herbicides. It is important to properly identify the weed before choosing an herbicide. Some common perennial  broadleaf weeds in lawns are dandelion, field bindweed  ( morning glory), White clover, curly dock, ground ivy, Canada thistle, broad leaf plantain, buckhorn plantain and yarrow. The best time to control perennial weeds is in late summer or early fall when weeds are preparing for winter. 

Core cultivate ( aerate) the lawn at least once a year to reduce compaction and to  control thatch. 

Fertilization Fertilizer may be needed if the lawn has poor color and vigor, doesn’t recover from traffic or more weeds are present. Nitrogen is the most important nutrient for lawns. Do not use Phosphorus or Potassium unless soil test indicates it is needed. Cool season grasses should be fertilized in fall, late spring and little in the summer. Warm season grasses should be fertilized late May, June, avoid fertilizing in late summer and fall.