Friday, September 26, 2025

“Leave the Leaves” vs. Fall Cleanup

Leave the Leaves vs. Fall Cleanup - Is It Contradictory?
Each fall, gardeners in Southwest Idaho face the same choice: clear out leaves, stalks, and seed heads—or leave them in place for wildlife. At first glance, the advice seems to conflict. In practice, both approaches are grounded in science. The key is knowing what to remove and what to keep.

Why Cleanup Still Matters

Some plant debris harbors pests and pathogens that overwinter in our climate. Powdery mildew can persist on cucurbits and peonies; tomato blight can linger in stems and fallen fruit; rust fungi hang on in hollyhock stalks. Insects like squash bugs and grasshoppers survive in crop debris or soil. If this material remains, it becomes a ready source of infection or infestation in spring. Removing diseased or infested debris in fall reduces inoculum and pest pressure for the following season.


What about composting? 

Most plant pathogens are inactivated at sustained hot-compost temperatures around 131–140°F for several days. However, many weed seeds and tougher pathogens need higher and longer exposure—often 150–160°F with thorough turning so all materials pass through the hot core. If your backyard pile doesn’t reliably reach and hold those temps, it’s safest to bag diseased plants and noxious weeds rather than compost them.

Why We Also “Leave the Leaves”

At the same time, many beneficial insects and birds depend on fall’s “messiness.” Research and field observations show that native bees and other insects overwinter in hollow or pithy stems and within leaf litter. Seed heads from plants like coneflower, rudbeckia, and native grasses feed birds through winter. Decomposing leaves improve soil structure and organic matter—especially helpful in our typically lean, alkaline Intermountain soils.

Finding the Balance

Think “tidy where you must, messy where you can.”

    Remove: Blight-infected tomato vines, mildew-covered cucurbits, rusted stalks, and obviously infested material. Dispose rather than compost unless your pile truly runs hot and is turned.

    Leave: Healthy seed heads and stems for winter structure, food, and habitat. A thin layer of leaves beneath shrubs, trees, and perennials helps insulate soil and shelter beneficials.

    Modify: Clear leaves from lawns and hardscapes to prevent turf smothering and slick surfaces, but keep some in beds and wild corners.

    Local Timing Tips

    Wait for dormancy before major cutback—typically late October into November. Leaves retained under woody plants conserve soil moisture through our dry winters. In early spring, cut back the stems you left standing before new growth begins; by then, most overwintering insects have emerged.

    Takeaway

    “Leave the Leaves” and fall cleanup aren’t opposites—they’re complementary. Remove the problem material; keep the habitat. That balance supports pollinators, birds, soil life, and a healthier garden next season.

    Resources:


    https://blog.nwf.org/2024/09/how-fallen-leaves-support-moths-and-butterflies


    https://www.usda.gov/about-usda/news/blog/fall-leave-leaves


    https://www.nwf.org/Home/Latest-News/Press-Releases/2025/9-16-2025-Leave-the-Leaves-Survey

    Monday, September 22, 2025

    Bringing the Fall Garden Into Your Home

    Fall is a season when the garden gives us more than food — it also offers color, texture, and beauty to enjoy indoors. Pumpkins, gourds, leaves, seed pods, and even dried flowers can all be used in creative ways that celebrate the harvest while making good use of what we grow.

    Pumpkins and Gourds Beyond the Jack-o-Lantern

    Pumpkins are the stars of the season, but they’re not just for carving.

    • Table displays: Mini pumpkins and colorful gourds add natural charm to a centerpiece.

    • Serving dishes: Hollowed-out sugar pumpkins can hold soups, dips, or baked custards.

    • Long-lasting decoration: Wipe gourds and pumpkins with a mild bleach solution (1 part bleach to 10 parts water) to slow decay and extend their indoor life.

    Many hard-shelled gourds can be dried and later crafted into birdhouses, bowls, or ornaments. This was once a traditional farm practice — practical and decorative.

    Leaves and Seed Heads for Autumn Beauty

    Raking piles of leaves is inevitable, but setting aside a few of the most colorful can bring the season indoors.

    • Pressed leaves: Layer between wax paper or in heavy books to create natural bookmarks or frameable art.

    • Wreaths and garlands: Combine bright leaves with acorns, pinecones, or crabapple branches.

    • Table scatter: Dried leaves, paired with seed heads from sunflowers or rudbeckia, make an easy seasonal accent.

    Seed pods — like milkweed, poppy, or love-in-a-mist — can be dried and added to bouquets. Sunflower heads can be hung as bird feeders, doubling beauty with function.

    Garden Herbs and Flowers in the Home

    Fall is also a perfect time to bring herbs and late-blooming flowers indoors.

    • Dried herbs: Bundles of thyme, sage, or oregano not only flavor autumn cooking but also scent the kitchen.

    • Everlastings: Flowers like strawflower, statice, and globe amaranth hold their color when dried, brightening indoor arrangements.

    • Aromatic décor: Lavender stems, mint sprigs, or even fennel seed heads can be tied into small sachets or seasonal potpourri.

    Fun for Families

    Involving children or grandchildren adds joy to the season. Let kids paint pumpkins instead of carving for longer-lasting decorations. Press leaves into shapes for greeting cards. Fill clear jars with acorns, gourds, and berries for a simple, kid-friendly display. These projects connect younger gardeners to the rhythms of the season and show them that the garden’s value goes beyond the harvest basket.

    Closing Thought 

    Your fall garden is more than a place of work — it’s a source of beauty and creativity. Pumpkins, gourds, leaves, herbs, and seed heads can all be transformed into seasonal decorations that bring warmth into the home. With a little imagination, the bounty of the season will carry you indoors and brighten the darker months ahead.

    Looking for Inspiration?


    Friday, September 12, 2025

    Roasted Tomato Sauce Preservation the EASY Way!

     It’s that wonderful time of year, when we are beyond the  scorching hot days of our summer and we’ve settled into the 90s. This is also the time when tomatoes come on with a fury! If you’ve planted many varieties, as so many of us do, then it’s almost a sprint to keep up with the daily harvest. As an advanced Master Gardener and advanced Master Food Safety Advisor with the University of Idaho Extension program, I’m always looking for the quick and easy way to use what comes from my garden.

    I’ve grown it. Now…what? Many years ago, I made and water bath canned my own tomato sauce. It was a lot of work. Since then, I’ve procured the mother of all freezers and now, what I would have canned years ago, I freeze. This way, I have the fresh taste of my garden, all year round. And, the bonus is, I know exactly what goes into what I freeze.

    Making and freezing the sauce begins as soon as I have enough tomatoes for a batch. You can use any variety and any size of tomato. I’ll wash, core and quarter the big ones. The Sun Sugar cherry tomatoes, (that I’m so fond of) go into this procedure, whole.

    I have peeled garlic, olive oil, salt and pepper at hand. Often, I’ll tuck basil leaves under the tomatoes, if my plan is to make the base for a drop-dead-delicious marinara sauce.

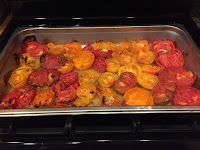
    red/yellow tomatoes in roasting panI’ll use a small pan, if I have a smaller batch. I’ll save energy and roast the tomatoes in my toaster oven. Conversely, I’ll use a large restaurant size pan when roasting in my larger, convection oven.
    Once I’ve filled the pan with tomatoes, garlic and (sometimes) basil, I drizzle a very conservative amount of olive oil on top. This year, I’ll use a pump atomizer to coat the ingredients with oil, I think it will be more effective and cut down on the amount of oil used. If you use fresh basil, tuck it under the tomatoes, as it can tend to burn during the roasting process.

    I pop the entire pan into a preheated, 400° oven and set a timer for 20-minutes. I use this time to revel in the glory of the smells that come from the oven…even opening a window to entice neighbors. I will also tidy my work space during the roasting time. After 20 minutes, I check for signs of roasting. Look for small char marks on the tomatoes and garlic. Check for tenderness in the tomatoes.

    mesh sieve with red tomato pureeNow, I’m in the home stretch! After removing the pan from the oven and letting it cool to touch, I’ll put the contents of it in my blender. I whiz it until it’s pureed.
    The next step is not entirely necessary. But, I do it to achieve a velvety smooth consistency. I pour the mixture through a wider gauge strainer to catch any seed or skins that didn’t get blended. This step really does kick it up a notch in terms of quality. Because the skin stayed on the tomatoes during the entire process, there are still plenty of vitamins in the sauce.
    I put my sauce in freezer-safe containers with ½ inch head space (for possible freezing expansion), and I label EXACTLY what I added to the mix. This way, I know if I’ll use the sauce for stews, chili, Italian or Mexican recipes. Plus, nothing goes in my freezer without a date. Try to use the sauce within a year’s time.  
    The quality of the sauce really holds up with this procedure. The other night, I made homemade pizza. The container I thawed (from my 2016 harvest) was a bit thin for pizza sauce. I simply put the contents in a saucepan and added a small amount of cornstarch. In minutes, I had thick, delicious homemade pizza sauce. The results were delectable!

    Friday, September 5, 2025

    Gardener Guide to Saving Seeds

    Saving seeds is sustainable and saves money. It also helps strengthen plants as they adapt to local conditions and it preserves your favorite heirloom varieties. Many gardeners love to share or swap their seeds with other gardeners. In this light, we can learn a lot about seed saving from Small-Scale Market Gardening (SMG), which is all about keeping things sustainable, encouraging variety, space-saving, and sharing among gardeners. This process helps plants become stronger and better suited to their local environment.

    How to Save Seeds 
    Start by selecting healthy, non-hybrid plants. Allow fruits and vegetables to mature fully on the plant before harvesting. Wet seeds, like tomatoes, should be separated from the fruit, rinsed, fermented, and then dried. Fermenting helps remove the gelatinous coating that sometimes inhibits germination. Simply put seeds in water for a few days until a layer of mold forms, which helps break down the coating. After fermentation, rinse the seeds well and dry them. Dry seeds, like beans and lettuce, need to be removed from pods, separated from chaff, and dried. Store dried seeds in labeled envelopes or airtight containers in a cool, dry place to maintain their viability. If you want to be especially crafty, you can use pre-made templates to make your own seed packets!

    Concerns About GMO Seeds
    Home gardeners sometimes worry about exchanging seed with other gardeners because they don't want GMO contamination. GMOs are not likely to be found in your home garden because no retailer sells genetically engineered seeds to home gardeners. GMO crops are expensive and commercial farmers are required to sign a contract that protects the patented technology. These companies do not sell GM-crops to the home garden market or to garden centers.

    The Best Plants for Beginners
    • Tomatoes & Peppers are self-pollinating and easy to dry.
    • Beans & Peas should be allowed to dry in their pods before you harvest them.
    • Lettuce produces abundant seeds and is easy to grow.

    Other Things to Consider
    Be sure to prevent cross-pollination
     by isolating certain plants like squash, pumpkins, cucumbers, melons, and corn to maintain pure seed varieties. 

    Test germination by sprouting a few seeds before planting. This can be done indoors before the season starts. It is also a good idea to write the date on your seed envelopes and use the freshest seeds first.

    By practicing these techniques, you’ll cultivate stronger plants and preserve valuable varieties for the future. Happy seed saving!