Friday, December 29, 2023

Fungus Gnats in Your Indoor Houseplants

Fungus Gnats can become a problem on potted house plants, especially during the holiday season because we are bringing in flowering plants from nurseries, and big box stores, as well as receiving them as gifts. They are difficult to control because of their tiny size and life cycle.

Here are some effective ways to treat them:

Proper Watering
Let the potting soil dry out between watering. The dry surface is less attractive to females depositing eggs, and if eggs are deposited, they fail to hatch because of lack of moisture. This cultural approach can be very effective.

Fly Tape or Sticky Traps 
The gnats are drawn to the yellow color. No need to fall for the trap of buying anything with pheromones either. Simply a yellow sticky trap.

Biological Control
Bt is available (Sold under the names Gnatrol, Mosquito Bits) is very effective in controlling the larvae, is not harmful to beneficial insects, and is approved for organic growers. Plus, it is so easy to use! Just sprinkle it on the soil in the pot!  Nematodes are also a natural option.

In severe infestations, you may consider washing the roots and re-potting your plant in fresh soil, or simply spraying a light application of indoor houseplant insecticide. When you use any insecticide, be sure to read and follow all label instructions! Finish by creating a tent over your plant and secure the bottom with a rubber band. Watch for a couple of weeks to see if there is still activity.  Don't worry about watering because you have created a little greenhouse but keep the plastic from touching the leaves. 

Contact your local University of Idaho Extension office
 for more information on controlling fungus gnats in your home.

Friday, December 8, 2023

Fun Indoor Plants for the Holidays and Beyond

Cooler temperatures mark the end of the gardening season for many, but for people who love plants, winter is just an excuse to move our favorite hobby indoors. Your home can become a showcase of what can be grown indoors, and holiday seasonal plants can be a fun place to start. Let’s talk about some of the best holiday plants that can be enjoyed year-round if cared for properly.

One of my favorite indoor plants is the Norfolk Island pine, sometimes called the Star Pine. Araucaria heterophylla. This beautiful, coniferous tree grows slowly indoors and needs plenty of light. It may start as a tabletop Christmas Tree but, if correctly cared for over the years, this plant will grow into a small tree. It does best in a bright window and thrives with average water and humidity.

The most common winter Holiday plant, the Euphorbia pulcherrima, or Poinsettia, is a classic and is sold in various sizes in December. Care for your plant and it will reward you year after year. The bracts are what change color to form the traditional Christmas plant. Colors range from burgundy, purple, white, red, and pink with variations of solids, mottling, and variegation. 

This Poinsettia is native to Mexico and the legend of the plant goes something like this:
There was once a poor Mexican girl called Pepita who had no present to give the baby Jesus at the Christmas Eve Services. As Pepita walked sadly to the chapel her cousin Pedro tried to cheer her up. 'Pepita', he said, "I'm sure that even the smallest gift, given by someone who loves him, will make Jesus happy." Pepita didn't know what she could give, so she picked a small handful of weeds from the roadside and made them into a small bouquet. She felt embarrassed because she could only give this small present to Jesus. As she walked through the chapel to the altar, she remembered what Pedro had said. She began to feel better, knelt, and put the bouquet at the bottom of the nativity scene. Suddenly, the bouquet of weeds burst into bright red flowers, and everyone who saw them was sure they had seen a miracle. From that day on, the bright red flowers were known as the 'Flores de Noche Buena', or 'Flowers of the Holy Night'. The shape of the poinsettia flower and leaves are sometimes thought of as a symbol of the Star of Bethlehem which led the Wise Men to Jesus. The red-colored leaves symbolize the blood of Christ. The white leaves represent his purity.

Rosmarinus officinalis, commonly referred to as Rosemary, grows well as a Christmas-tree-shaped house plant and makes a nice tabletop or kitchen plant. Some people love the smell of Rosemary and having a fresh sprig to use for your holiday recipes is a bonus. Although not as vigorous as a Norfolk Island pine, it can be planted outside in the spring. This plant just needs a little water, and a happy window to look out if grown indoors.

A more traditional plant to grow indoors is the Schlumbergera spp, or Christmas cactus. With flowers that range from orange to pink to red and even purple, these plants do not require a lot of water, and are a good choice for plant owners who travel a lot. Here are some tips that will help initiate flowers in Christmas cactus.

Narcissus papyraceus or Paperwhites are closely related to Daffodils and are grown indoors. They are fragrant and easy to grow. Just pot them and place them in a window away from drafts and enjoy! A fun craft idea for kids is to buy a simple pot from any craft store and have them decorate and plant it for the holidays.

Another one of my favorites, which happens to be a bulb, is the Amaryllis. From the genus Hippeastrum, these bulbs are also native to South America. What I love about these bulbs is that they are so ridiculously easy to grow. Grab a shallow glass vase or pot, fill it with gravel, stick the bulb on top, give it some water, and watch it start growing. It takes about 6 weeks for it to bloom once it is planted. The colors are deep red to white with all types of variations in between. Because they can tolerate a lot of abuse, Amaryllis are a great indoor plant for college kids and people who have pets.

A relatively new one to the scene is Cupressus macrocarpa, or Lemon Cypress. This dwarf shrub, with chartreuse green foliage, can be grown in a pot and is a wonderful bright addition to your home. Potted cypresses need sunlight and are used to bright, sunny locations outdoors. Their soil should be kept moist but not wet and should not be allowed to dry out. A good test is to insert your finger into the pot down to the first knuckle and then remove it. If soil particles adhere to your fingertip, the plant does not need water at that time. Lemon Cypress can go outdoors and live as a containerized plant or be planted in the ground in USDA zones 7 to 10. 

So, while gardening outdoors may have been placed on pause for the winter, above are several plants that I hope will inspire you to keep growing through the Holiday Season and long afterward.

Friday, December 1, 2023

Yes! Pine Trees Dropping Needles in Autumn is Normal.

We've had several questions about evergreens. Homeowners will often see their needles on evergreen trees turning brown and falling off in the late summer or fall and become alarmed. Needle drop on pine trees is a naturally occurring phenomena. If pine needles turn brown from the interior of the tree, and the outer needless stay green, there is no cause for alarm.
Most people know that deciduous trees such as cottonwoods, oaks, or maples lose their leaves in the fall, but fewer people understand that evergreen trees also lose their old needles in the late summer or fall. Needle age at which drop occurs varies among evergreens and within species. Eastern white pine loses 2-year old needles. On the other extreme, bristle-cone pine sheds needles that are 14-17 years old.  If there is die-back or yellowing on the tips of branches or needles, there may be a problem. Consider drought, salts, root damage, herbicide damage, soil compaction, insects, or other factors. 

Occasionally, 'deciduous conifers' such as the bald cypress, larch, and dawn redwood are found in Idaho landscapes. These conifers all lose their needles every autumn, to be replaced the following spring. Don't lose hope - it's normal!!! 

Contact your local University of Idaho Extension Office - our Tree/Turf Team will get back to you about your concern.   Follow us on Facebook where we discuss all about gardening, trees, landscaping and more!  

Friday, November 24, 2023

Growing herbs for holidays meals...and as gifts!

Do you love using fresh herbs in your culinary creations? Consider growing your herbs indoors where you can snip a fresh branch as you're cooking your meals! PSST- they're wonderful gifts for that hard-to-shop-for person!

For an indoor culinary garden consider growing garlic, chives, basil, oregano, parsley, sage, rosemary or thyme. If you want to grow a tea garden you may want to plant spearmint, peppermint, lemon balm, lemon verbena, chamomile or catnip. It's not too late to start from seeds. 

Be sure to choose a container that provides good drainage, and fill with one or more of your favorite herbs. Light is very important so place your herb garden in a sunny location that receives at least half a day of sun. New information about indoor lighting has made it easier for the home gardeners. For grow lights, those labeled "cool white" work well. "Warm white" and "Daylight" may also work. Lamps tailored to a plant's needs are also available. Be to water regularly. After the threat of frost passes, you can place your garden outdoors and enjoy fresh herbs all year round.

With Christmas just around the corner, herb starts in pots are a welcome gift, both for hosts and under the tree. It also encourages growing fresh food in our homes.


For more information on herb gardening in Idaho, the University of Idaho Extension provides this excellent resource: Idaho Green Thumb How-To's.

Choosing Deicers That Are Friendly to Plants, Animals, and the Earth

While applying products to keep our walkways clear of snow and ice, it’s important to remember the nearby plant life. Deicing products, primarily composed of salt, can injure plant material, but is there a safer product to use around desirable vegetation? What about around pets? What about the run-off in our rivers and watershed?

  • Salts can cause injury to trees, lawns, and shrubs
  • Salt run-off can harm our groundwater
  • Salts can corrode concrete
  • Salts can do bodily harm to humans if handled improperly
  • Salts are hard on the little paws of your four-legged friends

So you may be thinking salt is salt, right? No, not all salt is not the same. Think table salts (Sodium chloride) and Epsom Salt (magnesium sulfate). If you remember your days in chemistry, salts are combinations of negatively charged anions and positively charged cations. Examples are sodium chloride (table salt), potassium chloride (used as a fertilizer), and magnesium chloride (the one you see trucks spraying on our roads). The most problematic element in these salts is chloride, a corrosive ion that damages metal and concrete. Chloride is also toxic to plants.

Salt damages plants by dehydrating plant tissues, causing burns, or being toxic at high levels. While most plants have some tolerance to salt injury, repeated applications of deicing products during the winter can result in dieback or even death the following spring. Misapplications of deicers (i.e. dumping piles or using too much) can leach through the ground and into the water table or wash into the storm sewers, causing pollution. Before buying or using any product, read the label carefully and use only as directed.

Here are a few of the salt products you might run into while shopping:

Calcium magnesium acetate (CMA)
It has low corrosion potential, so it’s less damaging to cars, metals, sidewalks, and plants. Notice it’s not a chloride product, the “salt” comes from the calcium-magnesium mix and the acetate replaces the chloride. Plus, it’s biodegradable! Its ice-melting properties are equivalent to traditional deicers, but the cost may be 20-30 times as expensive as sodium chloride products. These are often touted as “pet friendly”. 

Magnesium chloride
Commonly referred to as “mag chloride”. Applied as a brine, it’s the most common product used on our roadways before storms because it lowers the freezing point of soon-to-arrive precipitation. It can melt ice down to -15° F, which is a nice benefit. If applied in moderate amounts, it’s relatively safe for plants and pets. Its corrosion potential is low, as is its pollutant possibilities.

Potassium chloride
It’s expensive and not as widely used as a deicer because of the rising costs of fertilizer. This works best when temperatures are above 15° F. Because it’s most commonly used as a fertilizer, it’s relatively safe to apply near plants.

Sodium chloride
It’s the most widely available and the cheapest. It doesn’t cause corrosion to concrete and melts ice best when temperatures are in the 20s. It is the most damaging to plant material. If you use this product, use it sparingly and in small amounts!

Before using any de-icing product, clear away as much snow and ice with a shovel as possible. If heavy snow is predicted, then try to shovel more frequently. Remember, deicing products are not meant to melt all snow and ice, but rather aid you in your removal efforts. If you want to avoid adding chemicals to your landscape, then consider using sand or kitty litter. While they don’t melt snow, they can provide traction in slippery spots. Sand and kitty litter are also safe for pets and plants and can be swept up when the snow melts.

If you use deicing products near vegetative areas, then use caution with potential salt build-up and consider a soil test in the spring.  If it’s an especially snowy year, you may consider rinsing the areas next spring with clean water. Try not to scoop snow laced with deicing products directly on top of plants, especially if they are sensitive. If you have the opportunity, consider planting more salt-tolerant plants near walkways and driveways. Here's a great publication on plant tolerance to salts.

For more information about sustainable gardening, contact your local University of Idaho Extension Office. 

Saturday, November 4, 2023

Know How to Grow - Become a Master Gardener!

Have you ever been elbow deep in dirt and wondered 
why or what is happening to your plant? Do you wish you knew more about your soil and how to make your plants happier? Are you looking for research-based information that will allow you to reduce pesticide use and help work together with beneficial bugs? If you said yes to any of the above, YOU ARE NOT ALONE! 

Become an Idaho Master Gardener in Canyon County - learn the art and science of horticulture. Our series of classes provides you with a variety of ways to improve your gardening skills...and share your passion and knowledge with others. Do you want to connect with other gardeners in your community? Then you will not want to miss this opportunity! 

Classroom learning

The Idaho Master Gardener program consists of TWO phases:  

Phase One: This 48 hours of classroom training provides a stress-free, engaging learning environment. Fresh coffee and tea at each session is also a great perk! Maybe even food...

Phase Two: After the classroom training, you will complete 40 hours of practicum via volunteer educational service. 

Hands-on field trip
You will have the opportunity to choose from areas in which you would like to complete your hands-on experiences with various teams: Tree & Turf, Integrated Pest Management, Junior Master Gardener, Outreach, Plant Sale, and Social Media. Teams build comradery and skills. FUN, too!

Start Date: University of Idaho Extension, Canyon County (Caldwell, ID) Idaho Master Gardener classes start January 10 and run through May 8, 2024.  Classes are held on Wednesday mornings from 9am-12pm at the Canyon County Extension Office, 501 Main Street, Caldwell, Idaho.  

Cost: The cost for the 2024 Canyon County Master Gardener program is $175 (scholarships and payment plans are available).  This cost includes a handbook (electronic or hard copy), a soil test, several hands-on labs, at least two field trips, a background check, a Master Gardener t-shirt and a name badge at the end of the course.

Application Deadline: The deadline to apply for the Canyon County Idaho Master Gardener program is December 22, 2023. Get your spot early as space is limited in class.  We at U of I want everyone to be comfortable and safe learning about horticulture. We offer in-person classes (while spots are available). If you need another way to attend, please contact us with any questions. Complete your application today!

IPM Scouting Walk
The Idaho Master Gardener program is NOT ONLY a gardening class.  It is VOLUNTEER TRAINING.  The University of Idaho Master Gardener Volunteer Program serves as an educational and volunteer organization. All course participants must be willing and able to contribute 40 hours of practicum volunteer service prior to September 30, 2024, to complete certification. There will be plenty of time and lots of opportunities to complete your hours. We look forward to having you join our team.
Helping people grow is what we do. 

Apply here 👉 https://bit.ly/2024_ApplicationPacket

Call us today 👉  (208) 459-6003 

Follow us here 👉

Facebook @2CMasterGardeners   

 Instagram @2cMasterGardeners 


Twitter  [now
@2cUIHort

Friday, November 3, 2023

Mulching leaves is a better solution than disposal...Here's Why!

Credit: Pexels

 by Virginia Tech  Turf experts explain why mulching leaves is a better solution than disposal 

October is peak season for admiring fall foliage and soon those leaves will begin to fall, if they haven't already done so. Before you start to clean them up, Virginia Tech turf experts suggest that you try a different approach instead of bagging and tossing.

"If you collect leaves, it's ideal to compost them rather than disposing of them in the landfills," says Virginia Tech turf grass expert Mike Goatley. "The biggest concern with landfills is that the leaves occupy space that would be much better served for typical landfill debris, instead of organic waste that can be used in a proactive way for the lawn, landscape, garden, and/or flower beds."

"Research has shown that plastic bags filled with leaves can last for years in the landfill." Goatley says it's important to note that most municipalities will not accept leaves collected in non-biodegradable bags (i.e., plastic bags) in their community leaf-collection programs.

Mulching leaves in yards, instead of removing them, actually benefits lawns and gardens, according to experts.

"Using a mulching mower to not only mow but to mulch leaves will help keep your lawn properly trimmed, but also accelerate the rate of leaf decomposition into beneficial soil organic matter," says Dan Sandor, who is also an expert in turf grass science at Virginia Tech. "While the tree leaves do not have a lot of nutritional value, chopping them up and returning them to the soil is a great way to increase soil organic matter levels." Some research has even shown that leaves from specific tree species may provide some control of broadleaf-weeds and/or may provide nitrogen-fertilizer benefits.

According to Sandor, the best time to mulch leaves is when they are slightly moist because they are easier to shred. "It's important to wear eye protection during this process and make sure you have removed all other debris that might be a hazard. Remember, you are using a mower to mulch leaves, not grind stumps."

You also want to be sure not to let your yard get too many leaves on it. "A heavy leaf cover can significantly reduce the photosynthetic activity of the turf grasses in your lawn, restricting them from the beneficial sunlight that are required for optimal growth and development," explains Goatley. "If this is the case, you'll need to rake some of them and consider adding those to your compost pile, otherwise you will need to run the mulching mower over the leaves several times so they can be more-readily broken down into soil organic matter."

Provided by Virginia Tech 

Friday, October 27, 2023

Soil health? Now is the time to prepare!

The season is winding down. The weather is getting colder and it's about time to start putting away your yard and garden tools. But hold your horses! Now is an excellent time to prepare your soil for next year! 
I recommend 2 articles written by Ron Patterson - from the University of Idaho Extension office. The first article talks about the importance of soil health (found here), and the second article talks about the good and bad (mostly good!) of planting cover crops (found here).
Having healthy soil is worth every effort.  From better tasting vegetables to fewer weeds, it is absolutely worth it! 

Monday, October 23, 2023

Extending Your Tomato Harvest - the Great Tomato Ripening Experiment!

Results from the Great Tomato Ripening Experiment! It’s almost mid-January and I’m still enjoying tomatoes from the plants I grew this past summer. I just gathered a handful and made some tasty, fresh salsa to complement the vegan tacos I made for our dinner. So how is it that I’m still reaping the benefits of my garden? In late October/early November, I embarked on Grety’s Great Tomato Ripening Experiment. 
 
I asked all my friends on social media, “How do you extend the life of your (green) tomatoes?” For as many pounds as I still had on the vine, I got responses. The techniques were varied and came with a lot of guarantees. So, I put each method to the test. Most of the ideas required me using high-dollar real estate in the garage. I managed to claim a few square feet for the experiment.

The majority of green tomatoes came from my prolific, San Marzano plant but any tomato will work. I placed some in a plain, brown paper bag. Several friends swore by this method.

 Other friends told me, I should add a piece of fruit like a banana or an apple, into the bag. The theory is that the fruit releases ethylene, a chemical that will help green tomatoes ripen. So, I did one of each. I placed tomatoes in a single layer on paper.

I stacked them in several layers with heavy paper separating the produce. 

 I placed them along my windowsill near the kitchen.

 Lastly, I even took whole vines and hung them upside down from bicycles in the garage. 
 
By this time, my husband thought I’d lost it.

 With each method, I tried to leave on some of the stem of the tomato and I situated the San Manzanos so they didn’t touch one another. In an effort to not attract fruit flies, I washed each tomato before I placed them on the windowsill. I didn’t have any fruit fly problems.

In the end, the very best method was actually a combination of a few. The windowsill tomatoes ripened quickly. They still tasted garden-fresh and we used them in salads and such.

 The next two methods that have worked for me are the single layer and the stacking of single layers. It takes up more space than I would like, but my family has feasted on tomatoes, non-stop.

None of the bag methods really worked for me—nor did hanging the vines from the bikes. Those tomatoes dried up before they were finally ripened. I should add, that the tomatoes I’m using in January aren’t as flavorful as the ones that ripened in November. But, I’ll guarantee you they are better than the plum or Roma tomatoes available at local markets. They are delicious in salsas or pan roasted for sauces and soups.

I’m sure tomato variety and garage temperature play a large role in success rates of ripening green tomatoes. But, I’ve concluded that I won’t let any more produce wither on the vine. From now on, every year when October rolls around, I’ll be clearing a spot in the garage to continue reaping the benefits of my summer’s labors.

Friday, October 13, 2023

Frost, Freeze, or Hard Frost? It's that time of year...!

 According to the National Weather Service, here are the definitions:

Frost:  Frost occurs when there is a solid deposition of water vapor from the air. Frost will form when solid surfaces are cooled below the dew point. An air temperature range of 33°- 36°, along with very light winds, is usually needed to initiate frost formation. At least minor damage is possible to plants. One must keep in mind that a frost is not guaranteed at these temperatures if moisture in the air is lacking and/or winds are strong.

Freeze:  Freeze occurs when the air temperature drops to 32°-or-lower. A freeze will result in significant damage to many unprotected plants, especially if the temperature remains at-or-below the freezing mark for several hours.

Hard Freeze:  Hard freeze occurs when the temperature reaches 28°-or-lower for at least a few hours. It usually means that many types of plants and most seasonal vegetation will be destroyed.

Mark Longstroth with Michigan State University Extension posted the following information explaining the differences more clearly than just a definition.

A frost is when we get a visible frost. A freeze is when the air temperature drops below freezing. Sometimes we get frost when the temperatures are above freezing and we often have a freeze without frost. It all has to do with the amount of water in the air.

At the dew point, water vapor in the air condenses on the ground and other surfaces as dew. If the dew point is below freezing, the water vapor condenses as ice, freezing as frost. So the air can be above freezing and the surface of your car (or the roof of your house) can be colder than the air and colder than freezing causing a frost even though the air temperature is above freezing. That is how we get a frost without a freeze. If the dew point is much below freezing then we can get freezing temperatures cold enough to freeze plants without any frost. This is also called a black frost, a freeze without a frost. When frozen plants thaw they have a water-soaked, black appearance as they die. Sometimes we get a freeze under windy conditions. This is caused by the movement of a cold air mass into the area with subfreezing temperatures. These freezes are called wind freezes.

Idaho Average First Frost Date Map will give you accurate information for your county.

Steps to take to help your plants survive as long as they can.
1.    Of course cover your plants with a frost fabric or sheets or plastic.
2.    Bring what plants you can indoors
3.    Water extra with warm water
4.    Keep water running at a trickle if possible for a few days.  Be careful not to over water.
5.    Wrap the trunks of young trees.
6.    Wrap pots that cannot be moved indoors.
Protect your plants!

Sunday, October 8, 2023

Potato harvest time! How do you like them?

One of my favorite vegetables is the humble and oh so delicious potato!  Watch this video for tips on when and how to harvest. You can harvest young potatoes when the vines are still green - or wait until the vines die for final harvest...or both!  

Here's an article about how to have a successful potato garden. Also there are many ways to store and then enjoy throughout the seasons.

My family enjoys it mashed, cubed, roasted, shredded...I don't think there is a potato preparation they would turn down. One of the simplest - and most delicious - is oven roasted potatoes. Easy to prepare and oh so delicious!

Roasted potatoes in a convection oven

3-4 large potatoes, cubed

1 tablespoon of olive oil

salt and pepper to taste

dried or fresh herbs (optional). We love Rosemary or Thyme

Directions: add your cubed potatoes to a large bowl.  Pour the olive oil over the potatoes and then toss them until they are evenly coated.  Evenly coat them with salt and pepper.  

Put them on a rack (we use a cooling rack that is oven safe) on a cookie sheet. Place in a convection oven at 400 degrees for 35-40 minutes or until the edges of the potatoes are crisp and brown.

Remove from oven, and enjoy!  Find more delicious potato recipes here!

Friday, September 29, 2023

Is this true...Chrysanthemums don't help Pollinators?

I read this on the internet and wondered "Is this True?"
I do love the Autumn Asters in my yard and the constant buzzing of pollinators around them - I, also, have several chrysanthemums planted that come back every year and when area nurseries bring out new colors, I'm so tempted. So let's talk...

Some main points:
  • Pollination is the process that takes place when pollen is moved between flowers for successful seed and food production and ensures that a plant or tree will produce mature fruit and a viable set of seeds that are capable of germination. What do birds and bees have to do with this? Birds, domestic honeybees, butterflies, and other insects and animals are responsible for the moving of the pollen among the flowers. Without the pollinators, there is no plant growth.
  • Pollinators prefer some flowers over others, a concept known as Pollinator Syndromes. For example, because a butterfly has a long, slender mouth part (proboscis), they prefer flowers that are long and tube-like, also think hummingbirds. Some flies, on the other hand, have short, round mouth parts much like a sponge. For these pollinators and most bees, a wide-open flower is preferred. Or, for other pollinators, like moths, a flower that is open at night is preferred because that is when moths are active.
  • My primary goal is to create a backyard ecology that promotes all pollinators - bees, birds, mammals, reptiles, insects - with plants that sustain them - whether native or non-native throughout the flowering seasons. 
One of my go-to resources is Nature's Best Hope: A New Approach to Conservation That Starts in Your Yard by Douglas W. Tallamy. He believes that "every homeowner can turn their yards into conservation corridors" that promote diversity with native plants as well as other cultivars that contribute to the food web. 

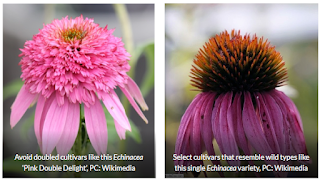
Echinacea choices - Tufts Pollinator Initiative
Some cultivars have been removed from evolutionary history with insects; humans have bred cultivars in labs and greenhouses to meet our aesthetic preferences. And sometimes, by selecting for traits that we deem impressive, like double or triple petals, we inadvertently produce plants that broadcast false advertising and eliminate access. Recent work has demonstrated how cultivars—even ones that look quite visually similar—can vary dramatically in the abundance and diversity of insects that they are able to support, so it’s important to choose carefully. References from Tufts Pollinator Initiative article are in the link below.
While cultivars are great for people, they are not always great for pollinators. According to Tufts Pollinator Initiative, native plants and their pollinators share a long evolutionary history, and many flowers have evolved particular traits that signal honest advertisements of a high quality food resources. For instance, the smell and color of wild geranium tell a bee that nectar and pollen awaits and the dark lines on the petals help them to quickly locate their meal. 
However, some pollinators are "generalists" that will feed on a variety of nectars and pollens. That explains why you'll see bees, butterflies and other insects flying around such non-natives as butterfly bush, catmint, lavender, sedum, salvia, Russian sage, mints, lantana, pentas, daisies, alyssum and zinnias. See Cornell Cooperative Extension list for moreAlthough pollinators prefer natives, says Tallamy, "If their mouthparts work, they don't care if it's native or non-native." 
My new favorite bush 
Caryopteris 'Blue Mist'
Potted greenhouse mums that we see everywhere this time of year are not bred for their pollen, nectar, or accessibility to pollinators. Most are bred to have multiple petals which reduce accessibility to pollinators. Some good features about these mums is that they are bushy and provide cover for a variety of  predators and parasites that naturally keep plant pests under control. 
Try an old fashioned Mum instead...or Autumn Asters...or Autumn Sedum!

Friday, September 22, 2023

Planting trees in the fall? Let's do this!

Fall is a great time to plant trees. What is the best way to plant them? Whether you plant them yourself, or you use a landscape contractor to plant your trees for you, there are recommended practices you should follow. Improper planting of trees, both in the nursery setting, and in the landscape setting, contribute to more tree deaths than all other factors combined!

Let’s review what are currently the best management practices and minimum standards which should be followed when planting a tree.

First, call 811 before you dig. Your spouse will be extremely unhappy with you if you should cut the internet cable, or worse, hit a gas line.

Next, look up. Make sure you have vertical clearance for your trees. Avoid planting them under the utility’s right of way.

Once you have done a site analysis to ensure you have selected the right tree for the right place and that you are not going to disrupt any utilities, head to the nursery to buy your plant material.

Here is where it becomes important to know what to look for when purchasing plant material. Look and shop around. Examine plant material carefully. You are making an investment that could add $20,000 or more to the value of your property, treat the experience as you would buying a new car! Check your tree for signs of girdling or circling roots. Make sure the tree is free from broken, rubbing, or damaged branches, and any place where the trunk has been injured. A tree should have good structure with a single trunk. Avoid co-dominant trunks.

The next step is to dig a proper hole. Standards state that the planting hole should be a minimum of 1.5 times the diameter of the root ball. Research from land-grant universities suggest a saucer shaped planting hole three times the diameter of the root ball. This allows the roots to establish quicker and avoid post planting stress. In our poor soils and arid climate, establishing the root system and minimizing stress factors is extremely important.

Be sure you are planting the tree at the proper depth. As mentioned above, planting trees too deep, either in the nursery setting, or in the landscape setting can lead to circling, and/or girdling roots and eventually, death. Check the depth of roots in the root ball by using a blunt probing instrument, such as a screwdriver. Do not assume it was planted correctly in the nursery! Two to three structural roots should be no deeper than one inch measured four inches out from the trunk of the tree. If roots are deeper than that, you will want to remove soil from the top of the root ball and adjust the depth of the planting hole. 

Handling the tree carefully by the root ball, place the tree in the planting hole with the root ball rising above the soil grade one to two inches on firm, undug soil. Once the tree is in place, remove the burlap and wire baskets from the top third of the root ball. Fabric, paper pulp pots, and containers should carefully be removed.  

Once the tree is properly in place, begin backfilling the planting hole. It is not recommended to add amendments to the planting hole as this creates a second container roots to have to grow through to establish. Planting holes should be amended with no more than 10% organic matter.  When backfilling, add the soil in small amounts and use water to settle it. Avoid compacting the soil around the roots.

Now you may add mulch. Just avoid mulch volcanoes
and don't allow mulch to touch the trunk of the tree. Mulch should be kept a minimum of four inches away from the tree's trunk. Not following this practice allows for disease and decay organisms to rot the trunk of the tree. Mulch should be applied at a depth of four inches. For young trees prone to winter damage, or in areas where animals can cause damage to the tree, consider protecting them. Tree staking is not recommended except in wind prone or high traffic areas. 

With this information, you are ready to go out and plant a new tree. Although these steps are an increase in labor, the return on the investment is a higher quality, longer lasting landscape.